Showing posts with label stash manicuring. Show all posts

Merry Pinwheels Baby Quilt

Sunday, March 3, 2024

 Hi there!  Today I want to share a baby quilt that I actually finished a couple of months ago.
The pattern is called Merry Pinwheels and this is the second Merry Pinwheels quilt I've made.  If you're curious, you can check out the original one HERE.


 I made this because I really wanted to see what this pattern looked like in non-Christmasy colors! 
Plus, I thought a pinwheel quilt would be so cute for a baby.


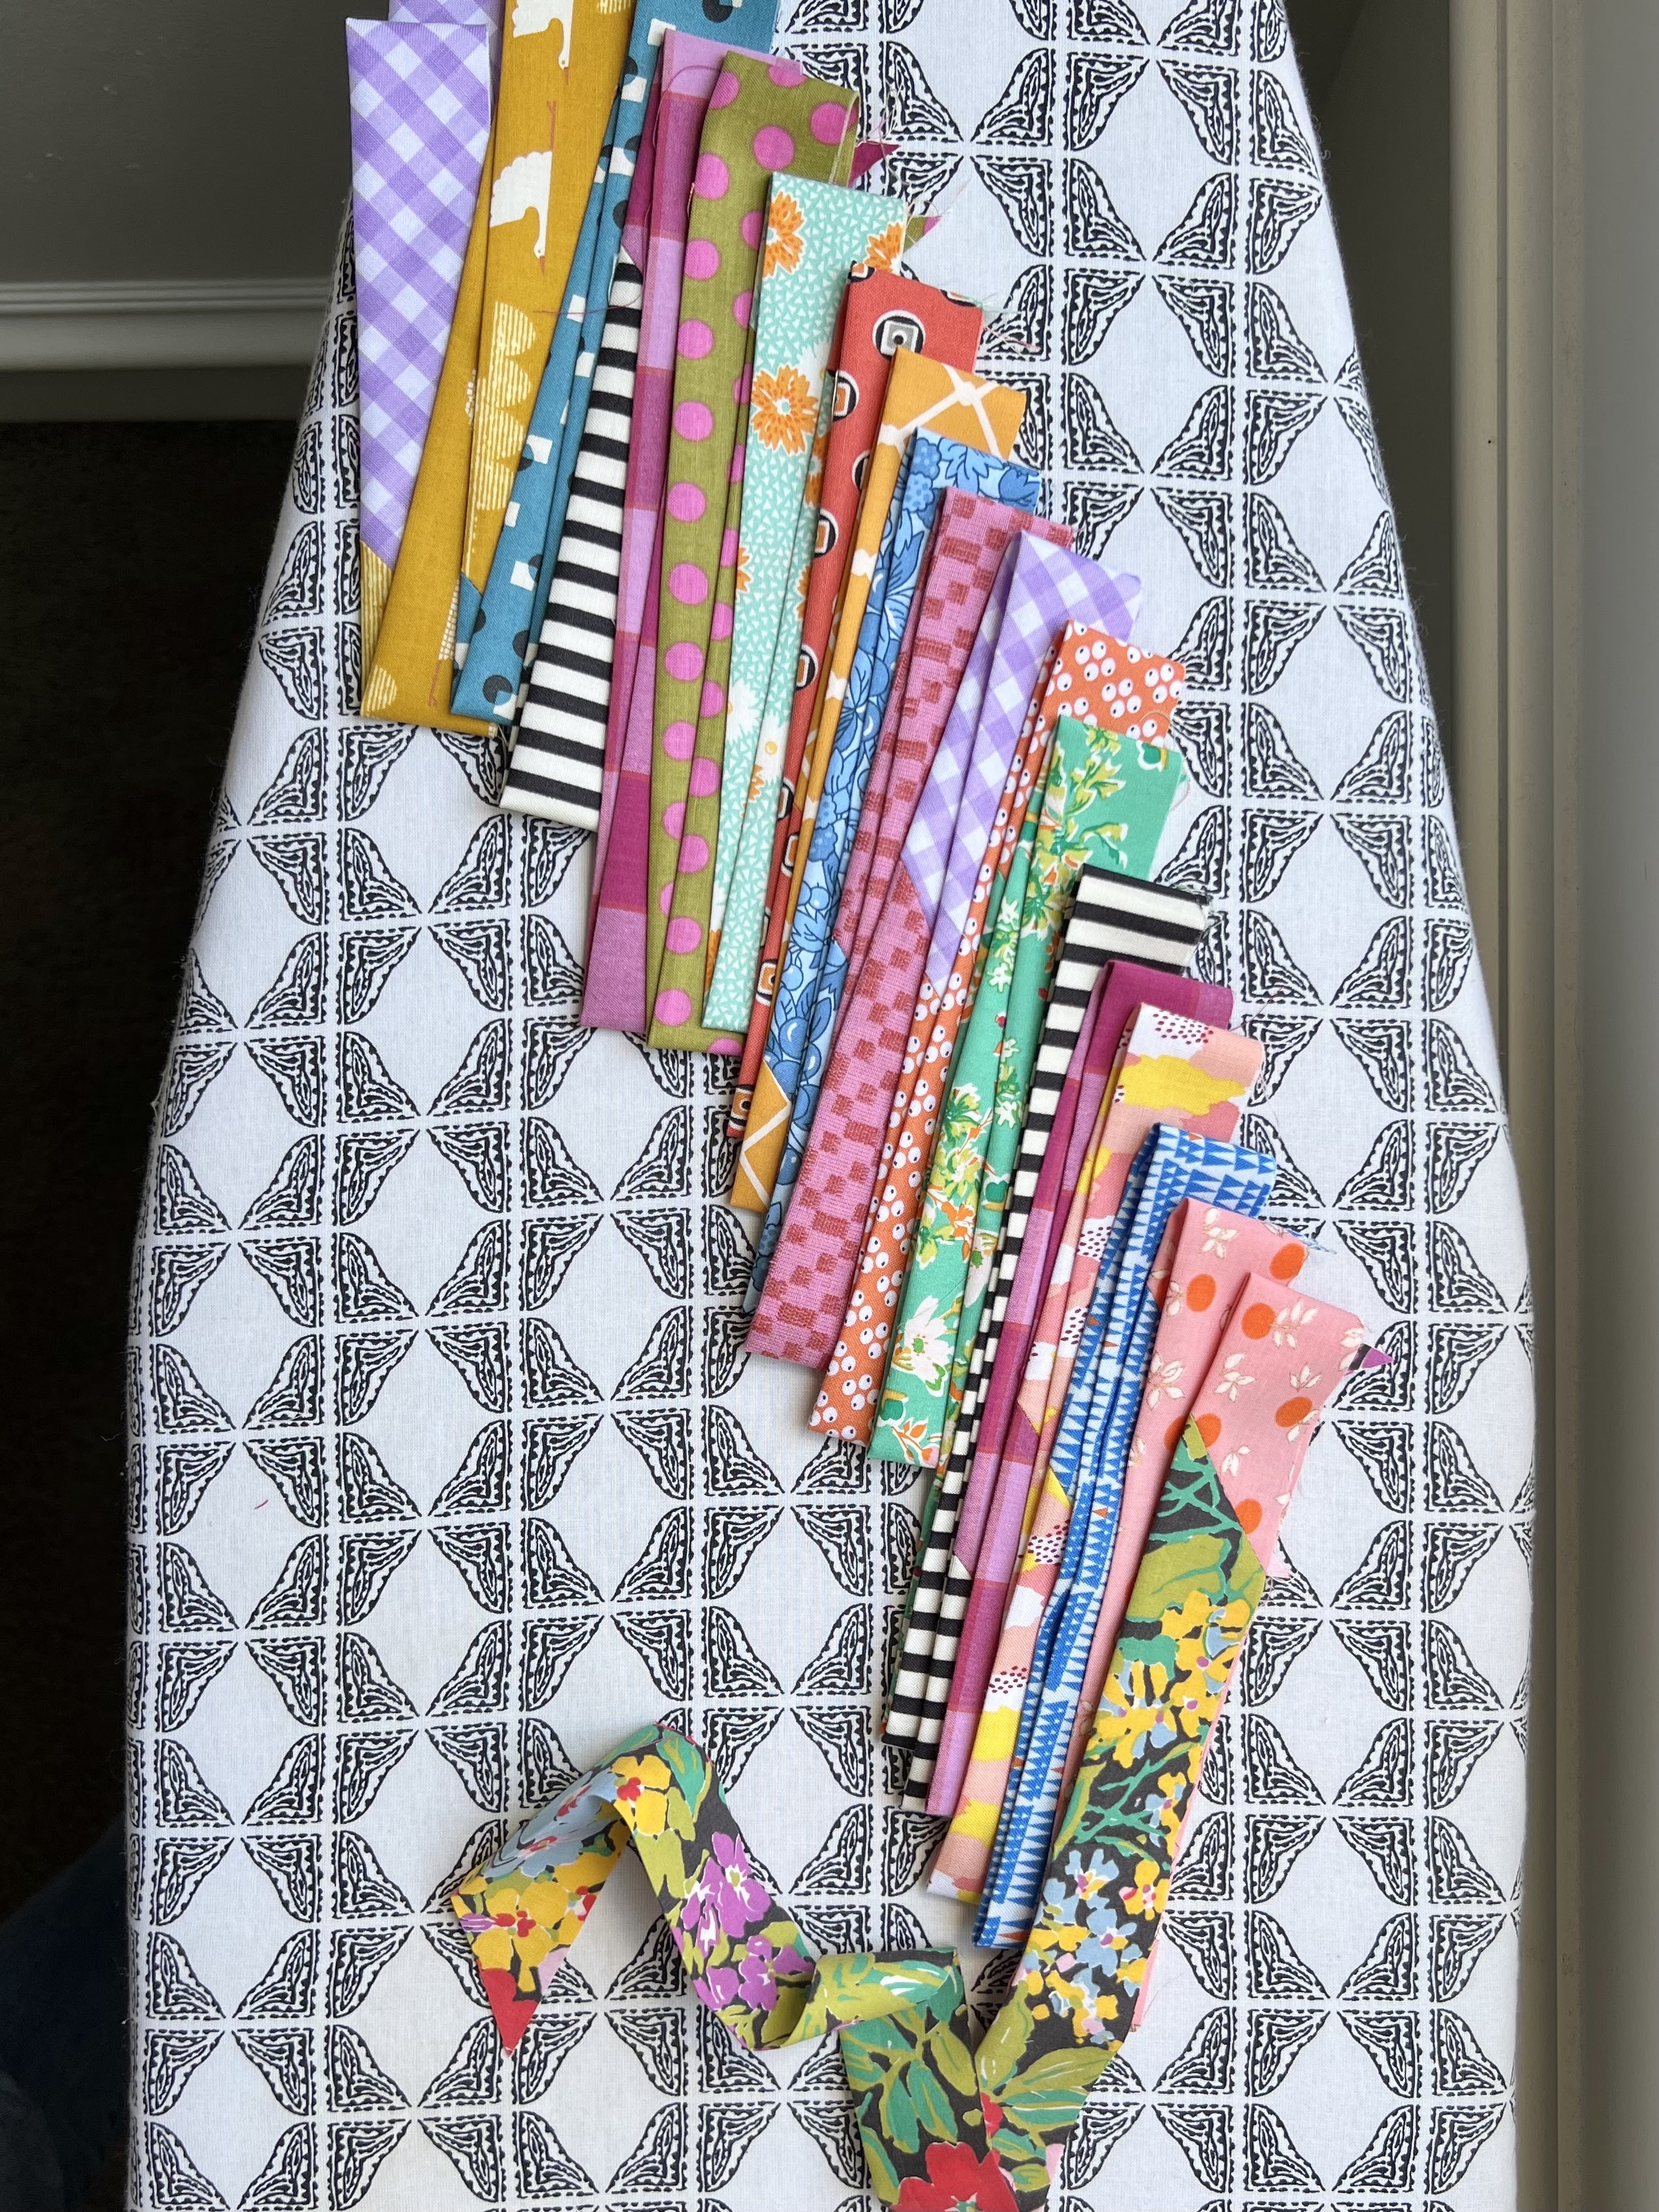
I based the color scheme on the sweet yellow, pink, and copper-brown ditzy floral print in the middle row above. I just love that print and thought it would make for a unique color palette for a baby girl quilt.


I tried to use a nice variety of prints including florals, plaids, checks, stripes, and geometrics.


I had everything in my stash for this quilt except the binding fabric. I love it when I get to make a quilt predominantly out of my stash.  Feels so good to use up what I have!

I inherited this pink stripe fabric from my grandmother after she passed away.
I love incorporating pieces of her fabrics into my quilts!


This copper-brown floral fabric is a favorite. And the yellow background fabric is 
from my first fabric collection, Treasured Threads.


The quilting was done by Jen Ostler in Highland, Utah.  She is awesome.
Jen used one of my favorite, go-to pantos called Interlocking Orange Peel by Karlee Porter Designs.


When I was making the quilt top, it was a little tricky to spread out similar colors and prints to achieve balance.  But I just kept moving the blocks around until I found a layout I was happy with.


I really enjoyed working with this color palette and all of the sweet prints.


Merry Pinwheels is perfect for confident beginners and comes with instructions for 5 different-size quilts. You can use your stash (like I did here) or 2-1/2" x 40" wide precut strips.  It's very versatile!
You can grab the Merry Pinwheels pdf pattern HERE or the paper pattern HERE.


I'd love to hear what you think about this baby quilt version of Merry Pinwheels!
Thanks for stopping by today and happy quilting!

Blossoms and Buds - Emily Belle Version

Sunday, March 5, 2023

 Good morning! 
I've been wanting to share this quilt with you
for a while now; I finished it back in 
September of 2022, I think.


I love this quilt because
A. It's a classic design
B. It's scrappy
C. It uses lots of my favorite fabrics from my stash
and
D. The Baptist Fan quilting gives it a very vintage vibe.

This is the original version:

It's the Blossoms and Buds 
pattern from my book,


It's amazing how different this
version looks compared to the orange version!


In the orange version
the background is scrappy and
in this version the background is all
one fabric.  They look so different!
Which one do you prefer
(and disregard the orange if that's not your thing)?


I've seen several different versions online
and they're all awesome.  There are
so many ways to make this pattern your own
depending on your colors and fabric placement.


The only fabric I bought specifically
for this project was the background fabric -
Emily Belle Liberty from Riley Blake
in the color, Magnolia (a soft, buttery yellow). 
Emily Belle comes in about 45
different colors so you could
pick the one that speaks to you!


And it's such a great stash buster!
Even the binding is scrappy!


Quilt the Rainbow gives instructions
on how to make a scrappy binding
or scrappy quilt back!
There are lots of useful nuggets of 
information in it, besides the 10
versatile quilt patterns.
You can grab the book HERE.


I had this wild backing fabric in my stash
just waiting for the perfect project!
It's called Cameo by Kaffe Fassett.
It incorporated so many of the colors I used
for the quilt front so I thought
it would give this simple quilt just
the "wow factor" it needed.


I like to label my quilts with labels from Everemblem.
I get the 2" cotton, fold-over, sew-in labels.
If you go to their site, you'll have to pick a cotton label 
and customize it from there.  They're so convenient.
Now I don't have an excuse to not label my quilts!


Jen Ostler of Dry Creek Quilting
in Highland, UT quilted it with this
classic Baptist Fan pattern.  There are many different
Baptist Fan pantographs out there but I love this particular
one because it's so traditional.  It's the
pantograph and I've used it many times!


Before I let you go, I just want to remind you
about the 2023 Quilt the Rainbow Challenge.
If you make any quilt (in any size and colorway)
from the Quilt the Rainbow book and 
post it on Instagram with the hashtag
#quilttherainbowchallenge
you could be entered to win some fabulous
prizes!  I'm giving away prizes quarterly
and you can enter as many times as you'd like!
All the details are in THIS blog post.


Well, I hope I answered any questions
you might have but if not, be sure to drop them in the
comment section below.  I love any interaction with you!
Thank you for stopping by today!

Seaside Quilt

Friday, December 23, 2022

 It's Friday, December 23rd, 2022.  
Two days until Christmas.  
This month I've hosted two family parties,
 bought, wrapped, and delivered all the neighbor/friend gifts,
purchased and wrapped a good portion of our family's gifts,
ate my weight in toffee, made two batches of cinnamon rolls,
made two batches of caramels (both of which ended up in the trash, sadly), 
had a girls' night out/favorite things exchange with my besties,
 did two puzzles, and lots, lots more!  It's been a great month overall.


Today, I have been taking it easy even though
I should be out getting a few last-minute gifts
(my husband is on it though, thank goodness!)
I'm "done" and craving some rest.
Writing a little blog post isn't too hard...
So today I want to share with you my finished Seaside quilt!


I made this during the Seaside Quilt-Along I hosted
in September and October.

The pattern is from my book, Quilt the Rainbow.
Here's the original version:

[Photo courtesy of  Martingale Publishing]


Seaside is a great stash buster.  I used up tons of aquas for the background
so all I needed to buy was the solid teal fabric for the accent color.
While I was making the aqua version I also envisioned it
with low-volume fabrics for the background.  I was really excited
to see it come to life during the quilt-along, starting with this fabric pull:


I really love the soft, muted tones of these fabrics!


The quilting was a new-to-me design called Swivel Circles.
I really like it with these earthy fabrics.  Someone even said it reminded
them of seashells which is perfect for the name of the quilt!
Jen Ostler quilted it for me and did a fantastic job, as always!


I bound it with this copper print from Fig Tree's Cinnamon and Cream line
and backed it with Intrinsic Soft from Shine On by Sharon Holland for Art Gallery Fabrics.
I absolutely love that dark green floral fabric!  So pretty!


My labels are from Everemblem.
I get the 2" cotton, fold-over, sew-in labels.
If you go to their site, you'll have to pick a cotton label 
and customize it from there.  I've loved the ease of these labels.
Now I don't have an excuse to not label my quilts!


This is a great project for beginning quilters!


Seaside is such a quick, easy make.
I really see myself making more of these in the future.
I'd love to have one in all the colors!


If you'd like to purchase a copy of Quilt the Rainbow
you can snag an autographed copy from my Etsy shop.
It includes 10 patterns to help you whittle down each
color of your fabric stash + lots more!
Check out THIS post for all the details!

So which version do you like better?
Can you see yourself making Seaside and if so,
what colors would you make it in?

Thank you for stopping by today and happy holidays to you!


Star Patch - A New Pattern by Gigi's Thimble

Tuesday, February 13, 2018

 What do you do with your leftover scraps when you're done with a project?
For the last year or so I've been trying to cut my scraps into squares so they will be ready for a scrap project whenever the need arises.  I know Lori Holt did a big blog post on this idea back in 2013 (which you can find HERE).  I've been really inspired since then by some of the amazing scrap quilts some of my friends have made using their pre-cut squares.


[For those of you interested, I cut 5", 4", 3", 2-1/2", and 2" squares when cutting up my scraps.]

So, after a few crazy months at the end of 2017 when I designed 3 new patterns - Snow Village, With Love and Wonder (I'll share Wonder with you soon, it was an exclusive pattern for the Quilters Candy Box I curated in January) I decided I wanted to do some selfish sewing.  I started making 9-Patches with some of my pre-cut squares.  I didn't really know what I was going to do with them but the idea somehow quickly came to me to use them as the background for a giant star.


Originally I was planning on doing a vintagy, medium/dark green solid fabric for the star but the fabric store I was at didn't have a huge selection so I settled upon these 3 solids (above).  Obviously I'm not the most patient person to hold out for the perfect color I had in my mind!  I just wanted to get it figured out!  The mustard yellow spoke to me for some reason so I went with that.

Note:  It's interesting to me why we choose certain colors.  I went through the whole rainbow practically, in my mind.  I knew I wanted something bright that could stand up to all the bright fabrics in my 9-Patches.  But I find that red can be overpowering in large doses.  Orange - I just wasn't feeling that for this quilt.  Yellow - I thought yellow would look washed out.  Green - green sounded good.  Blue - I love blue but thought it was a little too safe.  Fushia, Pink, Purple all seemed a bit too much for me and my house (and for this project). 


So I finally settled on this mustard yellow.  Because it has black pigment in it and is not a "true" yellow I feel like it can stand up to the bright fabrics without getting washed out. I don't use yellow very often but was excited about it and ended up feeling like it "made sense" since it was for a star.  But really, as I was making this quilt I thought - a lot of colors would look fabulous for the star.  It's all personal preference and I hope to see many different color versions of this pattern someday!


I wanted to use up some extra 9-Patches on the back and am completely in love with that little surprise on the simple, white back.  I've had a request to write up some instructions on how I did the back.  Would any of you guys be interested in the instructions for that?


I had my quilter (Cathy Barney from Alpine, UT.) do a new-to-me swirl design for the quilting.  It's called "Overlapping Crop Circles" by Digi-Tech Designs.  I really like how it turned out and how it keeps the focus on the quilt pattern.


After a quick photo shoot outside, it was time to bind!


I can't bind a quilt anymore without using my Binding Baby!  It's so handy!  See my thoughts on it (along with a few of my other favorite notions) HERE.


 Finished!  And then another quick photo shoot before it headed off to a quilt shop for display...


So, what was supposed to be a "selfish sewing" project, turned into a new pattern!
Star Patch is the name I chose after opening up that discussion on Instagram.
If you're interested in purchasing this pattern click HERE to visit my Etsy shop.
There are PDF and paper patterns now available!

Thanks for stopping by!


Scrap Quilt Challenge + My Scrappy Log Cabin Quilt + A Free Log Cabin Block Pattern

Thursday, October 1, 2015

Have you heard about Fabrics N Quilts annual 
Scrap Quilt Challenge?


It's a great opportunity to bust through some of those scraps that I know you all have lying around (wink, wink).  PLUS, you get the chance to win some fabulous prizes!!!  Simply upload a photo of a scrappy quilt (that you finished this year) to the Scrap Quilt Challenge 5 Flickr Page by midnight on October 15th (that's just two more weeks, friends!) and you could win BIG!!! Click HERE for more details!

As one of the featured designers for this challenge,
I wanted to share with you my recently finished Scrappy Log Cabin Quilt!


I started this fun paper piecing project about 7 months ago 
and loved every minute of it!
♥ ♥ ♥
Now, there are lots of ways to make a Log Cabin block but I decided to go the paper piecing route because... 

#1 I love to paper piece
#2 I didn't have to pre-cut or press my strips
#3 Paper piecing ensures perfectly straight, square blocks!


Here are some details about my quilt:

Finished block size = 7"
Finished quilt size = 70" x 84"
Total number of blocks = 120
Total number of pieces = 1,560
Machine quilted by Cathy Barney in Alpine, UT.
Quilting design = Modern Loops


 Would you like this block pattern?
Click HERE for a free download.

+ check out my tutorial for a paper pieced Pineapple Block 
to help you get started!  Click HERE.


Now go on and get scrap busting!

~ Amber