Showing posts with label cutting chart. Show all posts

Chris' Christmas Quilt

Monday, December 4, 2023

 Hello, hello!
I recently had the pleasure of making
a Christmas quilt for a friend.  She was looking 
for a quilt in dark colors that would really pop 
against her white shiplap walls.  After seeing her space
(so I could get a sense of her style) and discussing
a few ideas, I came home and pulled these fabrics.


I decided to go with mostly red, green, and black fabrics with little pops of gold, white, and brown.


We discussed just making stars - which would be really easy to accommodate the unique size she wanted the quilt to be.  She has a wall right by her front door that needed a little something special...so she wanted the quilt to be about 42" x 72".


While making this quilt, I laid out sets of fabric for each block - a row or two at a time - so I could make sure the colors were spread out and balanced.  It was also important to me to have contrast between each block so that each one stood out and didn't get "lost" in the scrappiness of this quilt.


My friend, Jen Ostler (@drycreekquilter on Instagram) quilted it for me with some classic crosshatch quilting.  My friend's style is transistional so I figured she wouldn't want anything too cutesy.  I think the crosshatching compliments the diagonal lines of the star points really well.


As many of you know, Jen always quilts a little hidden object into the quilting.  It makes for a fun game of hide and seek. Great for kids!  Can you find the star in the picture above?


I found this pretty olive green woven fabric for the back and I had the red stripe binding fabric for another quilt but ended up liking it more for this quilt!


It was so fun to work on the binding while it snowed outside!


I watched Christmas movies and felt extra festive and cozy while binding it!


I used my Sawtooth Star Cutting Chart to make 7" stars and did a 6 x 10 layout (so 60 blocks total).
Click HERE for the cutting chart and tutorial.


I hope my friend likes it!  She didn't really want to be involved in the process.  (I think she was being nice and letting me "do my thing" but she also said she would get overwhelmed if she had to pick out the fabrics - even though she has really great taste!)


I don't usually do commission quilts but this was really fun for me to do.  I loved seeing my friend's home and Christmas decor and trying to make something that would fit in perfectly there.  I really hope
this is what she envisioned!


Now it's time to deliver it!  So fun!

Happy holidays my friends!

Friendship Star Quilt Block

 Hi Friends!
I'm popping in to share
a free block pattern with you today!
It's such a simple, yet classic quilt block.


This block is called the Friendship Star
and probably took me about 15 minutes to cut and assemble the pieces.


This block would be great for a swap or to make a quilt 
for a friend who needs a little bit of cheering up!
Maybe in their favorite colors!?!

You could even make some little friendship stars
to use in the cornerstones of your sashing
(which is what Jessica Dayon and I did in our
free Willow pattern that you can check out HERE!)


I've created a cutting chart for several Friendship Star block sizes with instructions!
Click HERE to get the free chart and pattern.
If you use it, I'd love to see your blocks!
Please tag me @gigis_thimble on Instagram with the hashtag
#friendshipstarcuttingchart.

Happy quilting!

Sawtooth Star Cutting Chart + Tutorial

Saturday, June 25, 2022

Today I have a little gift for you!
It's simple but hopefully, you'll enjoy it!
The Sawtooth Star block is one of the most basic,
yet classic quilt blocks around and today
I have a cutting chart for finished block sizes 3" - 20"!


Sawtooth Star Cutting Chart

FINISHED

BLOCK SIZE

BACKGROUND FABRIC

CUTTING

STAR FABRIC

CUTTING

3”

(4) 1 ¼” squares

(4) 1 ¼” x 2” rectangles

(8) 1 ¼” squares

(1) 2” square

4”

(4) 1 ½” squares

(4) 1 ½” x 2 ½” rectangles

(8) 1 ½” squares

(1) 2 ½” square

5”

(4) 1 ¾” squares

(4) 1 ¾” x 3” rectangles

(8) 1 ¾” squares

(1) 3” square

6”

(4) 2” squares

(4) 2” x 3 ½” rectangles

(8) 2” squares

(1) 3 ½” square

7”

(4) 2 ¼” squares

(4) 2 ¼” x 4” rectangles

(8) 2 ¼” squares

(1) 4” square

8”

(4) 2 ½” squares

(4) 2 ½” x 4 ½” rectangles

(8) 2 ½” squares

(1) 4 ½” square

9”

(4) 2 ¾” squares

(4) 2 ¾” x 5” rectangles

(8) 2 ¾” squares

(1) 5” square

10”

(4) 3” squares

(4) 3” x 5 ½” rectangles

(8) 3” squares

(1) 5 ½” square

11”

(4) 3 ¼” squares

(4) 3 ¼” x 6” rectangles

(8) 3 ¼” squares

(1) 6” square

12”

(4) 3 ½” squares

(4) 3 ½” x 6 ½” rectangles

(8) 3 ½” squares

(1) 6 ½” square

13”

(4) 3 ¾” squares

(4) 3 ¾” x 7” rectangles

(8) 3 ¾” squares

(1) 7” square

14”

(4) 4” squares

(4) 4” x 7 ½” rectangles

(8) 4” squares

(1) 7 ½” square

15”

(4) 4 ¼” squares

(4) 4 ¼” x 8” rectangles

(8) 4 ¼” squares

(1) 8” square

16”

(4) 4 ½” squares

(4) 4 ½” x 8 ½” rectangles

(8) 4 ½” squares

(1) 8 ½” square

17”

(4) 4 ¾” squares

(4) 4 ¾” x 9” rectangles

(8) 4 ¾” squares

(1) 9” square

18”

(4) 5” squares

(4) 5” x 9 ½” rectangles

(8) 5” squares

(1) 9 ½” square

19”

(4) 5 ¼” squares

(4) 5 ¼” x 10” rectangles

(8) 5 ¼” squares

(1) 10” square

20”

(4) 5 ½” squares

(4) 5 ½” x 10 ½” rectangles

(8) 5 ½” squares

(1) 10 ½” square


Click HERE for a printable version of this chart.
(Please do not redistribute this chart; it is for your personal use only.
But please do tell your quilting friends about this post so they can
check it out for themselves!)

Here's a quick tutorial on how to make a Sawtooth Star block:
(Please note: the seam allowance is 1/4".)

1. Cut out the required pieces for your chosen block size.


2. Draw a diagonal line from corner to corner on the wrong side of your smaller
squares from the Star fabric.  (You can skip this step if you have Diagonal
Seam Tape from Cluck Cluck Sew.  See product information for details).


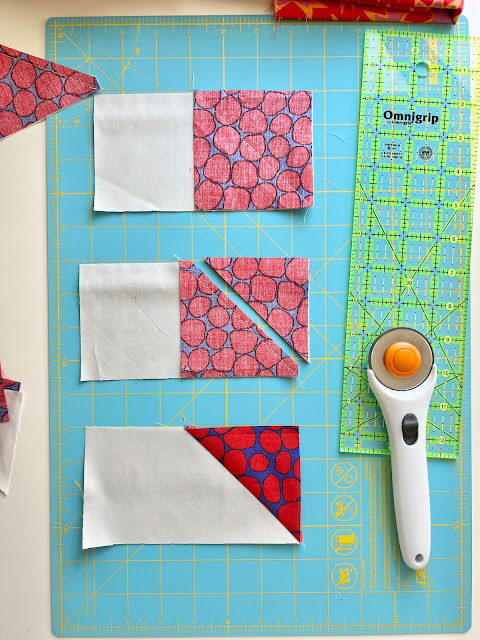
3. Place a marked square on one end of a background fabric rectangle
with right sides together.  Stitch on the marked line.  Trim 1/4" from the line.  
Press the seam allowance toward the dark fabric.


4.  Repeat step 3 on the opposite end of the rectangle.  Make 4 Flying Geese units. 


5. Layout the 4 Flying Geese units, 4 background fabric squares,
and 1 large square from your Star fabric as shown.  Sew the pieces
together in rows.  Press the seam allowances toward the squares.


6. Sew the rows together and press the seam allowances toward
the block center.


And there you have it!  A very classic Sawtooth Star block!

Note: I am making 12" Stars for my project.  The cutoffs from making
my Flying Geese units are a decent size so I plan to
make those into Half-Square Triangles for a bonus project!

Also, if you are not using sashing between the blocks,
I would recommend pressing your seam allowances open.
I am using sashing between my blocks.

[6" Stars from my Two Stars a Day quilt]

I hope you find this cutting chart and tutorial
very useful, for many years to come!
Tag me on Instagram if you use them!
I'd love to see what you're working on!

Happy quilting!