Showing posts with label finished quilts. Show all posts

Red, White, and Blue Checkered Spools Quilt

Monday, July 28, 2025

If you've been around here much, you know
I am a sucker for red, white, and blue quilts!


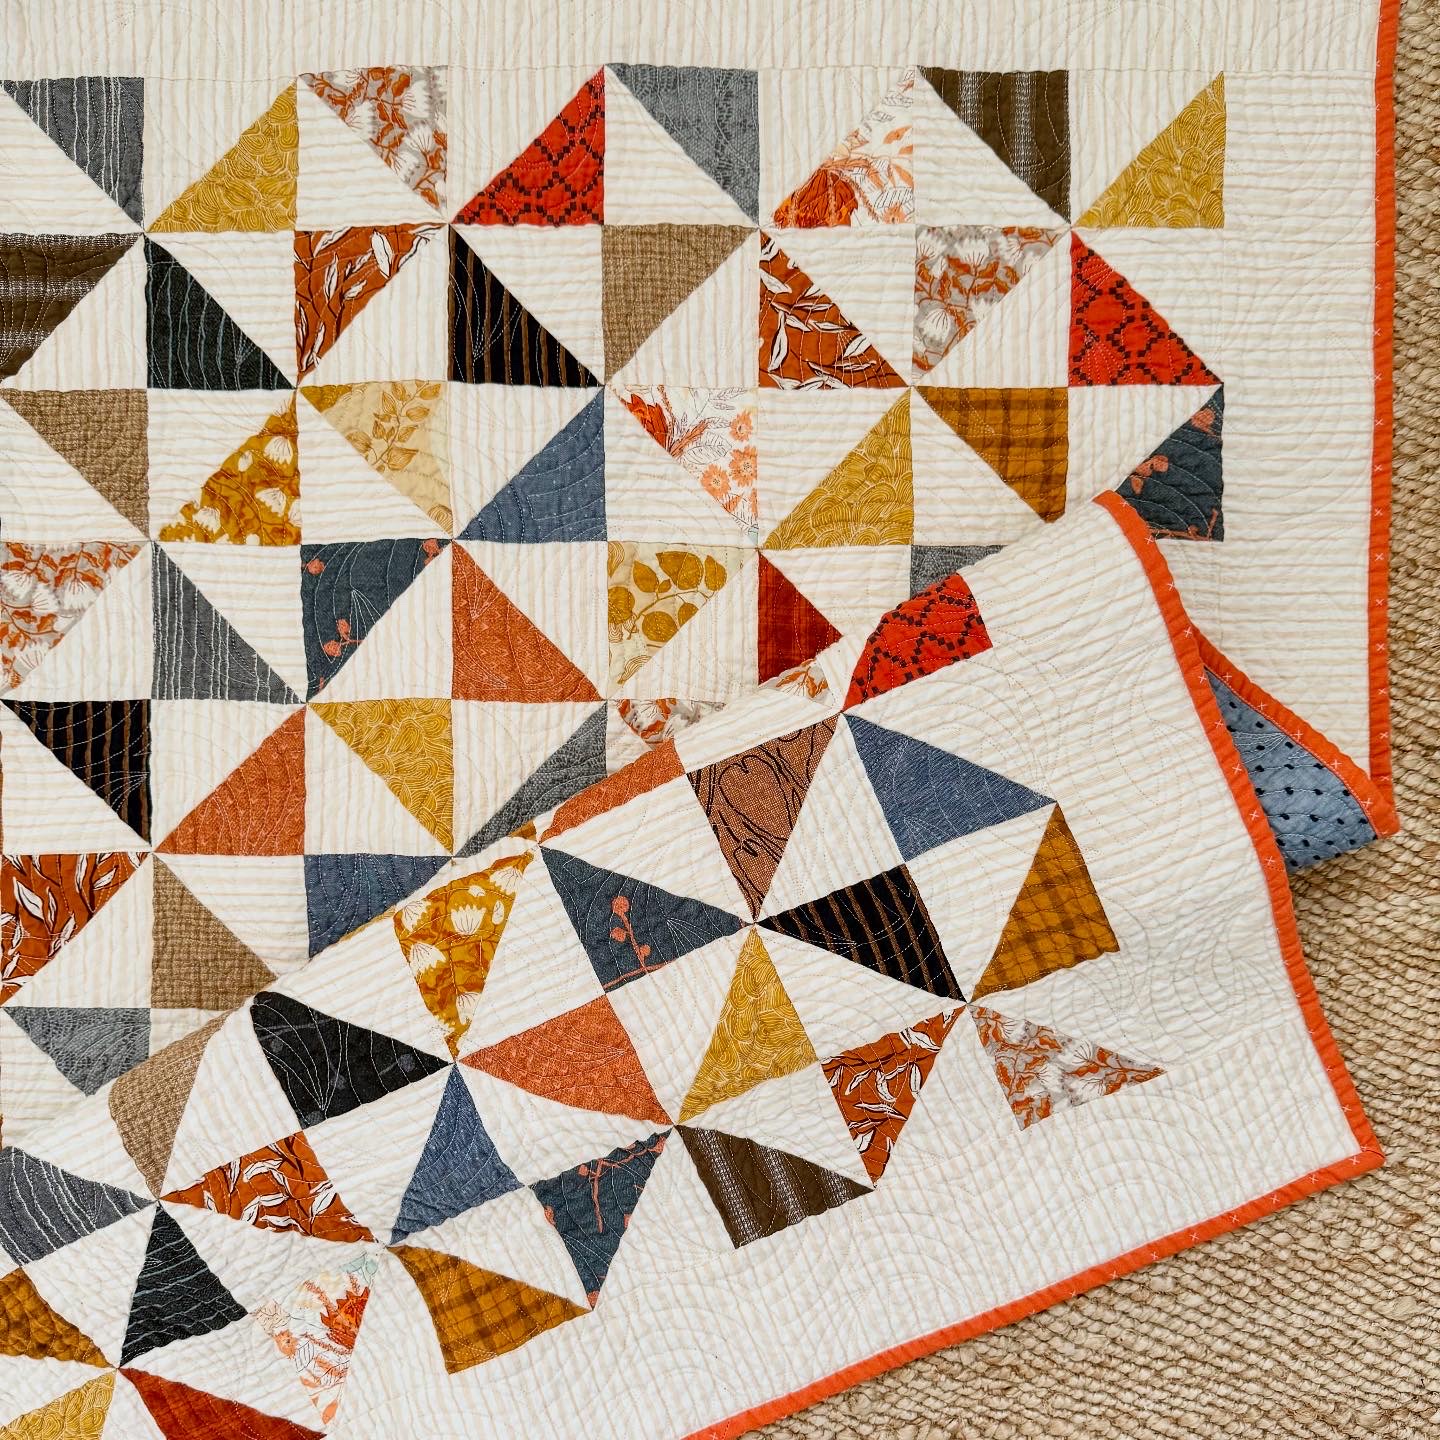
I was making my Honey Locust Checkered Spools quilt in June and
I just kept envisioning it in red, white, and blue!  So I just had to scratch that itch!


I had the white background fabric in my stash.  I actually designed that print for
the Riley Blake Designs Hush Hush 4 collection.  It was originally a creamy background
with tan stars and they reprinted it in white for their Lights On 2 collection.
The print is called Seeing Stars.  I was able to use fabrics from my stash for most of the spools 
(although I did treat myself to a few new ones just for fun).


Checkered Spools is a 2-1/2" x 42" strip-friendly pattern but since
I just used random cuts of fabric from my stash, it's scrappier
than the original version.  I love it!


I even made a scrappy back for it!
It always feels good to use up random remnants
from my stash.  There's no right or wrong way to make
a scrappy back.  It just depends on what size pieces of fabric you have!


And since I was in a "scrappy" mood, I thought, why not do a scrappy binding too?!?
The best part was that I only used leftover pieces of binding from
other projects!  I didn't have to cut any strips for this particular project! I've made several
red, white, and blue quilts over the years so I had plenty to choose from!


Jen Ostler quilted it for me with a new-to-me quilting panto called
Starry Twist by Melissa Kelley of Sew Shabby Quilting.


This was such a fun project to work on in July!
Checkered Spools would be cute in any color way and is the
perfect pattern for a cherished bundle of 2-1/2" strips.


Checkered Spools comes with instructions for 2 quilt sizes.
This is the smaller, throw size which finishes at 64 1/2" x 80 1/2".


Quick sidenote:  I am teaching this class at The Garden of Quilts in Lehi, Utah
on September 12th from 2-5 pm.  I'd love for you to join me!  Click HERE for details.


If you'd like to make this pattern too, you can get the
paper pattern HERE or the PDF pattern HERE,

Click HERE to see the original version of Checkered Spools.
I'm curious if you have a favorite?

Thanks for stopping by today!

Honey Locust Checkered Spools Quilt

 I recently finished a new quilt called Checkered Spools.
I designed this pattern to go along with my new fabric collection
with Riley Blake Designs called Honey Locust, which is in stores now.


All you need for the quilt top is a Rolie Polie (a bundle of forty-two 2-1/2" x 42" strips),
background fabric and some yardage for the tops and bottoms of the spools.

I used this sky daisy print for the background.
I used the brown and blue hydrangea print for the binding.
And the other two browns (posies and patchwork) were used
for the top and bottom of the spools.


It was fun mixing and matching different prints for the checkerboard units.


I really wanted Honey Locust to have a curated, scrappy feel so it has
a total of 24 different sku's.  There are 9 unique prints and 8 colors.


Leftover checkerboard segments are used in the fun, patchwork border.


Since I was planning on using the brown and blue hydrangea print for the binding,
I debated about these 3 prints for the backing fabric.  I thought each of them
would compliment the front of the quilt and binding.


I ended up using the navy floral print called Gigi's Garden.  I love using
large-scale prints for quilt backs, so it was perfect.


I think the brown and blue hydrangea print for the binding tied it all together!
I usually hand-stitch my binding but was in a hurry this time so I machine bound it.  
It takes some practice but I think I've finally got my method down.  In this particular case,
I used two different color threads - blue on the front and brown on the back.


Jen Ostler quilted it for me with the Interlocking Orange Peel panto by Karlee Porter.
It's one of my go-to pantos; I've used it many times over the years!  Some other
pantos I considered were the Baptist Fan and Crosshatching.  I guess I wanted something
classic and timeless with a little bit of a vintage feel.  I landed on the Interlocking
Orange Peel and am really happy with it!


Checkered Spools comes with instructions for 2 different quilt sizes.
This is the bigger version, the full version that finishes at 80 1/2" x 96 1/2".
I turned it sideways and it fits perfectly on this queen-size bed!


This was such a fun project!  And I'm not gonna lie, after I made this,
I started dreaming of having a quilting retreat center
with all the beds adorned in Checkered Spools quilts!


If you'd like to make this pattern too you can get the
paper pattern HERE,
the PDF pattern HERE,
or I have 1 kit available HERE.

I also have some of the sky daisy fabric listed in my shop as well.
You can get that HERE.

I also thought this would be adorable in red, white, and blue!
Check out that version HERE!

Thanks for stopping by today!

Winding Ways Quilt

Monday, April 28, 2025

Hi friends!  Today I want to share a quilt I finished earlier this year called Winding Ways.  I started this quilt in July of 2023.  Around that time, I had mentioned to some friends that I wanted to get better at curved piecing.  One of them happened to have an Accuquilt Die Cut machine + dies for the Winding Ways pattern.  She offered to let us all use it, and well, here we are!


This was my color palette.  I got all of my fabrics (including my backing and binding fabrics) at Harmony in Provo, Utah.  It's one of my favorite shops (and lucky for you, they have an online shop!)  They have tons of fun gift items, yarn, and apparel fabrics.  Their quilting cotton selection is a bit on the small side, but every fabric is beautiful and unique!  


In a moment of insanity, I decided to "go big".  Why?  Why did I decide to go big?  I hadn't even made a test block.  I just dove right in.  And to be completely honest, I regretted that decision every step of the way...until it was finished, haha.  Every step was tedious.  I didn't enjoy it.  But I persevered and now I'm really glad I did!  

 
There isn't a pattern per se, just the dye cuts.  So, unfortunately, I don't have any information about fabric requirements.  But I do know, I did a 10 x 12 block layout.  So 120 blocks with 12 curved pieces on each one.  I chained pieced everything, so every step took a long time!


The blocks finished at 8" x 8" each.  So the finished quilt size is 80" x 96".
Perfect for a queen-size bed!


When it came to the quilting, I knew I wanted something circular to complement the quilt pattern design.  I found some inspiration pictures, but they all seemed to be custom quilted using curved rulers.  I didn't want to pay custom quilting prices, so I took it to my awesome long arm quilter, Jen Ostler.  We found an edge to edge pantograph called Hippie Dippie that was really similar to my inspiration pictures.  Jen tweaked the pattern a bit to make the design overlap a little and it came out perfect!


As many of you know, Jen always quilts a little object into the quilting for a fun game of hide 'n seek.  This time it was a cute little butterfly which you can see above.


I bound it in this striped woven fabric.  And I'm a little obsessed with this beautiful floral fabric I used for the back.  It tied everything together perfectly, don't you think?!?


The label is from Ever Emblem. I've been getting labels from them for years!  I get the 2" cotton, fold-over, sew-in labels.  If you want to get some for yourself, you will just have to pick one of their basic cotton labels and customize it from there.  I machine stitch my binding down around it because it's hard to hand stitch through it (but then I usually hand stitch the rest of my binding down to the back of my quilt).


I'm really happy with the way this quilt turned out!  I love the colors and the quilting.  But I kind of wish I had picked colors that went better in my house.  I don't know where I'm going to put this quilt!


I'm so thankful to my friend for letting me use her die-cut machine to cut all the pieces for this quilt!  So generous of her!  The dies cut out every piece accurately with little notches to show you where to line things up!  I can't imagine doing this project without the die-cutter!


I hope you enjoyed seeing this fun project using the Accuquilt Winding Ways Dies!  I'm glad I was able to get some serious practice with curved piecing.  Tell me, what's one quilting technique that you want to work on?

Thanks for stopping by today!

Half-Square Triangle Baby Quilts

Wednesday, April 16, 2025

Hi friends!  Today, I have two more really simple baby quilts that I want to share with you!  Last week I shared a simple patchwork quilt.  And this week, I have two Half-Square Triangle quilts that I recently gifted to two new mommas in my neighborhood.  Both had baby girls!  It's such a joy to spread the {quilty} love!

(Sidenote: I finished all 3 of these quilts a few months ago and I'm just now getting around to blogging about them.  Just wanted you to know that I didn't whip all of them up this past week or two. :))


First up is this super simple gingham quilt.  I had some leftover HST's from another project that I didn't end up using, and decided to put them to good use and make a baby quilt with them!  Since it was so simple on the front, I decided to jazz things up a bit with a fun floral on the back.  This quilt was wider than your standard 40" - 42" wide fabric, so I tried to find a wide-back fabric that matched.  Do you know it's really hard to find a cute wide-back!?!  I finally landed on this teal and taupe floral by Lori Holt for Riley Blake Designs.  It was perfect for the look I was going for!


My blocks finished at 6" and I did an 8 x 9 layout, so it finished at about 48" x 54".


Jen Ostler in Highland, Utah, quilted it with the Cartwheel panto, 
which I think added some nice movement to this quilt.


I added one of my usual labels from Ever Emblem that has my name, city, and year on it, plus a fun floral tag that I got from Sarah Hearts.  It looks like she's out of that particular label, but she has so many other cute options, including this one that's pretty similar.  They're all so cute and I think they add a little whimsy to every quilt!


This pattern would be perfect for anyone who loves a simple, cottagey aesthetic!
Or, if you did it in solid fabrics, it would give it a simple, modern aesthetic!

[ I love wrapping gifts with beautiful ribbons that match!]

The second HST quilt I made was this one, which is a bit more colorful!


Again, I used some cutoffs from another project to make these HST's.  They have a more earthy color palette but there's plenty of florals in there to make it somewhat girly.


Do you think the days of girly = pink are gone?  I think moms these days are going
a little more modern and thinking outside the box.  Anything goes!


These blocks finish at 3" and I did a 12 x 15 layout.
Then I added a 3" finished border so it finishes at about 42" x 51".


Jen Ostler quilted this one too (she pretty much does all my quilting unless I need custom quilting).
The panto she used is called Golden Curls and I love it!
I think it has a modern, organic vibe, just like my fabrics.


Again, I used a label from Ever Emblem.  They're so handy!
I finished this quilt at the end of last year but didn't get pictures of it until today.
I can't remember what the backing fabric is called but it has a little texture, which I think is fun.


I washed this one before I gifted it.  I don't usually prewash my fabrics but this was a high-contrast quilt so I wanted to make sure the colors didn't bleed.  I threw about 4 Shout Color Catchers
into the wash and had no bleeding!  Yay!


I dropped it off at my neighbor's today.  The mom couldn't talk long (new baby she had to attend to).  But as I was walking back to my house, she called to me from her porch - so shocked that it was a quilt inside the bag.  She thought it was just diapers or something!  I love surprising people with handmade quilts!  Don't you?!?

I hope you found a little inspiration here today!  Use what you have and keep it simple if you want!
Quilts don't have to be intricate.  Cute fabrics and a simple pattern is all you need!  Oh, and be sure to check out my tutorial on how to square up HST's if you're new to quilting!  This will give you perfect points every time!


Happy quilting!

Simple Blue and White Patchwork Quilt

Friday, April 11, 2025

Who said a quilt has to be intricate or time-consuming to make!?

Not me!  I love simple patchwork!
I had some blues leftover from a few projects recently
so I decided to cut them into 3 1/2" squares for a simple lap-size quilt. 


I did a 17 x 21 block layout, so this quilt finished at 51" x 63".
I think it would be perfect for a little boy.


Jen Ostler in Highland, UT. quilted it for me with this panto called Ripple.  I've used that panto before and think it adds some nice movement to a very "square" quilt.  I like that it's a play off the blues/water, too!  Do you see the little star (below) that Jen quilted into it?  Such a fun, signature move that she does on all of her quilts.  Makes for a fun game of hide and seek.


The label is from Ever Emblem. I've been getting labels from them for years!  I get the 2" cotton, fold-over, sew-in labels.  If you want to get some for yourself, you will just have to pick one of their basic cotton labels and customize it from there.  I machine stitch my binding down around it because it's hard to hand stitch through it (but then I usually hand stitch the rest of my binding down to the back of my quilt).


I had a partial bolt of this cream and navy plaid fabric in my stash.  It felt good to use some of it in the patchwork and for the back of the quilt.  I don't think I've used a plaid for an alternate/background fabric before, but I thought it was kind of fun in this particular project.  Since everything is going the same direction (as in, there aren't any triangles that would cause the plaid to be on-point in some places) it was definitely a good project for that!  I had someone ask me if it was hard to get all of the lines straight and I honestly didn't even pay attention to that.  I just cut it like I normally would.  It's generally pretty straight but I think a little imperfection adds some charm!  Would it bug you if the plaid wasn't perfectly straight?


I hope this inspires you to go simple and not worry about perfection!


Happy quilting friends!