Showing posts with label Tutorials. Show all posts

4-Patch Quilt + a $2 Tutorial

Tuesday, November 3, 2026

 Hi there!  Today, I am sharing a very simple,
very traditional 4-patch quilt. If you've been looking for a
zero-stress project to stitch up, this one is for you.


Honestly, I can't believe I hadn't made one before!
A couple of months ago, I was going through an exceptionally busy period of life,
and I think I needed some mindless sewing to help me relax in those stolen moments
of "me" time.  So I grabbed some precut squares (leftover from other projects)
and sewed my little heart out!  


I auditioned several fabrics for the solid squares
but ultimately landed on this tan and white plaid fabric that I had in my stash.
I inherited it from my grandma (the one who taught me how to quilt)
after she passed away in 2019.  I must've received quite a few yards,
as I've used it in many projects and even backed a quilt with it.


My grandma's fabric is a "Homespun" fabric, which is a lightweight, simple-weave fabric
that is 100% cotton.  I did a little research and found out that Homespun fabrics are made
of fibers that are individually dyed before they're woven together, as opposed to designs or colors stamped or printed onto the fabric afterward.  This makes the fabric reversible!  They typically come in just solids, checks, plaids, and stripes and are known to have slight imperfections that give them a
primitive look.  Some of them tend to fray a lot, but I didn't have that issue with this particular fabric. 

I know some of you might steer away from using a plaid like the one I chose here,
fearing the lines won't line up perfectly.  But I am here to tell you that subtle, small-scale
plaids like this are incredibly forgiving.  When the grid lines are tiny or low-contrast, a minor
misalignment disappears into the overall texture of the piece, leaving nothing but
cozy, homemade charm.  A large, high-contrast plaid (like a bold black-and-white buffalo check)
would be a totally different story though! When those thick, striking lines are even an eighth
of an inch off, it acts like a visual magnet, drawing the eye right to the seam.  So, if you worry
about using a small plaid in a context like this, I say go for it!  I didn't do anything special
when I cut this fabric, I promise!  It's not perfect but that's kind of why I love it!

I also liked this neutral, midtone tan color so that the dark and light
colors in my 4-Patches would all pop!


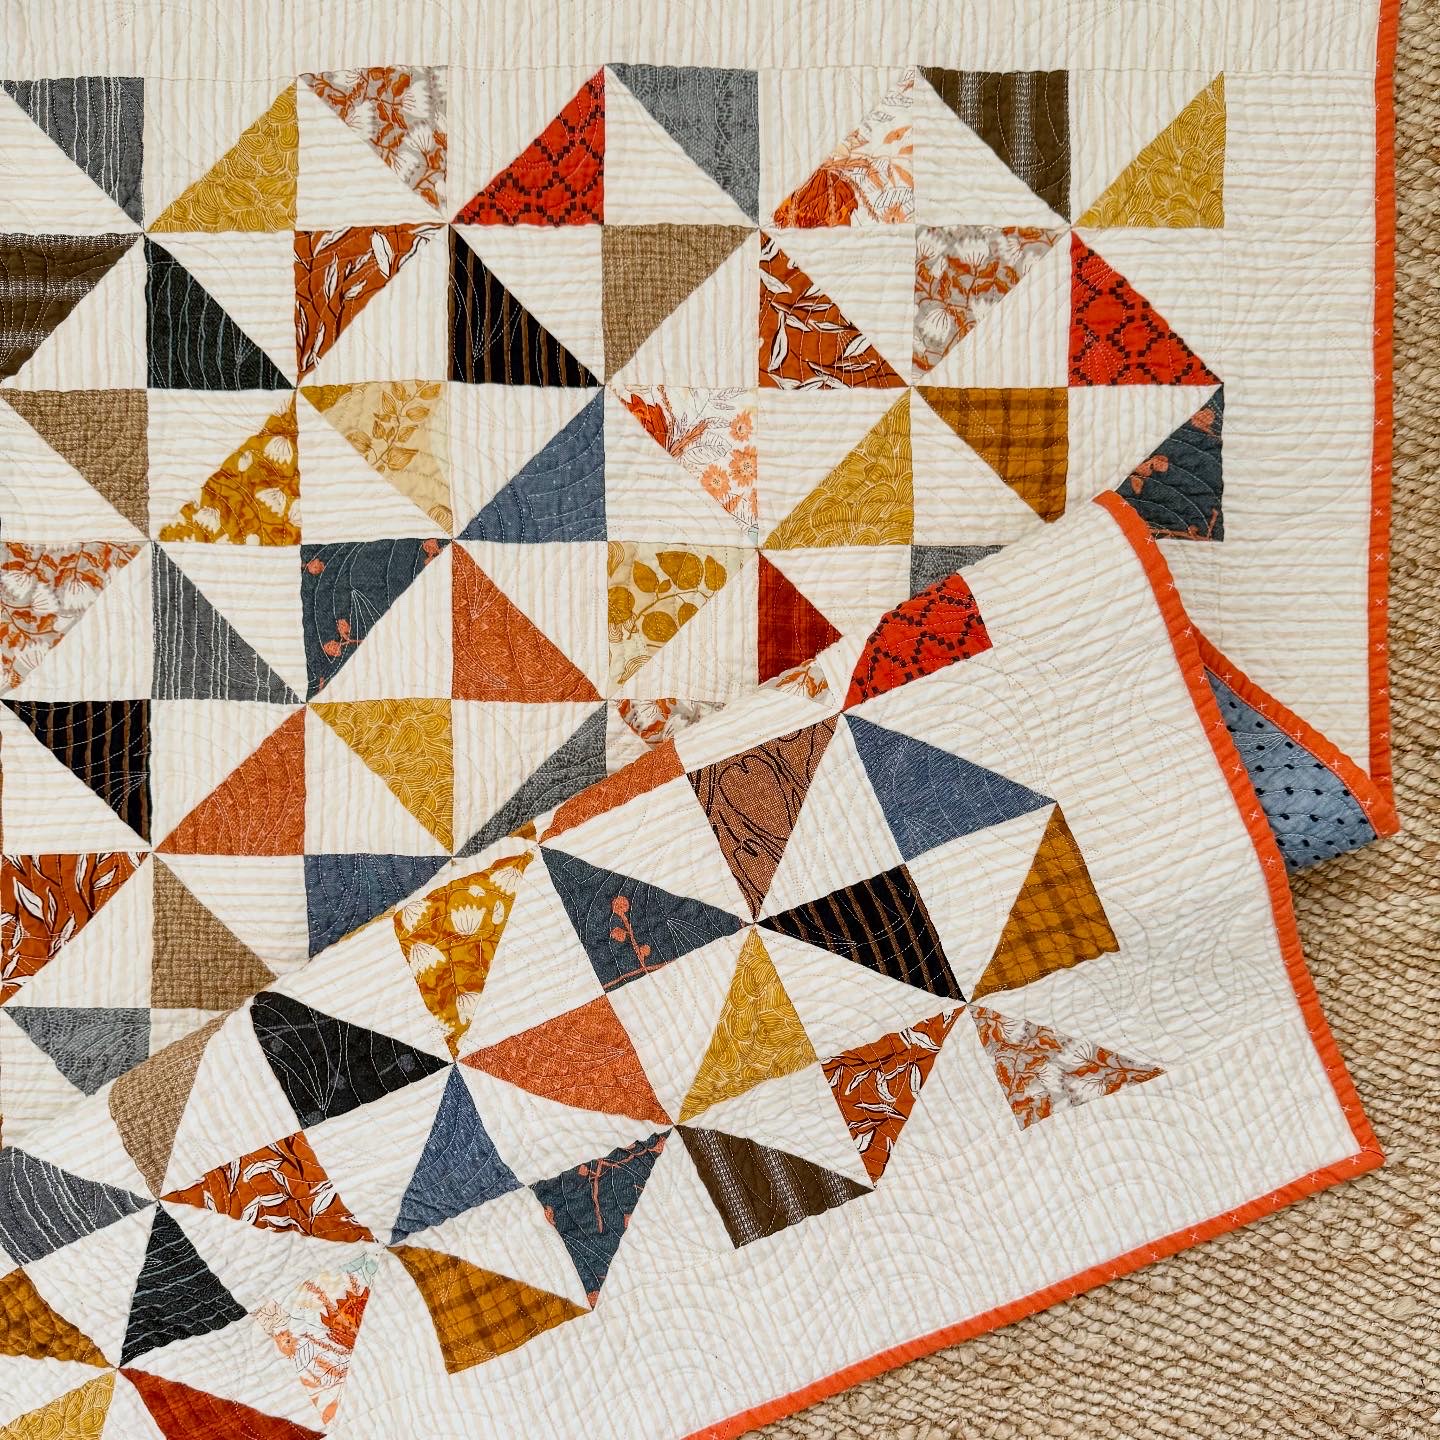
I was kind of going for a "Granny-Chic" look with this quilt.  I wanted it to look
like an old family heirloom or something you'd find at an antique shop.  Besides using my
grandma's homespun fabric, I also used a very scrappy fabric placement for my 
4-Patches, to achieve that look.  There was no rhyme or reason to where the darks and lights went;
I didn't lay my blocks out before sewing them together, completely embracing a random, scrappy layout. I even let identical prints touch (as you can see in the last two pictures above), because
when I look at antique quilts, there seems to be more of a make-do mentality than a perfection mentality. Quilts were more utilitarian back in the day, so what would normally be a mistake
or something I'd try to avoid, I fully embraced with this quilt.


I had my longarm quilter, Jen Ostler, quilt this with a classic Baptist Fan pattern
by Three Sisters Fabric. I think it fit the vibe I was going for perfectly!
Can you see the tiny heart she tucked into the design? She always stitches in a hidden object
—it's her signature move and makes for a fun game of hide-and-seek.


I hand-bound it with a Tilda Tiny Stripe fabric. I thought it complemented the tan plaid
and the other blues I had in the 4-patches. Blue and brown go so nicely together,
and I didn't love the pink or yellow against the tan as much.


The backing fabric was from my Feels Like Home collection
with Riley Blake Designs.  I sketched out all of that print in Procreate on my IPad.
Feels Like Home came out in 2024.


I always use 100% cotton batting, which creates so much crinkle once a quilt
is washed and dried. I think this quilt will feel like one big hug
from my grandma once I do that!


I have created a $2 tutorial/cutting chart so you can make your own 4-Patch quilt!
It includes all the information you need to make FIVE different quilt sizes.
And I've included options for scrappy and non-scrappy versions.
Click HERE to check it out in my Etsy shop.  It's such a great resource!


Thank you so much for stopping by today! This was such a fun, simple
project to stitch up, and I hope it inspires you to dive into your own stash.
Happy quilting!

Hanging Fabric Hearts Tutorial

Wednesday, January 21, 2026

Looking for a way to use the scraps of batting you've been saving from past quilt projects?  Or the little pieces of ribbon you've collected over the years because they were just too pretty to throw away?  Do you LOVE fabric and have a bunch of scraps lying around?  If you answered yes to any of these questions, then I have a tutorial for you!


Hanging Fabric Hearts!  They're festive, easy, quick, and fun to make!
Plus, they're a great way to put your scraps to good use!  

I (along with several employees of the quilt shop I work at - Maker's & Co. in American Fork, Utah) made a bunch of hanging hearts to warm up the store for January and February!
We also wanted to show our appreciation to our awesome customers for 
supporting us in the first few months we've been open!


I'll be sharing a simple photo tutorial below or you can go to the end of this post for a printable PDF.

NOTES: 
Use two different pink or two different red fabrics for each heart.  For a pink heart, use
pink thread.  For a red heart, use red thread.  You can get about 8-10 hearts from two 
¼ yard cuts of fabric (less with certain directional fabrics).

To make these Hanging Fabric Hearts, you will need:

- Red and pink fabric scraps (1” bigger than the heart templates)
- Thin batting scraps (1” bigger than the heart templates)
- Coordinating ribbon or lace (optional)
- Red and pink thread + invisible thread or fishing line for hanging
- Frixion pen, straight pins or 505 Temporary Adhesive Spray for Fabric, sewing machine, iron, scalloped pinking shears, needle, and heavy spray starch
- Clear packing tape, push pins, or removable poster mounting putty for hanging 


1. Cut out the paper HEART TEMPLATES.

2. Use a Frixion pen to trace a heart onto the right side of a pink or red piece of fabric.
NOTE: The Frixion pen's ink disappears with heat.


3. Lay a coordinating piece of pink or red fabric on your work surface, right side down.
Then lay a piece of thin batting on top of it.
Then lay the fabric with the traced heart on top of the batting, right side up.

4. Follow the directions on the 505 Temporary Adhesive Spray
or use straight pins to baste the 3 layers together.  I tried it both ways.
I thought pinning worked just fine, but if you find your fabric is puckering or shifting,
you could try pinning more, using the spray, or using a walking foot.
The spray is a little bit messy, so use a plastic bag or cardboard to cover your
workspace if you try it.  It definitely bastes everything together, well!


5. Stitch on the drawn lines around the heart with a simple straight stitch.  (If you’re adding ribbon or lace, center the top edge of the ribbon/lace at the base of the “valley” of the heart.  Start and end your stitches at the bottom edge of the ribbon/lace to secure it in place.  I use a piece that is 3-4 inches wider than my heart.)  Avoid the ribbon/lace when sewing around the heart.


6.  Remove the straight pins, if used.

7. Starch both sides of the heart with spray starch and set with a hot iron.
This will stiffen up the heart so it stays flat while hanging and will remove the traced lines.


8. If using ribbon/lace, tie the two ends into a knot.  Trim as desired.

9. Use scalloped pinking shears to cut out the heart 1/8” away from the stitches.
Be careful to avoid the ribbon/lace.


10. Thread a long piece of invisible thread or fishing line through the heart at the base of the “valley” (through the stitches, right above the ribbon/lace).  Attach the two ends of the thread/fishing line to the ceiling with tape, putty, or stick a push pin into the ceiling and tie a knot around that (that's what we did!)

You could also hang these as a garland on one long piece of ribbon or twine.
I think they would be super cute on a mantle or staircase banister!


We even hung some on the porch outside the shop!


I hope you found some inspiration here today!  Please let me know
if you decide to use this tutorial.


Half-Square Triangle Baby Quilts

Wednesday, April 16, 2025

Hi friends!  Today, I have two more really simple baby quilts that I want to share with you!  Last week I shared a simple patchwork quilt.  And this week, I have two Half-Square Triangle quilts that I recently gifted to two new mommas in my neighborhood.  Both had baby girls!  It's such a joy to spread the {quilty} love!

(Sidenote: I finished all 3 of these quilts a few months ago and I'm just now getting around to blogging about them.  Just wanted you to know that I didn't whip all of them up this past week or two. :))


First up is this super simple gingham quilt.  I had some leftover HST's from another project that I didn't end up using, and decided to put them to good use and make a baby quilt with them!  Since it was so simple on the front, I decided to jazz things up a bit with a fun floral on the back.  This quilt was wider than your standard 40" - 42" wide fabric, so I tried to find a wide-back fabric that matched.  Do you know it's really hard to find a cute wide-back!?!  I finally landed on this teal and taupe floral by Lori Holt for Riley Blake Designs.  It was perfect for the look I was going for!


My blocks finished at 6" and I did an 8 x 9 layout, so it finished at about 48" x 54".


Jen Ostler in Highland, Utah, quilted it with the Cartwheel panto, 
which I think added some nice movement to this quilt.


I added one of my usual labels from Ever Emblem that has my name, city, and year on it, plus a fun floral tag that I got from Sarah Hearts.  It looks like she's out of that particular label, but she has so many other cute options, including this one that's pretty similar.  They're all so cute and I think they add a little whimsy to every quilt!


This pattern would be perfect for anyone who loves a simple, cottagey aesthetic!
Or, if you did it in solid fabrics, it would give it a simple, modern aesthetic!

[ I love wrapping gifts with beautiful ribbons that match!]

The second HST quilt I made was this one, which is a bit more colorful!


Again, I used some cutoffs from another project to make these HST's.  They have a more earthy color palette but there's plenty of florals in there to make it somewhat girly.


Do you think the days of girly = pink are gone?  I think moms these days are going
a little more modern and thinking outside the box.  Anything goes!


These blocks finish at 3" and I did a 12 x 15 layout.
Then I added a 3" finished border so it finishes at about 42" x 51".


Jen Ostler quilted this one too (she pretty much does all my quilting unless I need custom quilting).
The panto she used is called Golden Curls and I love it!
I think it has a modern, organic vibe, just like my fabrics.


Again, I used a label from Ever Emblem.  They're so handy!
I finished this quilt at the end of last year but didn't get pictures of it until today.
I can't remember what the backing fabric is called but it has a little texture, which I think is fun.


I washed this one before I gifted it.  I don't usually prewash my fabrics but this was a high-contrast quilt so I wanted to make sure the colors didn't bleed.  I threw about 4 Shout Color Catchers
into the wash and had no bleeding!  Yay!


I dropped it off at my neighbor's today.  The mom couldn't talk long (new baby she had to attend to).  But as I was walking back to my house, she called to me from her porch - so shocked that it was a quilt inside the bag.  She thought it was just diapers or something!  I love surprising people with handmade quilts!  Don't you?!?

I hope you found a little inspiration here today!  Use what you have and keep it simple if you want!
Quilts don't have to be intricate.  Cute fabrics and a simple pattern is all you need!  Oh, and be sure to check out my tutorial on how to square up HST's if you're new to quilting!  This will give you perfect points every time!


Happy quilting!

Homemade Ironing Board Cover

Monday, March 24, 2025

 Hi there!  Today, I want to share a quick project that I think every quilter and sewist will find useful!  
When your ironing board cover becomes worn and scorched you can replace it with a fresh, homemade cover with stuff you just might have on hand!  And it won't take long to make!


My friend Eva Garlick (who I used to work with at a quilt shop many moons ago) wrote
THIS TUTORIAL on how to make your own ironing board cover.  I have used it many times over the years and wanted to share it again.  It doesn't take long to make and I love that you can make it in any fabric - to match your space.


I happened to have all the supplies on hand for this cover so it didn't cost me anything (is that "girl math" LOL?)  The best part was using some leftover binding I had (from previous projects) for the elastic casing, so it came together really fast!


I knew I wanted to use the cheater print from my last fabric collection (Feels Like Home) with Riley Blake Designs for this project.  It features 6" pineapple blocks and matches the sewing machine mat/organizer I posted about a couple of weeks ago.  You can check out that project HERE.


For those of you that don't know, a cheater print is a fabric that has a quilt block or entire quilt printed on it.  So you can get the look of a patchwork quilt without all of the work!  This cheater print is so happy and would be perfect in any sewing/craft room but of course, you can make your ironing board cover in whatever fabric you'd like!  It doesn't have to be a cheater print.


It took just an hour or so to make my cover.  I love a quick, instant satisfaction project like this!


Have you ever made your own ironing board cover?
I hope this post inspires you to make one!

If you would like to make one just like mine, I have a few listings in my Etsy shop for just the fabric you would need (a 21" x 72" piece of the cheater print).  Click HERE to check it out.

Thanks for stopping by today!

Sewing Machine Mat and Organizer Tutorial

Monday, March 10, 2025

 Hi friends!  Today I want to share a fun project I made for the Riley Blake Designs YouTube channel!  It's for a sewing machine mat that will keep your notions close by and organized during any sewing session, whether you're at home or away.


You've probably seen tutorials for these mats before but this one uses my Pineapple Block Cheater Print which is part of my Feels Like Home fabric collection with Riley Blake Designs.  Any cheater print would be cute for this project but you know I love Pineapple Blocks! This print features little 6" Pineapple Blocks so it has a big "wow" factor and would be cute in any sewing space.


Mine just so happens to match an ironing board cover that I made a few months ago. 
You can check that project out HERE!  It includes a link to the tutorial I use.  


The sewing mat has a large pocket on one side that is meant to hang off your sewing table.  You can customize the size of each compartment to hold all of your favorite notions. I especially love taking my mat to quilt retreats so that all of my notions stay in my own sewing space.  There's usually a lot going on at retreats and it's easy for things to get misplaced.


It also has ric rac on the side so you can roll it up for easy transport.
You could use some beautiful ribbon instead if you prefer.


Check out the YouTube video HERE for all the details.

Thanks for stopping by today.
Happy quilting!