Showing posts with label my fabric. Show all posts

Lulu Quilt

Monday, February 23, 2026

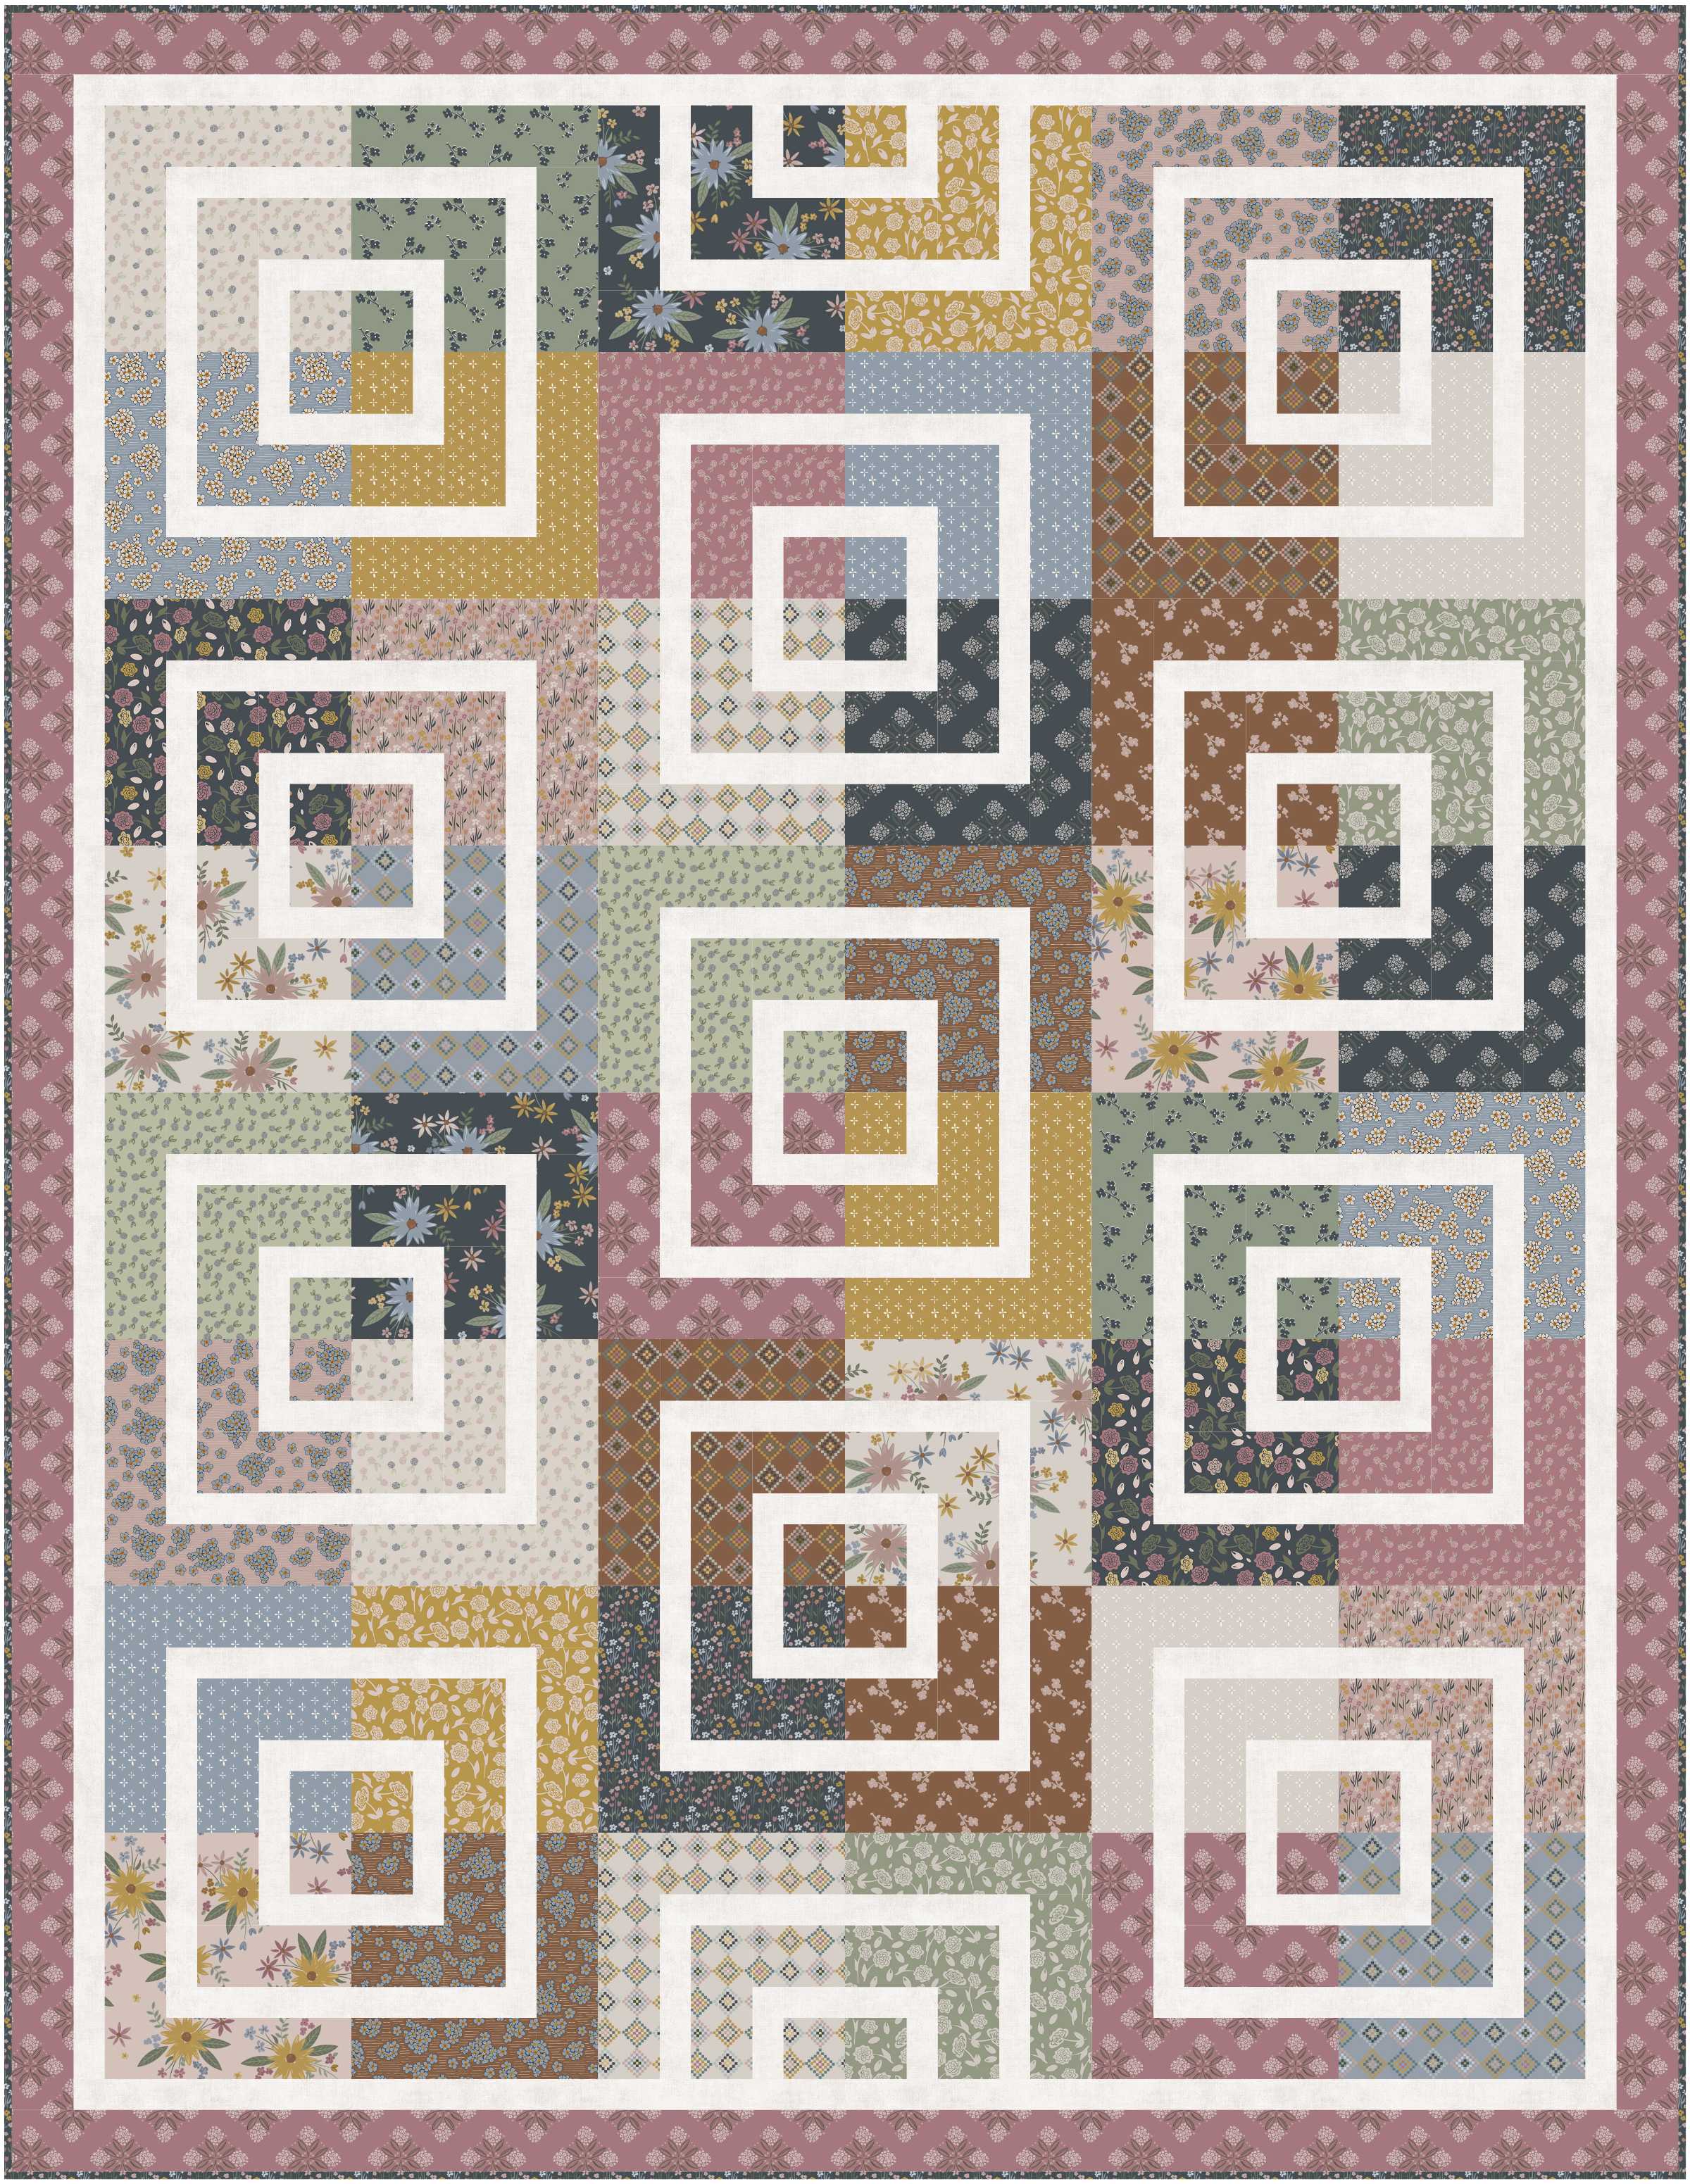
 Today I want to share a quilt that is kind of special to me!
I made it at the end of 2025, but just barely finished the binding.


This is my Lulu quilt pattern, which is based on an antique quilt I once saw.
I designed it in 2016 and have made a few Lulu quilts since then.


It may just be one of the simplest patterns I've designed.  It's perfect if you need a quick make!


It comes with 2 size options - lap and twin.  This is the lap size.
It finishes at 48" x 64".


It's Jelly Roll (or 2-1/2" strip friendly).

The reason why this particular quilt is so special to me is that it's made with
fabrics that I designed!  I had a lot of partial 2-1/2" strips and scraps
leftover from other projects so it felt good to put them to use.


99% of the fabrics are from my two collections with Riley Blake Designs,
Feels Like Home and Honey Locust.  It's fun to see how well both of the collections
work together.  I think there are also a few pieces in it that I designed for
one or two of the Hush Hush (low volume) collections for Riley Blake.


I backed the quilt in the main print from Honey Locust called Gigi's Garden in the color Blush.
The binding is from Feels Like Home.  It's called Alpine Meadow in the color Rose.


Jen Ostler in Highland, Utah, quilted it for me.  This time, I let her pick the panto
which was a fun surprise!  I don't do that very often, haha.  But I love Jen, and I trusted her
to pick something I would like.  And she did not disappoint!   This panto is called Chip by Leisha Farnsworth, and I like that it added some curve to this very square/rectangular quilt.


Of course, I added one of my favorite labels from Ever Emblem.  They're so easy to sew into the binding so I don't have an excuse to not label my quilts!  I get the 2" cotton, fold-over, sew-in labels.
If you want to get some for yourself, you will just have to pick one of their
basic cotton labels and customize it from there.  I machine stitch my binding
down around it because it's hard to hand stitch through it).


I hand-bound the rest of the binding to the back of the quilt and that was nice to slow down for a bit.
Sometimes I forget how much I enjoy that process.


I love that this has a bit of a scrappy look to it.  Please don't be afraid to mix fabric
collections and use what you have!  It makes a quilt unique and oh, so charming, don't you think?!
This pattern is so versatile.  It will be great for any age, occasion, gender, and colorway!


If you would like to make your own Lulu quilt,
you can grab the paper pattern HERE.
Or the PDF pattern HERE.

I'd love to hear what you think about this very simple quilt!
Thanks for stopping by!

A Not-So-Scrappy Scrap Jar Stars Quilt

Thursday, November 6, 2025

 Hi friends!  I'm happy to share a recent quilt finish with you today!
I made this just for fun as I thought it would be beautiful in my own home.


Towards the end of August 2025, I got a wild hair to take one of my most popular patterns,
Scrap Jar Stars and make it not-so-scrappy!  I love two-color quilts and thought it would
be fun to see a simplified, timeless version it!


It was love at first block!  And it brings me so much joy every time I look this quilt because
all of the fabrics are fabrics I designed!  The background fabric is called Sketchy Leaves
in the color Linen from my Feels Like Home collection with Riley Blake Designs. 
The blue fabric is called Daisies in the color Sky from my collection Honey Locust
with RBD.


I got most of the quilt top put together at a quilt retreat that I went to in September.
(My friends and I did a photo shoot with all of our quilts on the last day of our retreat.)

I am not gonna lie, it's all I got done at the 5-day retreat (besides our daily walks,
chatting, floating a river, cooking and eating, shopping, a few naps, etc.  It was a GREAT retreat!)
I brought a bunch of other projects but unfortunately, this took the majority of the time.

I added the border once I got back home.


This pattern comes with 4 quilt-size options - baby, lap, twin, and queen.
I added on one row to the twin size to make it a little wider.


My friend Jen Ostler in Highland, Utah quilted it with straight lines.
Those are always a win in my book!


The backing fabric is also from my collection, Honey Locust with Riley Blake Designs.
It's called Hydrangeas in the color Sky.  I hand-bound it in the blue daisy fabric.


It had been a while since I've hand-bound a quilt and I thoroughly enjoyed doing it!


And per usual, I added one of the simple labels I get from Ever Emblem.  They're so easy to sew into the binding so I don't have an excuse to not label my quilts!  I get the 2" cotton, fold-over, sew-in labels.  If you want to get some for yourself, you will just have to pick one of their basic cotton labels and customize it from there.  I machine stitch my binding down around it because it's hard to hand stitch through it (but then I usually hand stitch the rest of my binding down to the back of my quilt).


I'm not sure where this quilt will "land".  On the back of a sofa, a chair, or on a bed?
But I know I will not regret having this timeless blue and "white" quilt in my home!
This one is definitely a keeper!


I want to give you the fabric requirements in case you want to make a two-color
version of Scrap Jar Stars.  First, you will need the pattern.  You can get the 
paper pattern HERE or the PDF pattern HERE.

All fabric requirements will stay the same, except that instead of using bright print fat quarters,
you will need:

Baby quilt = 1-1/2 yards of 1 accent color + the optional non-scrappy binding fabric
Lap quilt = 2-1/2 yards of 1 accent color + the optional non-scrappy binding fabric
Twin quilt = 2-7/8 yards of 1 accent color + the optional non-scrappy binding fabric
Queen quilt = 5-1/2 yards of 1 accent color + the optional non-scrappy binding fabric

Cutting will be a little different, so here are the number of 2" and 3-1/2" strips to cut for each quilt size:

Baby quilt = cut (8) 2" strips and (9) 3-1/2" strips
Lap quilt = cut (13) 2" strips and (15) 3-1/2" strips
Twin quilt = cut (16) 2" strips and (18) 3-1/2" strips
Queen quilt = cut (32) 2" strips and (36) 3-1/2" strips

Then cut the necessary squares for your chosen quilt size.


Hope that helps!  Let me know if you decide to make a two-color version!
Or even a scrappy version!  They're both so fun!  Who doesn't love stars and patchwork!?!

Happy quilting!


Honey Locust Ironing Board Cover

Sunday, June 8, 2025

 Now that my new fabric collection, Honey Locust, has shipped to stores, I am busy making all the things!  The first project I made was a quick one using the Echelons Cheater Print.


I whipped up a new ironing board cover (I know, I know, I just made one with my last cheater print), but I couldn't help myself!  It's such a quick project, and I thought these softer colors would go beautifully in my sewing room.

THIS is the tutorial I use to make ironing board covers.  I've shared it many times before.
It just takes an hour or so to make, and I often have all the supplies on hand.


It's such a sweet, happy print and oh so quilty, don't you think!!??


This little ironing board cover is bringing me a lot of joy right now.  


I also really love my Oliso iron.  I love the color, the weight, the heat, the long automatic shutoff feature, and the extra-long cord!  This is my second Oliso iron.  I had my first one for 7-10 years and knew I would be getting another one when the first one broke en route to a quilting retreat!


Anyways, if you're interested in making one of these covers too, I've got just the amount of this cheater fabric you need to make one just like it, listed in my Etsy shop HERE.


I would also love to make a quilt coat and a tote bag with this cheater print.
What would you make with it?

Honey Locust - My New Fabric Collection!

Friday, June 6, 2025

 About a year and a half ago, I began working on my newest fabric collection with Riley Blake Designs.  It's called Honey Locust, and I am happy to announce that it has finally shipped to stores! 

Honey Locust is an homage to my grandparents, who lived in a cute little house on Locust Avenue in Pleasant Grove, Utah, for many years.  Before that, they lived in Laie, Hawaii for 25 years.  My grandpa was a cowboy and a history professor.  My grandma was a quilter and a homemaker.  Their home in Pleasant Grove was on the historic registry, and it was full of learning and love (as well as lots of quilts and antiques!)  I have many memories of riding horses, learning skills such as quilting and canning, working alongside family while painting their picket fence, and singing songs while my grandpa played the guitar and taught us about our heritage.  We worked together and played together at that sweet little house on Locust Avenue, and I miss my grandparents dearly.


In this collection, you'll find cozy colors such as grove green, sky blue, berry pink, honeycomb yellow, lead navy blue, petal pink, saddle brown, and linen.  The names remind me of Pleasant Grove, picking cherries and grapes on my grandparents' property, Utah (the beehive state), my grandpa - the teacher and cowboy, and fresh linen sheets hanging on a clothesline. 

The large floral print (bottom fabric below) is called Gigi's Garden.
The grandkids called my grandma Gigi (she is the namesake of my company!)


There are 9 different prints plus one "cheater" print.
I'm kind of obsessed with the cheater print and want to make "all the things" with it!


The cheater print was inspired by a quilt I made several years ago (and that was inspired by several antique quilts I had seen around).  I kept meaning to write a pattern for the quilt, but it just never happened!  When it came time to design a cheater print for this collection, I knew I wanted to recreate the quilt on fabric!  I love that design, and I love that the blocks are even smaller than the ones in my quilt.  Everything is cuter when it's tiny, right!?


Honey Locust Rolie Polies, 5" Stackers, 10" Stackers, and Fat Quarter Bundles are available.


I hope you're seeing just how scrappy this collection is!
So many prints and colors!  It's been a blast to work with!


I've designed 3 new patterns to go along with Honey Locust.  First up is one of the first patterns I ever designed - with a major update!  I omitted some outdated appliqué and included one more size option.  It's called Square Root and it's 2-1/2" strip-friendly.


Next up is a row-style quilt called The Locust House Row Quilt.  Again, it was inspired by my grandparents' house.  My grandma also had a few row-style quilts that I admired greatly so I knew I wanted to design one for this collection.  It finishes at 62" x 81" and would make a great block of the month program for any shop!  Or a great scrap buster project if you want to make it on your own!


And finally, Checkered Spools.  In honor of my grandma, who taught me how to quilt!  It comes with instructions for two size options and is 2-1/2" strip-friendly!


I can't wait to share more with you soon!  I am busy making all the samples for these quilts (and more!) so stay tuned!  For the most up-to-date info, follow me on Instagram (@gigis_thimble) or check-out my Etsy shop for new patterns and fabric by clicking HERE.


I'd love to hear what you think of Honey Locust and the patterns I've designed to go along with it!
And if you really want to do me a favor, please tell your local fabric store about this collection!  I would appreciate that so much!  Let me know if you have any questions and thanks for stopping by today!

Sewing Machine Mat and Organizer Tutorial

Monday, March 10, 2025

 Hi friends!  Today I want to share a fun project I made for the Riley Blake Designs YouTube channel!  It's for a sewing machine mat that will keep your notions close by and organized during any sewing session, whether you're at home or away.


You've probably seen tutorials for these mats before but this one uses my Pineapple Block Cheater Print which is part of my Feels Like Home fabric collection with Riley Blake Designs.  Any cheater print would be cute for this project but you know I love Pineapple Blocks! This print features little 6" Pineapple Blocks so it has a big "wow" factor and would be cute in any sewing space.


Mine just so happens to match an ironing board cover that I made a few months ago. 
You can check that project out HERE!  It includes a link to the tutorial I use.  


The sewing mat has a large pocket on one side that is meant to hang off your sewing table.  You can customize the size of each compartment to hold all of your favorite notions. I especially love taking my mat to quilt retreats so that all of my notions stay in my own sewing space.  There's usually a lot going on at retreats and it's easy for things to get misplaced.


It also has ric rac on the side so you can roll it up for easy transport.
You could use some beautiful ribbon instead if you prefer.


Check out the YouTube video HERE for all the details.

Thanks for stopping by today.
Happy quilting!


Finished Uneven 9-Patch Quilt

Sunday, February 9, 2025

 Hello friends! On November 30th, I shared a free pattern (on my blog) for an Uneven 9-patch quilt and today, I want to share my finished quilt! (Click HERE for my original post about starting this project.)

I wanted to make a 2-color quilt for my king-size bed using these two fabrics I designed.  The cream fabric is called Seeing Stars for the Hush Hush 4 low-volume collection for Riley Blake Designs.  And the green fabric is called Sketchy Leaves for my Feels Like Home collection with RBD.


I worked on the quilt top throughout December 2024 and finished it right after Christmas.  It was fun working on something kind of festive in December but I love that the fabrics aren't Christmasy so they'll be great in my bedroom all year round!


It's a big quilt!  It finishes at 112" x 102".


I found this beautiful fabric for the back.  It's so classy and matched the green well.


My cute mom stopped by my house one day and helped me line up the backing pieces so the print matched up.  So glad we took the time to do that!  She is a really good seamstress so she showed me some good tricks!


Pretty darn good, right?!?  Thanks mom!!!


I had my quilter, Jen Ostler (in Highland, UT.) quilt it with a 1" grid pattern.  Grid quilting is always a favorite of mine; it's so timeless!  Jen did her signature move and quilted an extra little object into the quilting (in this case - a quilty star) which makes for a fun game of I-Spy!  Do you see the star below?


After I bound the quilt in the same green Sketchy Leaves fabric, I found some coordinating pillows to tie everything together.  I already had the artwork above my bed so I just pulled light green, natural, and gold colors from those prints to use as my pillow colors!  I got all of the pillows that you see here from a wonderful local shop called Layers Bedding.  It's at Gardner Village in West Jordan, Utah.  They add the perfect finishing touch and make my bed feel so cozy and inviting!


I love how the different sizes, colors, textures, shapes, and prints of the pillow fabrics add a lot of warmth to the room.  It took a lot of time to find the perfect combination but it was fun. The process was similar to doing a fabric pull for a quilt and I love that part of quilt-making!


If you want to make a quilt like this, you can download the free pattern HERE.
It includes instructions for 5 quilt-size options and would be cute in any colorway!


Have you ever made a 2-color quilt?  They're so classic; I just love them.
Tell me, what colors would you use if you made a quilt like this?