Showing posts with label scappy. Show all posts

Firework Quilt Tutorial

Saturday, July 1, 2023

Happy July friends!
Today I'm sharing another red, white, and blue quilt with you.
I just can't get enough of this summery, patriotic color combo!


I've been wanting to do something with the
 triangle cutoffs from my Glory quilt for a while now. 


So I used them to make 
3" finished Hourglass blocks.


And paired them with some coordinating 
solid squares that I cut from my stash.


I used 97 Hourglass blocks and 98 solid squares in this quilt.
I did a 13 x 15 layout so the finished size is 39-1/2" x 45 1/2".  
A nice baby-size quilt!  Are there any 4th of July babies out there?!?
I know a couple...


I had the backing fabric (leftover from another quilt back)
+ the binding fabric in my stash so I didn't buy anything
specifically for this project.  That always feels so good!


Jen Ostler in Highland, Utah quilted it for me.
She always quilts in an extra little motif for the
recipient to find; this time it was a heart.  So cute!
The panto Jen used is called Groovy Stars by Melissa Kelley.


If you want to make this baby-size quilt but don't have cutoffs 
from the Glory quilt, you will need:

Approximately 2-1/2 yards of red/blue scraps
1-1/2 yards of white fabric
1-1/2 yards of backing fabric
1/2 yard of binding fabric (cut five 2-1/2" x 40" strips)

To make (2) 3" finished Hourglass blocks, cut:
(1) red/blue 4-1/2" square and 
(1) white 4-1/2" square to make 

Here's a quick little step-by-step tutorial 
on how to make Hourglass blocks:

Step 1: Place (1) red/blue 4-1/2" square and (1) white 4-1/2" square on top of each other,
right sides together.  Mark a diagonal line on the top (white) square
going from corner to corner in both directions.  Sew 1/4" away
from one of those diagonal lines on both sides of the marked line.


Step 2: Cut through the squares on
both of the marked diagonal lines.


3.  Press the seam allowances toward the red/blue triangles
and then mix and match the units so two red/blue
triangles are opposite each other.  Sew the units together 
along the long edges (nesting the seams) to make
2 Hourglass blocks.


Step 4. Trim each block to 3-1/2".
(The center point of the block should be
the 1-3/4" mark on your ruler.)


Of course, you can make a 
Firework quilt as big or as small as you want.
Make as many Hourglass blocks as you need
for your desired quilt size.  

Click HERE if you want a Firework Quilt Coloring Sheet.
(There are extra squares on it if you want to make a bigger quilt!)


Also, if you're looking for more red, white, and blue
inspiration - check out THIS post featuring all 
the red, white, and blue quilts I've ever made!

What fun plans do you have in July?
We're going to Bear Lake at the end of the month.  Can't wait!

I hope you enjoyed this tutorial today.
Let me know if you have any questions and happy quilting!

Blossoms and Buds - Emily Belle Version

Sunday, March 5, 2023

 Good morning! 
I've been wanting to share this quilt with you
for a while now; I finished it back in 
September of 2022, I think.


I love this quilt because
A. It's a classic design
B. It's scrappy
C. It uses lots of my favorite fabrics from my stash
and
D. The Baptist Fan quilting gives it a very vintage vibe.

This is the original version:

It's the Blossoms and Buds 
pattern from my book,


It's amazing how different this
version looks compared to the orange version!


In the orange version
the background is scrappy and
in this version the background is all
one fabric.  They look so different!
Which one do you prefer
(and disregard the orange if that's not your thing)?


I've seen several different versions online
and they're all awesome.  There are
so many ways to make this pattern your own
depending on your colors and fabric placement.


The only fabric I bought specifically
for this project was the background fabric -
Emily Belle Liberty from Riley Blake
in the color, Magnolia (a soft, buttery yellow). 
Emily Belle comes in about 45
different colors so you could
pick the one that speaks to you!


And it's such a great stash buster!
Even the binding is scrappy!


Quilt the Rainbow gives instructions
on how to make a scrappy binding
or scrappy quilt back!
There are lots of useful nuggets of 
information in it, besides the 10
versatile quilt patterns.
You can grab the book HERE.


I had this wild backing fabric in my stash
just waiting for the perfect project!
It's called Cameo by Kaffe Fassett.
It incorporated so many of the colors I used
for the quilt front so I thought
it would give this simple quilt just
the "wow factor" it needed.


I like to label my quilts with labels from Everemblem.
I get the 2" cotton, fold-over, sew-in labels.
If you go to their site, you'll have to pick a cotton label 
and customize it from there.  They're so convenient.
Now I don't have an excuse to not label my quilts!


Jen Ostler of Dry Creek Quilting
in Highland, UT quilted it with this
classic Baptist Fan pattern.  There are many different
Baptist Fan pantographs out there but I love this particular
one because it's so traditional.  It's the
pantograph and I've used it many times!


Before I let you go, I just want to remind you
about the 2023 Quilt the Rainbow Challenge.
If you make any quilt (in any size and colorway)
from the Quilt the Rainbow book and 
post it on Instagram with the hashtag
#quilttherainbowchallenge
you could be entered to win some fabulous
prizes!  I'm giving away prizes quarterly
and you can enter as many times as you'd like!
All the details are in THIS blog post.


Well, I hope I answered any questions
you might have but if not, be sure to drop them in the
comment section below.  I love any interaction with you!
Thank you for stopping by today!

Stash Hash (a new pattern)

Wednesday, June 24, 2020

Good morning friends!
 Today I'd like to introduce to you my new pattern called Stash Hash!


I made the first star back in February 2019!  I had no plan for it.  I just knew I wanted to
make pretty stars to use up scraps.  One star turned into two, then three, then the quarantine 
happened and bam!  I had lots of sewing time on my hands and decided to finish what I started!


I had a blast making each star.  It was fun pulling from my scraps and stash 
to see each different colored star come together.  Scrappy, stars and low volumes are 
some of my favorite things so it was just a delight to make this quilt.


I paired the stars with the alternate blocks that I'm calling "Hashtag" blocks.
I liked the subtle secondary design they create when next to the stars.
(Which you might be able to see better if the background was a solid white.  Scroll down 
to the digital picture of the quilt and squint your eyes.  Do you see a kind-of circular, 
orange peel-type design around the Hashtag Blocks?)


Anyways, this fun quilting design is called Crosshatched Clamshells by Intelligent Quilting.
Cathy Barney in Alpine, UT did the quilting and I just love the way it turned out!
Have I told you how much I absolutely adore crosshatching?
I thought this was a fun, funky spin on crosshatching and it had a little bit of 
a "rainbow" vibe which excited me because of the rainbow colors I used in the quilt. 


One of the best things about this quilt is that I didn't have to buy a single fabric
for it!  I had everything in my stash including this striped binding.
For the back, I just pieced a bunch of aqua and teal remnants together so that felt
great to use up those leftover pieces in my stash!


This pattern comes with instructions for 3 different quilt sizes -
Lap (48 1/2" x 48 1/2")
Throw (64 1/2" x 80 1/2")
Full (80 1/2" x 80 1/2")

It's stash/scrap or precut friendly!
I wrote it to use 1 background fabric but made a note that you
could use lots of low volumes (like I did) for extra scrappiness!
I love the extra scrappy look but it definitely takes more time
 so I wanted to provide the easier option in the pattern.


Stash Hash is now available in my Etsy shop as a PDF (click HERE).
The paper pattern will be available very soon!

And guess what! I am planning a quilt-along for Stash Hash starting in July 
(details coming next week).  I'd love for you to join me as I'm dying to make 
another version asap.  I think I'll be doing a Christmas version.
What colors or fabric line would YOU like to see or make this in?


Rainbow 4-Patch Baby Quilt

Friday, June 7, 2019

 Hi friends!  It's been a minute and I've been meaning to share a few quilts that I finished a while ago.
Today I want to share a fun, little baby quilt I made that is a little out of the norm for me.  


Back in October, I participated in a block swap for these low-volume/bright 4-Patches.
The individual squares were cut at 3" to make 5" (finished) 4-Patches.


A swap for 4-Patches was really fun to participate in because 
they're so quick and easy to make but there are so many possibilities 
of what you can do with them!


I ended up putting four like-colored 4-Patches together to make one big block.  
Then I sewed them together in a rainbow fashion with 1-1/2" (cut) low-volume 
sashing strips between.  I then added a 2" (cut) low-volume border that's different on each side.


Here's a little sneak peek of the back; a navy blue buffalo check fabric that I had in my stash.
I love it!  And I love my little helper!


Denae Hansen of Plain Jain Quilting in American Fork, Utah quilted it for me 
with a geometric triangle pattern to go along with the modern feel of this quilt!  
It was a new-to-me pattern and I really like the way it turned out!


One of my favorite parts of this quilt is the scrappy rainbow binding!
It wasn't too hard to get the colors of the binding to coordinate with the colors of the 
blocks and I think it adds a fun finishing touch!


I love that these blocks came from a swap; instant variety in color and print!

Also, are you thinking what I'm thinking?
This would be a great stash buster quilt! 


Well, I hope you found some inspiration here today.
Did I make you want to whip up some 4-Patches?  Or maybe make a rainbow quilt?
Or try a scrappy, rainbow binding?

It feels so good to do something different once in a while.
Tell me, what is the most recent thing you've done recently that was out of your "box"?
Leave a comment below!

How to Pick Fabrics for a Scrappy Quilt

Friday, March 11, 2016

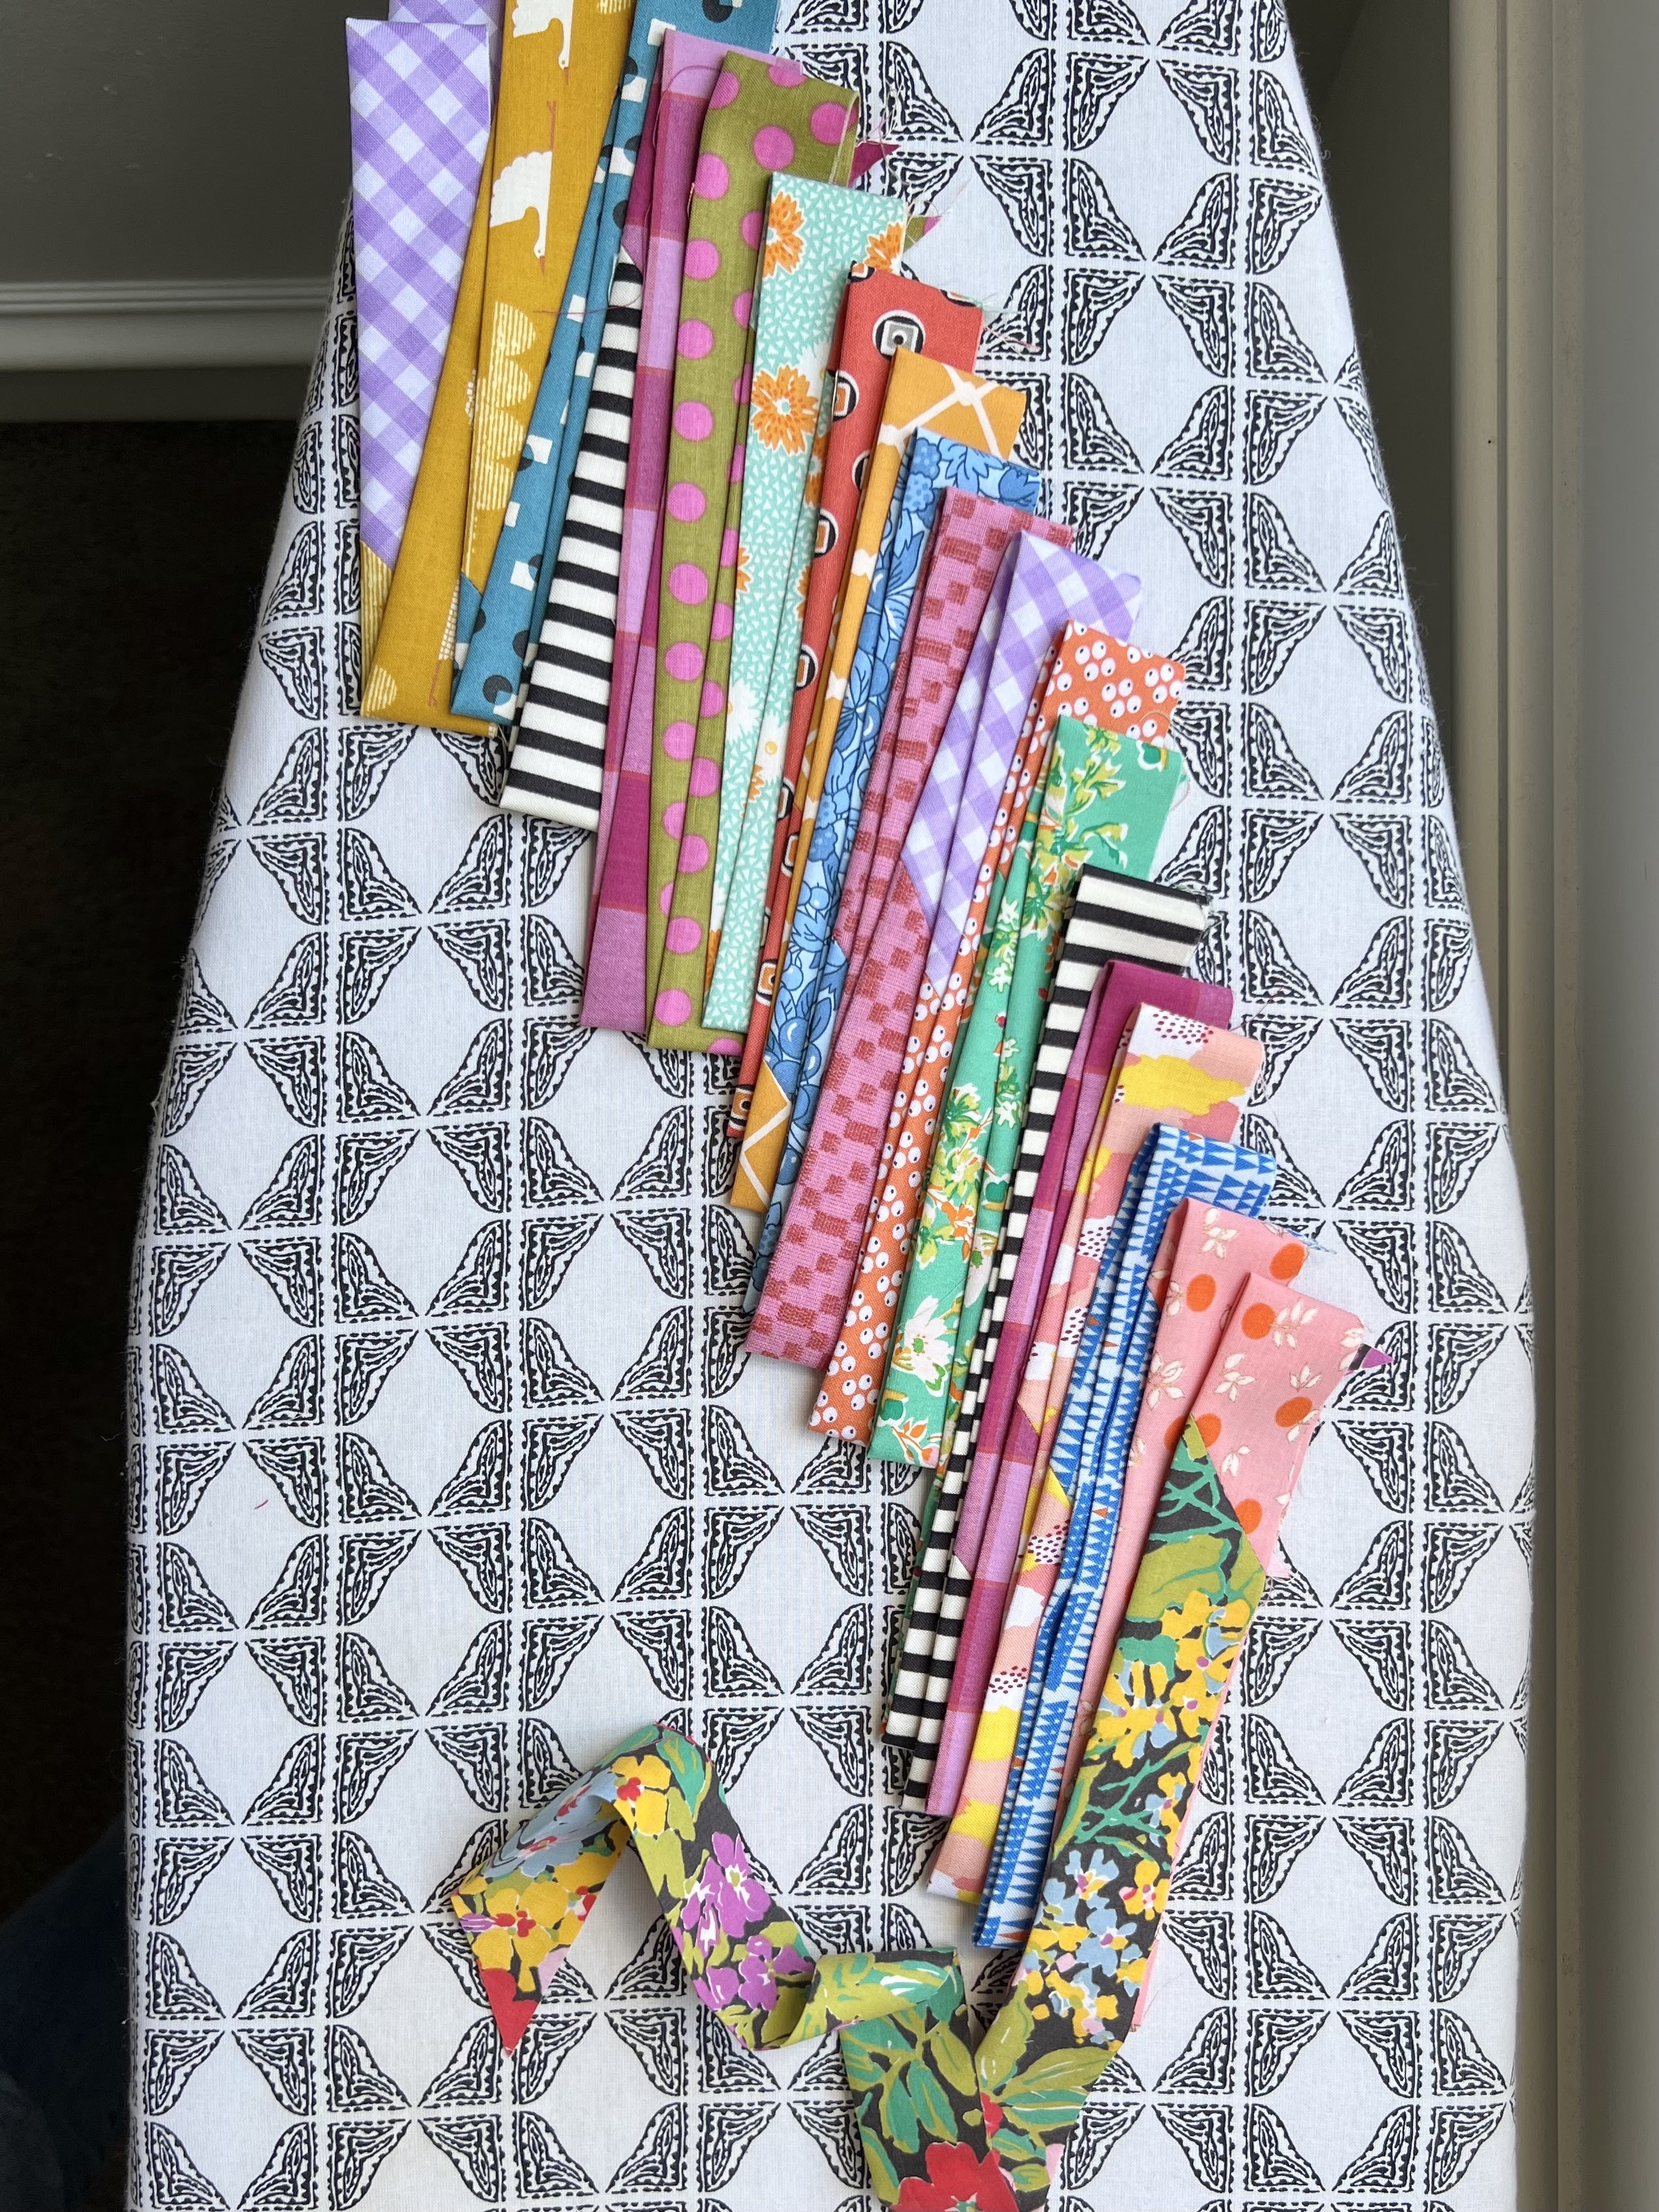
I recently posted this photo on Instagram of a fabric pull I did for a scrappy, new quilt pattern I'm designing.  As you probably already know, I love scrappy quilts.  I love the vintagy feel they have!  I have so much fun picking out fabrics and trying new color combinations.  But I know for some of you, it can be overwhelming to pick out fabrics starting from scratch.  


I had a follower on Instagram leave me a comment after I posted the photo, saying, "I wish someone would go through this process with me...I take forever and ever to pick my fabric!  It's just all so pretty I can't decide and it feels like I waste a lot of time."

I don't want it to be a stressful or time-consuming thing for you! 

I love talking about the "whys" behind fabric selection and if you're one of those people that is overwhelmed with the fabric picking process then this post is for you!  Here are some tips that will hopefully help to make it an enjoyable process for you in the future.


Tip #1:  Figure out a basic color scheme.  Sometimes I base mine off a photo I've seen, some artwork, an article of clothing, or another quilt that I like.  Whatever.  Just pick a color scheme and start pulling fabrics (you can always eliminate some later if you want to).
As you can see (above), I wanted to use reds, blues and greens, with a tiny pop of yellow.  Note that there is no rule that says you have to have an equal number of fabrics of each color.  The little bits of yellow will be used as a little surprise here and there...a little something unexpected.


Tip #2: I think it's always nice to have a lot of different "values" of each color.  The term, "Color Value" is also known as "lightness", "tone" or a "color space's brightness".  In the photo above, I've got whites with just a little red on them, light reds and bright reds.  


Tip #3: Choose a variety of different types and sizes of prints.  On the left (above) I have some small to medium sized prints - most of which have lots of movement.  On the right, I have two fabrics that will add a nice "pop". They're also known as "zingers".  They're very graphic and their scale is on the larger side.  Note, that a zinger can also add "pop" through it's color - it doesn't always have to be graphic.  It's nice to have a few zingers in a quilt.


Geometrics, text and dots are some of my favorite "go-to" prints.


 Florals are a must as well (and offer good movement).  Notice the different scales in the four florals above.


A few solids (at least) are always nice to throw in.  They give your eye a place to rest and break up all the busyness.  Can you spy the two different blue solids in the photo above?  


Repeat, choosing different values, prints, and scales in each color. 


Since I only have a few yellows, I tried to get a nice variety of prints, scales and value.  I chose a large-scaled floral, a geometric, and a light-valued yellow that has lots of movement.


And last but not least I have some greys, neutrals and low volume prints.
The term "Low-Volume" refers to fabrics that have a light value and low contrast.  There is a spectrum of what is considered "low-volume" and in my opinion, the one or two fabrics on the right are pushing it.  But all of these neutrals will break up the monotony of my color scheme.


Now, these are just the fabrics I pulled for my quilt.  These are what I like.  I obviously like a lot of text, geometrics, etc.  I also used some of my favorite vintagy prints + some new japanese prints, so I'm excited.  

Tip #4: Repeat fabrics throughout your quilt.  This will help create balance as your eye recognizes specific colors and prints.  Almost every print of mine will be used in the quilt 5-6 times (can't wait to show you a picture of the finished quilt!!!)


Tip #5: Don't stress too much about whether a fabric matches or not!  If you can't tell with in a second or two that a fabric "clashes" then it's fine!!!  You don't need to stew too much about each and every fabric!

My friend (and neighbor!) Calli Taylor from the blog, Make It Do, makes the most beautiful, scrappy quilts. I am seriously in awe of her knack for picking fabrics! Her motto, is that "you always need a few 'ugly or off-colored fabrics' in a quilt to make the pretty fabrics shine.  It adds character and dimension to a quilt!"  Calli says that those "ugly" fabrics are ones that she still likes - but that other people might consider ugly.

And finally, Tip #6: Use what you love!  
As I was considering what I might say in this post, I came across a picture of a quilt my sister-in-law posted on Instagram recently.  Her name is Brittany (IG username is @bmariedavis).  I love her style.  Like, really, really, love her scrappy style.  I always have.  She is another quilter who completely inspires me!  She just finished making a larger version of my Sugar and Spice pattern, with a few tweaks regarding color placement (pattern available in my Etsy shop). 


Brittany said on her post caption, "I gave myself no restrictions.  If I liked the fabric and it made me happy, it went in this quilt.  I really wanted it to look like my grandma made it years ago, so I just had fun with it."

I think she achieved that look.  And that's what I love about vintage and vintage-inspired quilts!  They're just so one-of-a-kind, full of character and depth.  They're unique and interesting and lovely.

After I saw Brittany's post and read her caption, I went back to my stack of fabrics for my upcoming pattern.  I took out one fabric I didn't love and threw in this fun stripe!  I think it will add a lot of interest and whimsy to my quilt!


I hope you all feel inspired now to make a scrappy quilt.  I hope these tips have helped you.  Don't stress about it.  Have fun with it and enjoy the process!

Happy quilting!
~ Amber