Showing posts with label fabric tour. Show all posts

Oh What Fun Fabric Tour

Monday, June 19, 2023

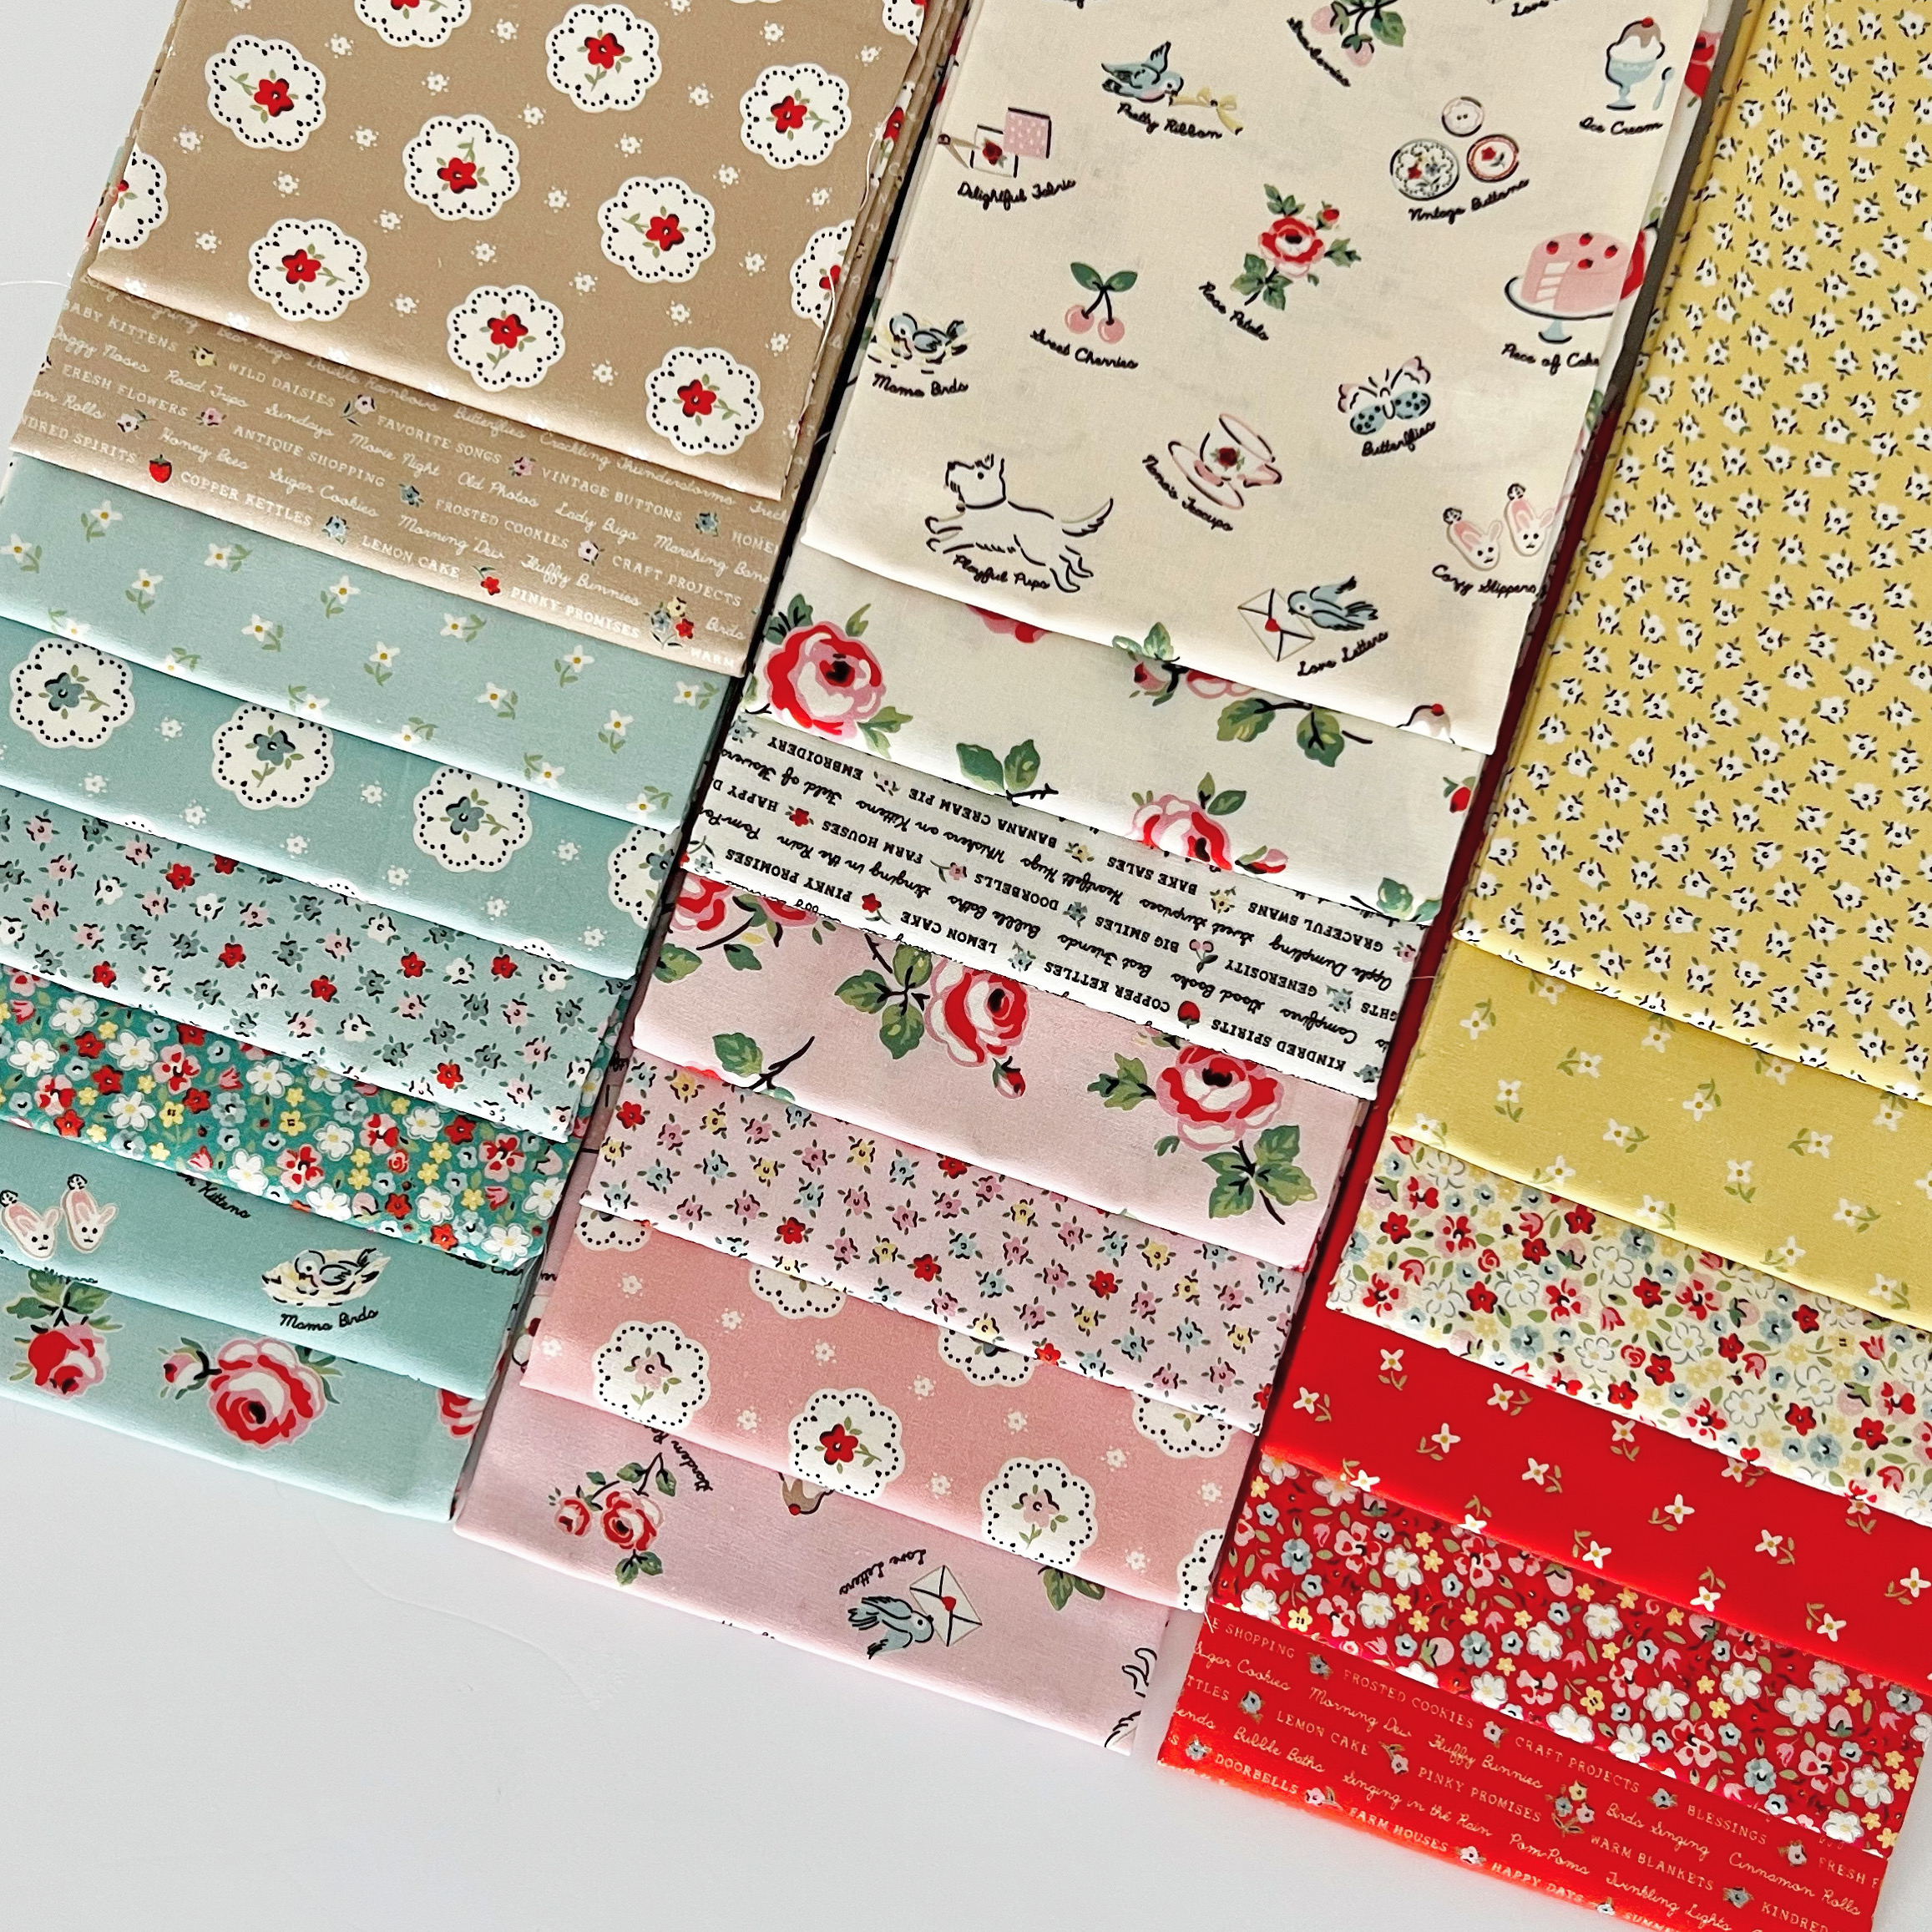
The day is finally here that I get to share the project I made with the
darling fabric line, Oh What Fun by Elea Lutz for Poppie Cotton.


 I first saw this line at the 2023 International Fall Quilt Market.
I was immediately smitten with Elea's signature
vintage style, the unique color palette, and the 
fun details of this fabric line.


Oh What Fun features Santas, snowflakes and text, polka dots,
plaid, stockings, Christmas trees, snowmen, flowers and holly, and my personal
favorite...ice skating reindeer.  It's just so whimsical and sweet.
I thoroughly enjoyed working with this line.


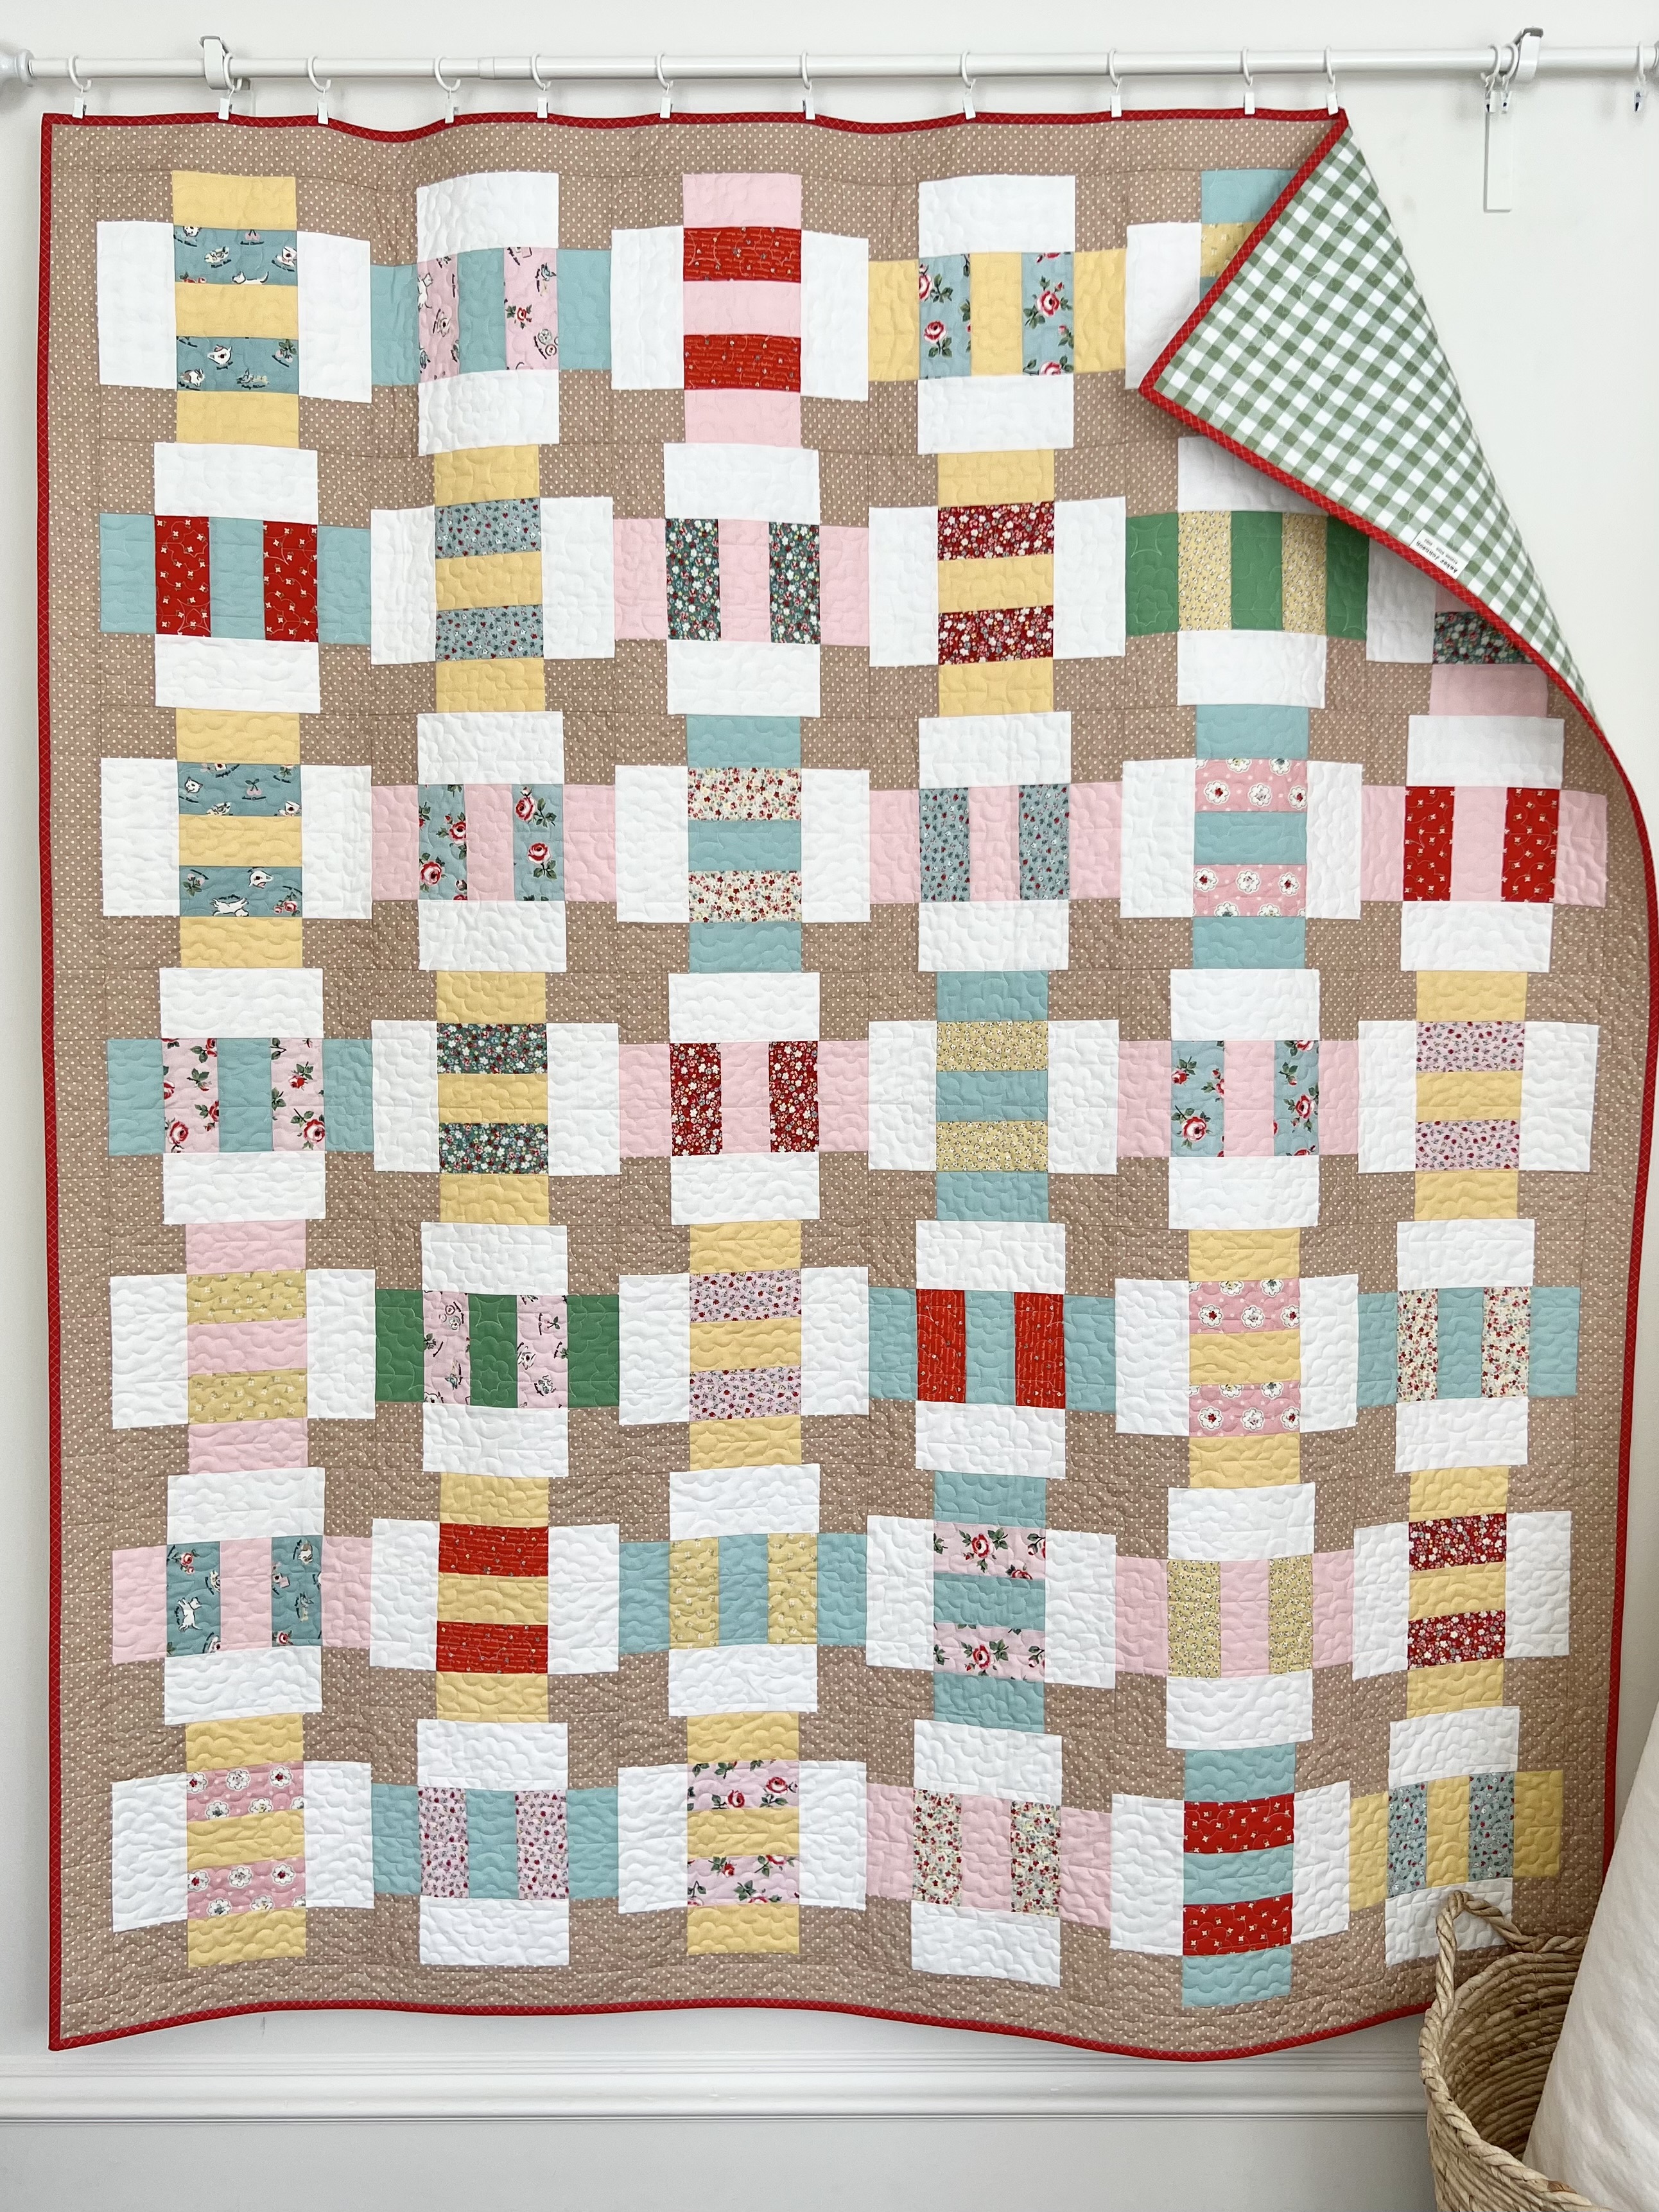
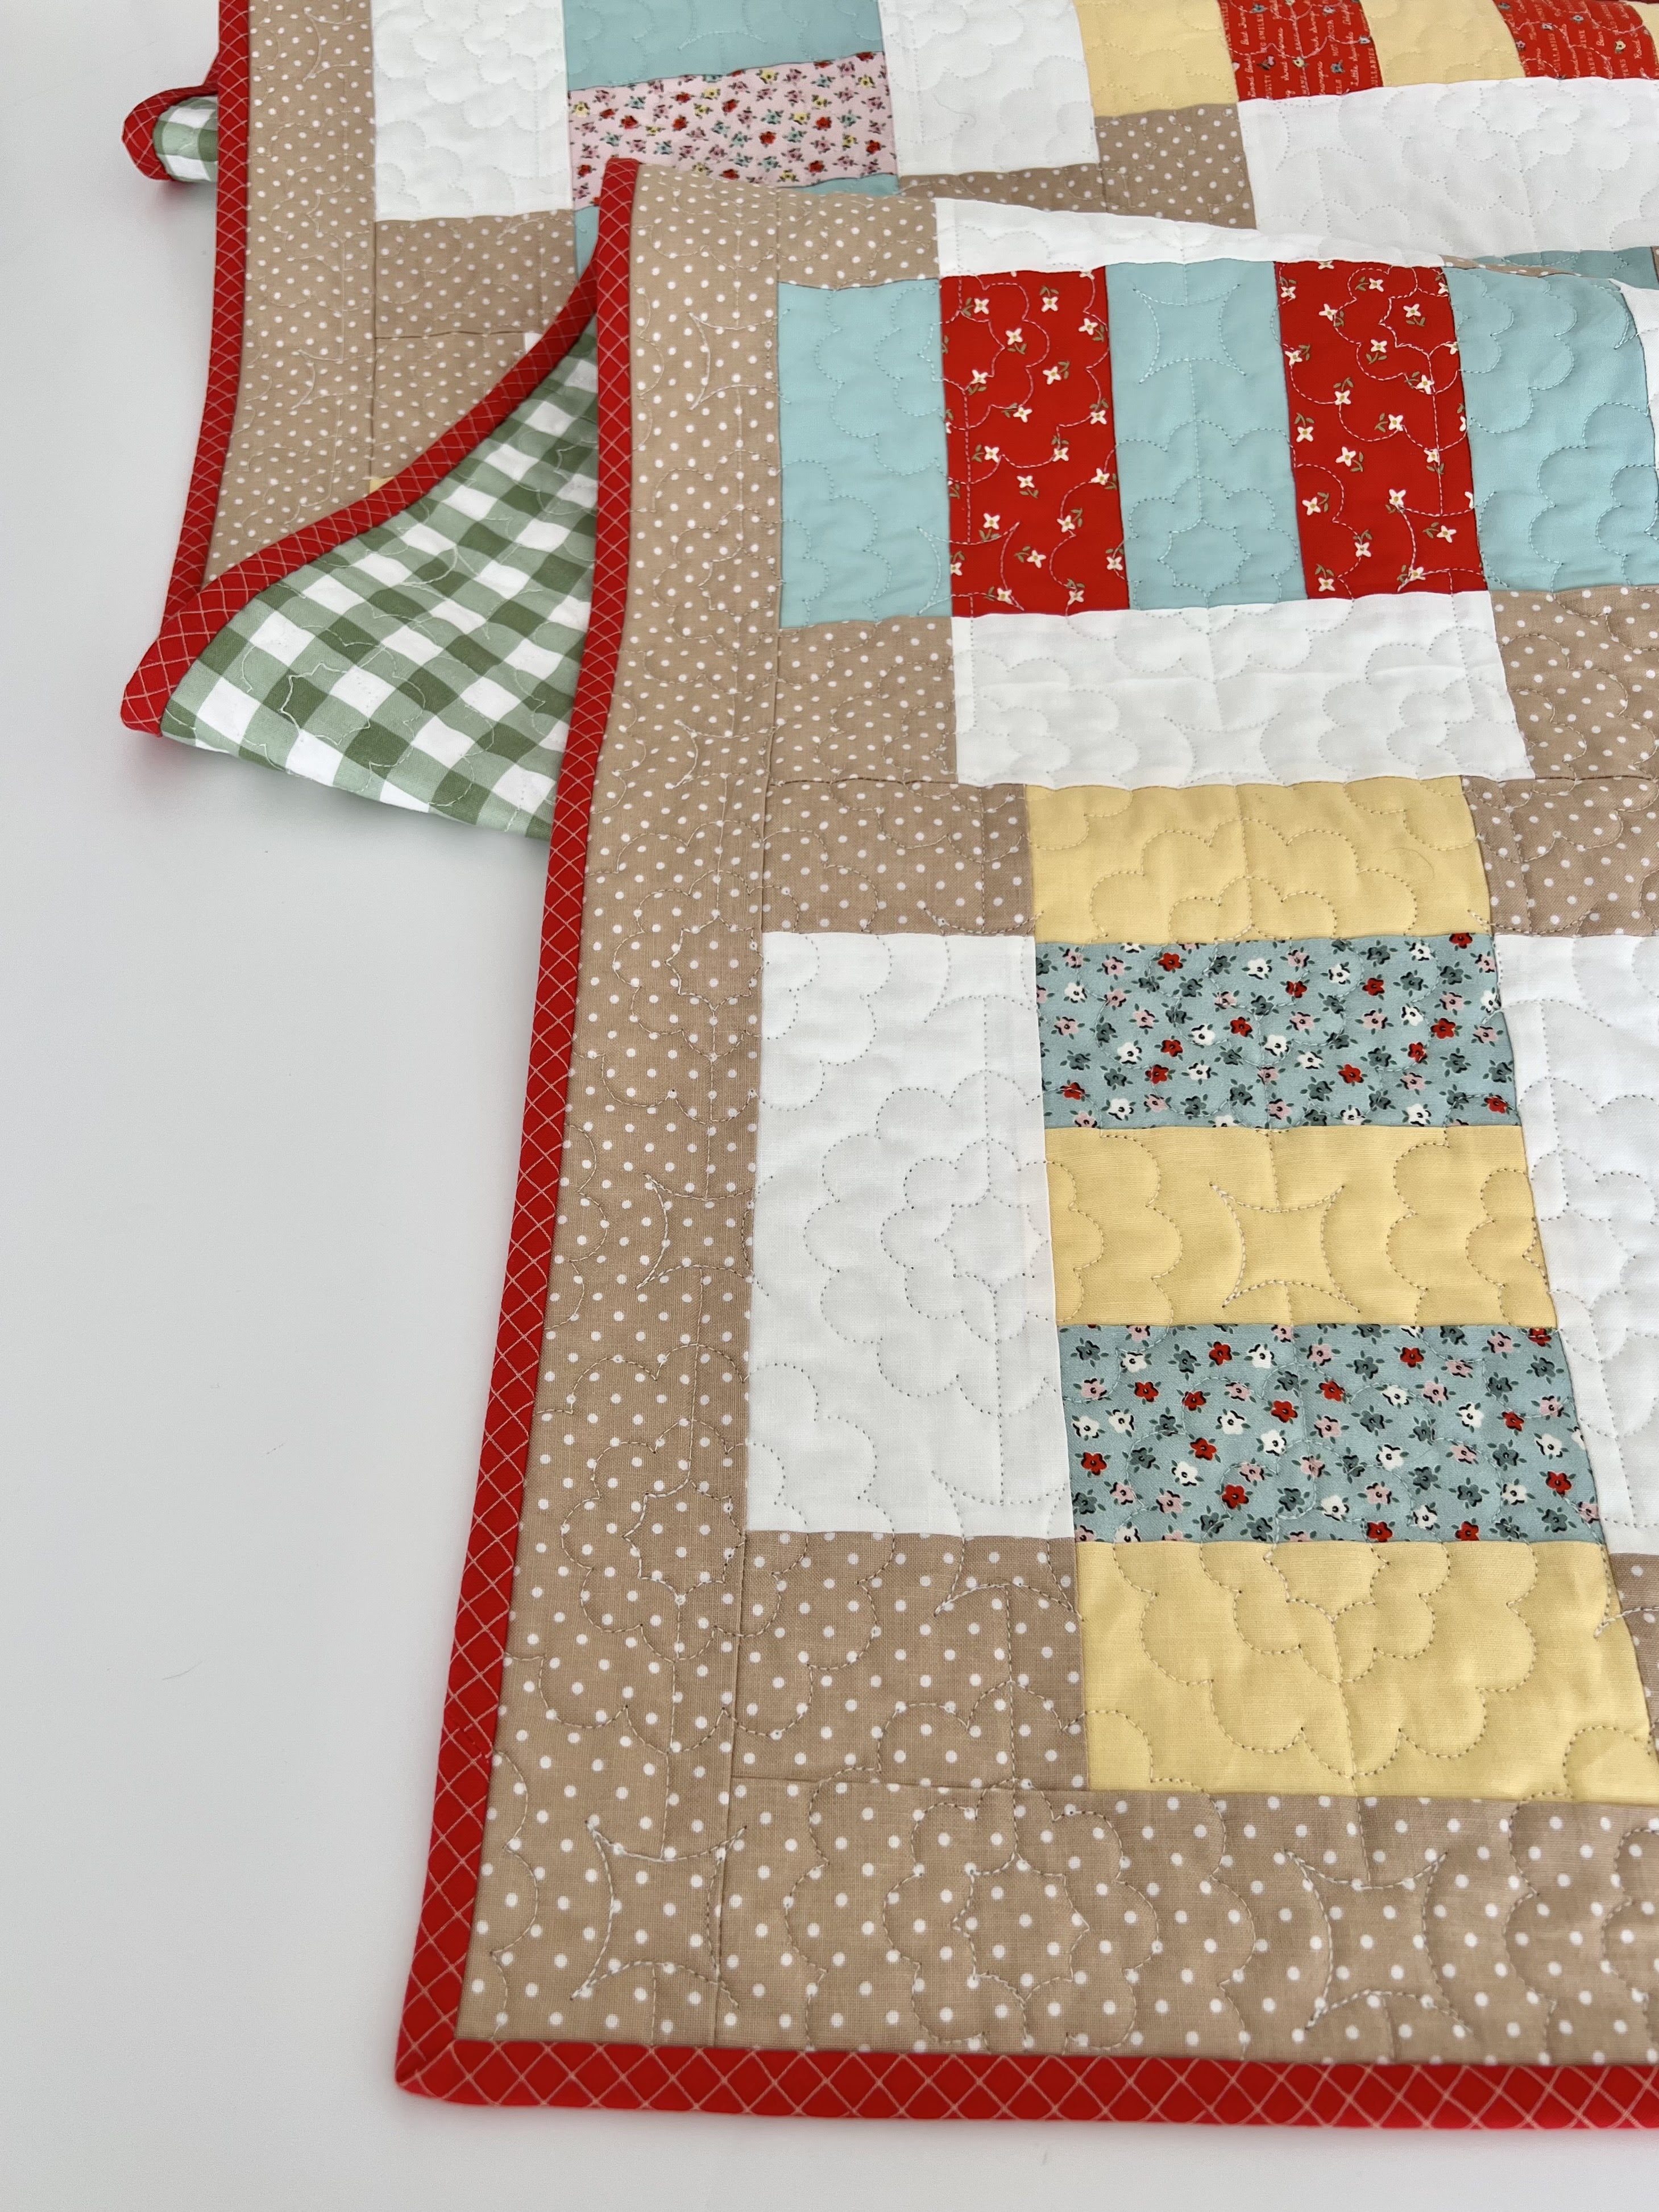
I chose to make a quilt using the Patchwork Plaid pattern from my book,
Quilt the Rainbow.  I wanted to see it in another colorway
besides blue and white.  I think Christmas fabrics were the 
perfect match for that pattern.


I paired the Oh What Fun fabrics with a dark blue chambray
fabric that I had in my stash and a white with red polka dot fabric by
Lori Holt for Riley Blake.


Jen Ostler in Highland, Utah quilted it for me
with a fun loop and snowflake design.  It's called
Snowflake Meander.  Jen always hides an extra little 
shape in the quilting for its recipient to find.
This time it was a tiny star - so cute!


There are 3 different Plus blocks in Patchwork Plaid.
It finishes at 70-1/2" x 90-1/2" and would be cute in any colorway!


I backed it in a navy blue plaid fabric and bound it with 
the red Good Measure grid fabric from my fabric line, 
Treasured Treads with Poppie Cotton.


Oh What Fun is now in stores.
Grab a fat-quarter bundle and my book, Quilt the Rainbow
so you can make this quilt too.


Congratulations to Elea for another fabulous
fabric line!  I just love everything she creates
and am so happy I got to be a part of this tour!

To see some more Oh What Fun projects
check out these other makers on the tour:

Friday, June 2 http://prettybyhand.com/
Monday, June 5 http://neverlandstitches.blogspot.com/
Wednesday, June 7      http://www.abrightcorner.com/
Friday, June 9         https://bretquiltdesigns.com/
Monday, June 12     https://www.sewmariana.com/
Wednesday, June 14 https://verityvintagestudio.typepad.com/my-blog/
Friday, June 16     Website: http://blueribbondesigns.com
Monday, June 19 http://www.gigisthimble.com/
Wednesday, June 21 theredfeedsack.blogspot.com
Friday, June 23     https://www.nannygoatquilts.com/
Monday, June 26     http://www.linenbouquet.com
Wednesday, June 28 www.cardinalcreekquilting.com
Friday, June 30     Instagram: @emmas_crafternoons

Thanks for stopping by today!

Kitty Loves Candy Fabric

Wednesday, May 24, 2023

 I fell in love with this new fabric line,
Kitty Loves Candy by Poppie Cotton
the moment I saw swatches of it at the
International Quilt Market last fall.


It has such a fun, unique color palette for Halloween and the prints are
sweet and whimsical.  There are so many fun details like Candy the witch, 
barns, chickens, kittens + pumpkins, pigs, stars, florals, and ginghams.  It's just darling!


I decided to use some Kitty Loves Candy fat quarters to remake
my Cross Stitch pattern.


It's a Layer Cake friendly pattern
and the quilt finishes at 62" x 81".
A nice throw/twin-size quilt!


The blocks are big - a great way to show off those cute prints!


And the scrappy binding is a fun way to finish off the quilt.
(I really can't decide which print is my favorite!)


You can snag the Cross Stitch pattern in my shop HERE.


Who said Halloween has to be dark and scary!?!
I love these bright, happy prints and can't wait to snuggle
under this fun quilt come October.

Thank you to Poppie Cotton for asking me to participate
in this fabric tour and for the darling fat quarter bundle!

Want to see more Kitty Loves Candy?
Visit the other stops on the fabric tour:

Wednesday, May 10 http://blueribbondesigns.com
Friday, May 12     http://neverlandstitches.blogspot.com/
Monday, May 15 https://www.cardinalcreekquilting.com
Wednesday, May 17     https://amerooniedesigns.com/
Friday, May 19     https://charismascorner.com/category/blog/
Monday, May 22  http://theredfeedsack.blogspot.com
Wednesday, May 24 http://www.gigisthimble.com/
Friday, May 26     https://bretquiltdesigns.com/
Monday, May 29 https://www.sewmariana.com/

My Favorite Things Fabric Tour

Monday, March 27, 2023

I have been a fan of Elea Lutz' designs since I first discovered her in 2015.  
Her first fabric line was Milk, Sugar, and Flower (which was absolutely adorable; 
I'm sad I missed out on it!)  However, I did end up making a 
Christmas quilt with her second fabric line, Little Joys.


 Today I get to share some projects I made with her
most recent fabric line, My Favorite Things.  It has that 
sweet, vintage style that Elea is known for.  And she is now a designer for 
Poppie Cotton which I think is a match made in heaven!


As you can see the line is full of soft pinks, blues, buttery yellows, creamy whites
and tans...with a little pop of red!  Such a cute color palette!  There are lots of 
different florals in various scales and one of my favorite things - text prints!  
But the main print features many of Elea's favorite
things (which I'm sure most of us can relate to.)  See THIS post
on Elea's blog for more pictures, the inspiration behind this collection, 
the darling coordinating cheater print, and a free mini
quilt pattern that Elea is offering to members of her new Facebook group. 


The first project I made with My Favorite Things
was a throw-size version of my Rough and Tumble pattern.
It comes with instructions for 5 different sizes!


I had so much fun playing with 5" squares of
My Favorite Things + a few solid fabrics 
and a tan with a white dot background fabric.


I love this pattern because the blocks go together really quickly
and there is no sashing!  So it's a very fast make, overall.
I bound it with the red Good Measure grid fabric from my fabric line, 
Treasured Treads with Poppie Cotton and backed it in a
large green gingham fabric from Riley Blake.


My friend, Jen Ostler in Highland, UT quilted it for me.
She did a fantastic job, as always!  The quilting pantograph 
she used is called Fluffy Lumps.  It's a new-to-me design
that I thought complimented the scalloped/floral print in 
My Favorite Things really well!  She also quilted a tiny heart 
on the quilt for me to find - in a little game of quilters' hide and seek.  
Can you see it?


I just couldn't get enough of My Favorite Things so I decided
to make one more project with the remaining fabric I had.  But don't
worry, it was a super fast baby quilt that just takes a couple of hours to put together.


I've had many requests for this pattern called, Big Baby.
It was originally in my book, Vintage Vibe
but it's out of print now so I decided to make Big
Baby into an individual pattern which you can find in my shop, HERE.


The pantograph is called Cartwheels and the quilt finishes at 38" square.
It's a big-block baby quilt version of my Scrap Jar Stars pattern.
It goes together so fast and looks cute in any colorway!
Perfect for gift-giving!

I love this fabric line and am so thankful that I got to be a part of
the My Favorite Things Fabric Tour.  My Favorite Things is in stores now
so be sure to run out and grab some before it's all gone!

Gingham Farmhouse Fabric Tour + Tutorial and Giveaway!

Thursday, November 14, 2019

I've been waiting for this day for weeks now!
It's my stop on the Gingham Farmhouse Fabric Tour and guys, I absolutely LOVE 
this fabric line by Poppie Cotton!


It's full of florals, orange peels, houses (not shown here), gingham and gingham BUNNIES!!!  I mean, can you even!?!  All things I love in soft, beautiful colors!  But I especially love the navy!  


Gingham Farmhouse also includes the sweetest alphabet panel that you ever did see.  
It's available in 3 different colorways!


I couldn't resist making a little something from the panel and a "HOME" pillow seemed to be the perfect thing.  Click HERE for the tutorial! 


I also made a quilt!


The pattern is called Sugar from my book, Vintage Vibe.
(Click HERE to get an autographed copy.  
It's on sale right now for $14.99 for 14 project patterns!)


Sugar calls for 8 fat quarters for the blocks but I used 18 and made it really scrappy!


It finishes at 64" x 80".


I had my quilter, Cathy Barney in Alpine, Utah do an orange peel edge-to-edge design on it.
It's one I hadn't used before and I love the way it turned out!


Look at that texture!


I finished this quilt off with a scrappy binding.  
I think it adds a fun touch and is a great way to use up fabric from the line.  
Do you ever do scrappy bindings?  They're my fave!


I want to share the love of Poppie Cotton with you
so today I am giving away 2 darling Gingham Farmhouse 
panels with coordinating house print fat quarters! 
You can make a pillow (like mine!) using THIS tutorial 
or you can incorporate these letters and numbers into a quilt.  
There are so many possibilities!

Two lucky winners will be chosen.
Just leave a comment below telling me what you love about your home.
I will announce the winners next Wednesday, November 20th here on the blog.


Thank you for stopping by today!
Be sure to visit the other blogs for more Gingham Farmhouse inspiration!


Gingham Farmhouse HOME Pillow Tutorial

As part of the Gingham Farmhouse Fabric Tour, 


and a sweet little pillow using the Rosy Monogram in Navy from Gingham Farmhouse by Poppie Cotton.  Today I would like to share a tutorial for the pillow!  It's a fun project you could easily get done in a day!


Materials you will need:
1 Rosy Monogram panel in Navy from Gingham Farmhouse by Poppie Cotton
2.5" x 10" strip of pink dot fabric (I used a scrap from my stash) - star
2.5" x 10" strip of white fabric (Peony Roses Basic from Gingham Farmhouse by P.C.) - star
2.5" x 18" strip of navy fabric (Wedding Ring Navy from Gingham Farmhouse by P.C.) - star block
1.5" x 40" strip of white fabric (Peony Roses Basic from Gingham Farmhouse by P.C.) - inner border
2.5" x 40" strip of navy fabric (Lattice Navy from Gingham Farmhouse by P.C.) - outer border
9" x 15" piece of navy fabric (Vintage Roses Navy from Gingham Farmhouse by P.C.) - back 
9" x 15" piece of batting
pillow stuffing

To make the star, cut:
4 navy squares, 2"
4 navy squares, 1 3/8"
4 pink dot squares, 2"
4 white squares, 2"


1. Draw a diagonal line from corner to corner on the wrong side of the 
4 navy 2" squares and 2 of the white 2" squares
2. Pair up a navy 2" square with a pink dot 2" square, right sides together.
3. Sew on both sides of the drawn line using a 1/4" seam allowance.
4. Cut on the drawn line to make 2 half-square triangles. 
5. Press the seam allowances open. 
6. Square up both half-square triangles to 1 3/8" x 1 3/8". 
7. Repeat steps 2 - 6 to make 2 more navy/pink half-square triangles.
8. Repeat steps 2-6 to make 4 navy/white half-square triangles.
9. Repeat steps 2-6 to make 4 pink/white half-square triangles.
10. Sew the half-square triangles and 4 navy 1 3/8" squares together into rows according to the photo above.  
Press the seam allowances open.
11. Sew the rows together and press the seam allowances open.  
The star block should measure 4" x 4".

(Sorry not a lot of pictures through that process! 
See my "How to Square Up Half -Square Triangles Tutorial"
for more tips and photos, if needed.)


To make the "HOME" block:

1. Carefully cut the "H", "M" and "E" letters from the panel.  Use the width of each letter - to the dashed cutting line.  Cut the height of each letter to 4" (which is slightly smaller than the given allowance).

2. Sew the 3 letters and the star block together.  Press the seam allowances away from the star block. 


Add the borders:

1. For the inner border, cut 2 white strips, 7/8" x 4".  Sew the strips to the sides of the "HOME" block.  Press the seam allowances toward the border.  Cut 2 white strips, 7/8" x 10 3/4".  Sew the strips to the top and bottom of the "HOME" block.  Press the seam allowances toward the border.

2. For the outer border, cut 2 navy strips, 2" x 4 5/8".  Sew the strips to the sides of the "HOME" block.  Press the seam allowances toward the border.  Cut 2 navy strips, 2" x 13 3/4".  Sew the strips to the top and bottom of the "HOME" block.  Press the seam allowances toward the outer border.   

3. Square up.  I trimmed my outer border to 1 5/8" wide all the way around.


Quilt as desired:

1. Layer the pillow top with batting (pillow top facing up).  Pin in place several times to secure.

2. Quilt as desired.  I just went around the inside of the star with a 1/8" seam allowance, as well as, in the ditch of the seam between the inner border and outer border.  Very simple but I think it was enough.

3. Trim excess batting.


Assemble the Pillow:

1. Cut the navy fabric for the back the same size as the quilted pillow top.  

2. Layer the quilted pillow top and back piece, right sides together.

3. Pin the layers together around the perimeter. 


4. Sew around the perimeter using a 1/4" seam allowance.  Leave a 2" opening at the bottom.


5. Clip the corners off to eliminate bulk.  Be careful not to clip the stitches.


6. Turn the pillow right side out.  Poke the corners out with a blunt object. 


7. Press the opening to ensure the 1/4" seam allowance.


8. Stuff the pillow to your desired liking


9. Hand sew the opening closed with a whip stitch and coordinating navy thread.


I hope you enjoyed this tutorial! 
Let me know if you decide to make the pillow.  
Gingham Farmhouse is in stores now so hurry and get yourself 
a fat quarter of the panel so you too, can make this sweet little pillow. 

Here are a few places I found that carry this panel...


To see my coordinating quilt using Gingham Farmhouse by Poppie Cotton click HERE.

Thanks for stopping by today!