Showing posts with label Irish Chain QAL. Show all posts

Finished Irish Chain Quilt + Printable Instructions

Wednesday, March 4, 2020

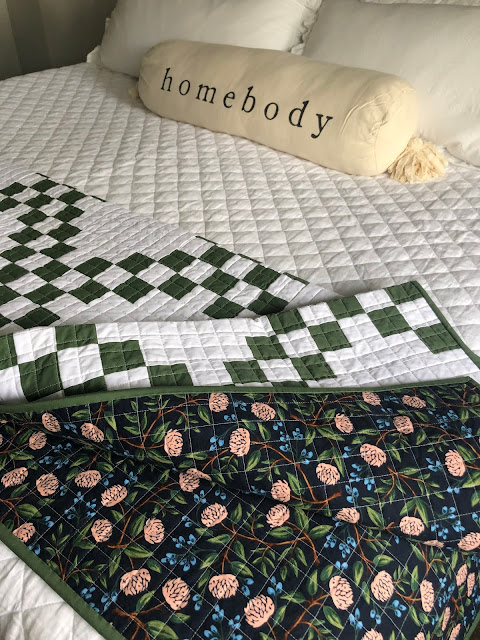
Well, it's done and I love it!
My green and white Irish Chain quilt turned out 
just how I envisioned it.


It adds just a little bit of color and vintage charm at the foot of my bed.
I also think it would've been cute had the fabric placement been reversed.

I get asked a lot - 
the green  I used is called "Forest" by Michael Miller (Cotton Couture).


What do you think of my new "homebody" pillow?
I got it at the Corn Wagon Mercantile a few weeks ago.
The Corn Wagon is an awesome quilt shop in Springville, UT. 
and they recently opened a retreat center and mercantile behind the shop.  
The whole place is just a dream.  I definitely want to go back again soon! 


So I mentioned in my last post that I was debating whether or not to do crosshatching 
for the quilting on my quilt.  I decided to splurge and do it and I couldn't be happier!


 It was a bit pricey to do the crosshatching since my quilter basically had to quilt 
it twice but I think it was worth it.  I rarely do custom quilting (which is always more 
expensive) so I thought I would treat myself this time!  I feel like the crosshatching 
has a vintage vibe but is still kind of modern which is exactly the look I was going for!


The quilter I used on this was Denae Hansen of Plain Jane Quilting in American Fork, UT.
She always does a fantastic job and has a pretty quick turnaround time.
I always love her work!


I'm kind of obsessed with my backing fabric.  I went to 4 different fabric stores 
before I found it and the minute I saw it I knew it was the one.  It's called Wildwood
Peonies in Navy by Rifle Paper Co. for Cotton + Steel.  I actually ordered it through
AACottonCreations on Etsy though because the shop here in Utah only had it in canvas.
Are you one to put a lot of thought into your quilt backs or not?
Some people say, "Oh, it's on the back, you won't see it."  
But you do!  And I just want the back to make me as happy as the front.


Remember the labels I got a while back?  They're from Border City Quilts on Etsy.  
They were custom so if you want something similar just tell them you want the 2" x 2" 
cotton fold over labels.  You can pick the font and text.  I got a sheet of 20 for $16 
and I'm very happy with them! 


I'm so glad to have this quilt done so we can enjoy it now. 


I hope you don't mind me sharing a boatload of pictures with you today!
 Please let me know if you have any questions.  I'm also so happy to announce that I have 
the printable, condensed instructions for the two-color Irish Chain quilt HERE (2 size options). 

Happy quilting!

Two-Color Irish Chain Quilt-Along: Week 8

Wednesday, February 26, 2020

I can't believe it's the last week of our Quilt-Along!
It's been so fun seeing everyone's Irish Chain Quilts.  I love the adaptability of 
this pattern.  Whether you did two-colors or scrappy, strip piecing or good ol' traditional piecing, 
this pattern is classic and I hope you will love your quilt for many years to come.


This week's assignment is to finally sew all the blocks together and piece the back.

TWIN:
7 X 9 block layout


QUEEN:
9 X 9 block layout


Quilt Top Assembly:
For the twin quilt - sew together 5 rows made up of  4 Checkerboard Blocks and 3 Alternate Blocks each, starting and ending with the Checkerboard Blocks.  Then sew together 4 rows made up of  4 Alternate Blocks and 3 Checkerboard Blocks each, starting and ending with the Alternate Blocks.  Press all the seam allowances toward the Alternate Blocks.  Sew all the rows together (alternating) according to the twin quilt image above.  Press the seam allowances open.

For the queen quilt - sew together 5 rows made up of  5 Checkerboard Blocks and 4 Alternate Blocks each, starting and ending with the Checkerboard Blocks.  Then sew together 4 rows made up of  5 Alternate Blocks and 4 Checkerboard Blocks each, starting and ending with the Alternate Blocks.  Press all the seam allowances toward the Alternate Blocks.  Sew all the rows together (alternating) according to the queen quilt image above.  Press the seam allowances open. 

Note: Make sure the large rectangles in the Alternate Blocks are all going horizontal.


And voila!  Your Irish Chain quilt top is done!!!  
Pat yourself on the back and do a little happy dance!


These aren't great pictures, but here's mine! 


Now that your quilt top is done may I recommend pre-washing your backing fabric?  
We don't want any bleeding so consider washing and pressing it before piecing the back.
I am using this Cotton + Steel Rifle Paper Company Wildwood Peonies in Navy.  I hit up 3 fabric stores with no luck but the moment I walked into the fourth store and saw this, I knew it was the one.


Piece the Back:
For the Twin quilt - 
Cut 5 1/2 yards in half to create 2 pieces that measure approximately 40" x 99" each.
Trim the selvages.  With RST, sew the pieces together along the long edges.  
Press the seam allowances in one direction.  

For the Queen quilt - 
Cut 8 1/4 yards into 3 pieces that measure approximately 40" x 99" each.
Trim the selvages.  With RST, sew the pieces together along the long edges.  
Press the seam allowances in one direction.  


The back of the quilt needs to be 3-4" bigger than your quilt top on each side if you're 
going to have it professionally long-arm quilted.

Now it's time to start thinking about how you're going to quilt it!  Mine is being quilted 
right now.  I asked my quilter to do horizontal straight lines 1" apart and then I'm going to 
look at it (and see how much that cost) before deciding if I want her to do more straight 
lines the other direction to create a crosshatch.  I love crosshatching but my quilter 
was a little concerned about getting all the lines completely perpendicular and I'm concerned 
about the cost since that is basically like quilting it TWICE!  So we shall see!
How are you going to quilt yours?

Once your quilt is quilted, bind it.  For the twin quilt, you will need 9 strips, 2 1/2" x 40" each 
and for the queen quilt, you will need 10 strips, 2 1/2" x 40" each.  I have a tutorial saved in my "highlights" on Instagram with all the details on how I do my bindings.  I need to update my tutorial here on the blog so look for that soon!

Well, this is basically the end of our Quilt-Along.  
I will be back soon with pictures of my finished quilt soon though.  
Please let me know if you have any questions and please, please share your finished quilt with me on Instagram using the hashtag #irishchainqal and tag me @gigis_thimble.  I can't wait to see yours!
Thank you so much for all your kind messages throughout the QAL.  I'm so glad you were along for the ride!

Two-Color Irish Chain Quilt-Along: Week 7

Tuesday, February 18, 2020

Hello hello!
It's week 7 of the Two-Color Irish Chain Quilt-Along!
Can you believe there's only one week left after this?  It's gone by so fast!
I hope you're staying on schedule because soon you will have a beautiful quilt top!


This week's assignment is quite simple.
Just sew two A sections that you made last week onto opposite sides 
of the 6 1/2" x 10 1/2" color 2 rectangles to create the Alternate Blocks.


TWIN:
Make 31

QUEEN:
Make 40


Directions:
1. Sew an A section to the top of the 6 1/2" x 10 1/2" rectangle.  Repeat with the 
rest of the 6 1/2" x  10 1/2" rectangles for your chosen quilt size.


2. Sew the remaining A sections to the opposite side of the 6 1/2" x 10 1/2" rectangles.


3. Press the seam allowances toward the A sections.


4. Now sit back and enjoy the fact that all your blocks are D-O-N-E!
Yay!!!

That's it for this week!
Have a great day!
Amber

Two-Color Irish Chain Quilt-Along: Week 6

Wednesday, February 12, 2020

Welcome to week 6 of the Two-Color Irish Chain Quilt-Along!
Did you finish making your Checkerboard Blocks and are you getting excited now?
We are in the home stretch of finishing our Irish Chain quilts!


The assignment for this week is pretty simple - make the A sections for the Alternate Blocks!


Section A (Alternate Block)
Size: 2-1/2" x 10- 1/2" unfinished

TWIN:
Make 62

QUEEN:
Make 80

To make the A sections for the Alternate Block:
1. Sew a color 1 strip, 2-1/2" x 40" to a color 2 strip, 6-1/2" x 40" right sides together (RST). 
Do this 4 times for the Twin quilt or 5 times for the Queen quilt using the chain piecing method.


2. Sew a second color 1 strip onto the opposite side of the color 2 strips RST.


3. Carefully press the seam allowances toward the color 1 strips.


4. Square off the ends of the strip sets.


5. Cut 2-1/2" increments until you have 62 A sections for the Twin quilt 
or 80 A sections for the Queen quilt.


And that's it!
Where are you at with things?  Are you staying caught up, moving ahead or falling behind?
I'd love to hear how it's going.  Leave a comment below.

Two-Color Irish Chain Quilt-Along: Week 5

Wednesday, February 5, 2020

Welcome to week 5 of the Two-Color Irish Chain Quilt-Along!


We are cruising right along and I think you're going to LOVE this week's assignment because it's time to sew sections A and B together to complete the Checkerboard Blocks!

Checkerboard Blocks:
Twin: make 32
Queen: make 41


1. Sew together one A section and one B section, right sides together (be sure to "nest" opposing seams as you go).  Repeat (using the chain-piecing method) to make 64 checkerboard units for the twin quilt and 82 checkerboard units for the queen quilt.


2. Sew together 2 checkerboard units.  For the twin quilt, make 32 large checkerboard units and for the queen quilt, make 41 large checkerboard units.


3. Sew the remaining A sections onto the B section 
of the large checkerboard units to complete the Checkerboard Blocks.
For the twin quilt, make 32 blocks and for the queen quilt, make 41 blocks.


4. Press the seam allowances toward the center of the blocks.


And that's it!  Aren't they fun blocks!?!


If you'd like to post a photo of your blocks on Instagram, please tag me @gigis_thimble
and use the hashtag #irishchainqal.  I'd love to see them!

Two-Color Irish Chain Quilt-Along: Week 4

Wednesday, January 29, 2020

Welcome to week 4 of the Two-Color Irish Chain Quilt-Along!
Are you having fun yet?  I love seeing all the different colors you guys are using!


This week we will be sewing, pressing and cutting the B sections for the Checkerboard Blocks!


They are comprised of three color 1 squares and two color 2 squares.
There are two B sections per Checkerboard Block.
There are 32 Checkerboard Blocks in the Twin quilt and
41 Checkerboard Blocks in the Queen quilt.


SECTION B:
TWIN: make 64
QUEEN: make 82

STRIPS NEEDED FOR B SECTIONS:
TWIN:
12 strips, 2½” x WOF (color 1)
8 strips, 2½” x WOF (color 2)
             
QUEEN:
18 strips, 2½” x WOF (color 1)
12 strips, 2½” x WOF (color 2)

Please refer to the week 3 blog post (HERE)
for helpful tips on chain piecing, strip piecing and pressing.


1. Using a 1/4" seam allowance sew pairs of color 1 and color 2 strips together.  
For the Twin quilt, sew 8 pairs together.  For the Queen quilt, sew 12 pairs together.


2. Sew 2 of those strip sets together (alternating colors) 
to make a larger strip set consisting of 4 strips.  For the Twin quilt, make 4 large strip sets.  
For the Queen quilt, make 6 large strip sets.


3. Sew a color 1 strip to a large strip unit, alternating colors.  
Repeat until you have 4 large strip sets (consisting of 5 strips each) 
for the Twin quilt and 6 for the Queen quilt.


4.  Carefully press the seam allowances toward the dark fabric.

5. Subcut the strip set into 2 1/2" increments. Cut 64 B sections for the Twin quilt 
and 82 B sections for the Queen quilt.


That's it for this week!
Let me know if you have any questions!