Pineapple Quilt QAL Finishing Info

Tuesday, September 13, 2022

If you participated in the Scrappy 
Pineapple Quilt QAL this past year this post is for you!
We are at week 33 out of 36 so it's time to start
thinking about how to finish your quilt!

1. Trim blocks.
Trim 1/4" from the black line/square
going around your "slices" as shown below.


2. Remove papers.
I prefer to remove the paper right before I sew the blocks together.
It would be very cumbersome to remove them after!
The only parts you have to worry about when doing this
are the stitches around the perimeter of the block that aren't 
crossed over with another line of stitches to secure them in place.


To ensure the stitches don't come undone right there,
simply hold down the stitches (with one hand) where you're about to start 
pulling off the paper and pull the paper off with your other hand.  I have
some videos on this saved in my "Paper Piecing" highlight bubble on Instagram.
This is going to take some time so put on a good movie 
(or let your kids work off some of their chores!) 

3. Sew blocks together.
Lay out your blocks in a 6 x 6 layout.
Sew the blocks together into rows.  Press the 
seam allowances in one direction, alternating with each row.
Sew the rows together and press the seam allowances 
in one direction.
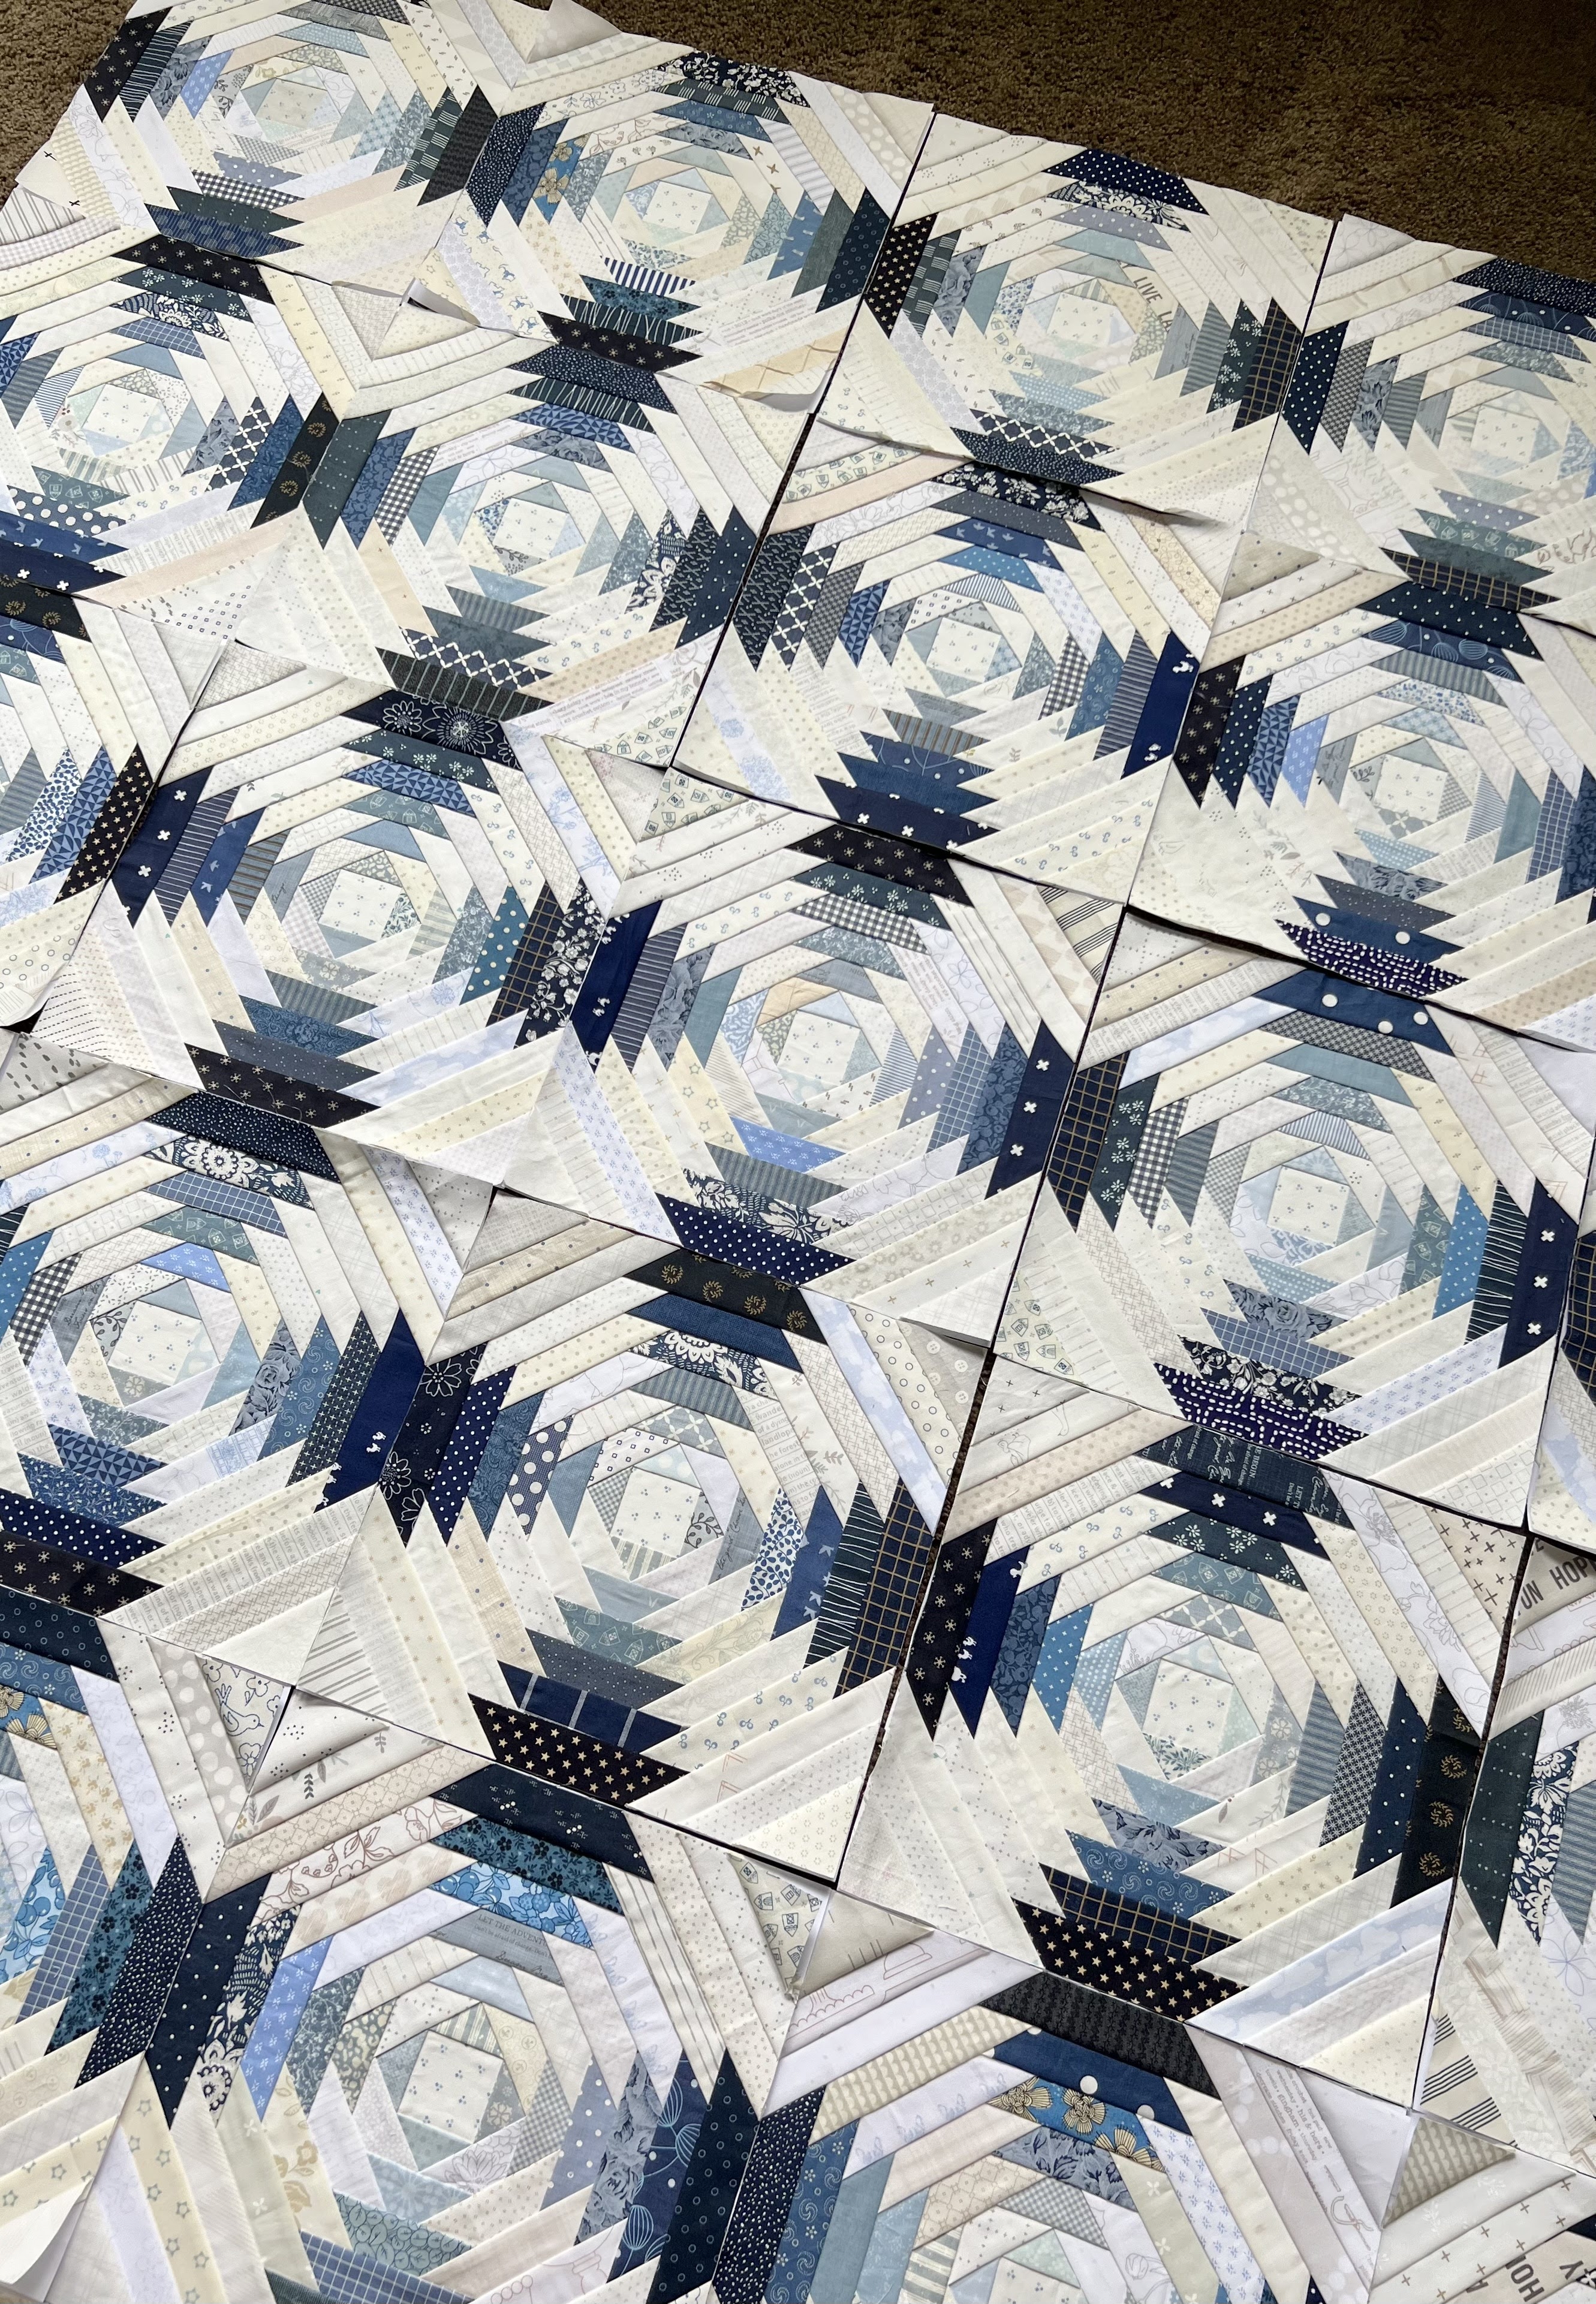
[This photo was taken a few weeks ago so I didn't have all 36 blocks done.]

Note: when you sew the blocks together, you will notice that the seams are going 
in the same direction (they aren't able to nest, which is ideal in quilting).  
There is no way to avoid this on this particular block.  But don't worry!  Just go
with it.  You won't notice any bulk when your quilt is finished.  Also, I didn't pin anything when
I sewed my blocks together.  Everything is pretty exact due to the nature of
paper piecing - sewing on the lines, trimming the completed blocks 
1/4" from the lines, etc.  Just be gentle and try not to stretch your fabric/blocks.


FINISHING FABRIC REQUIREMENTS
I will share 3 options...
Note: WOF = width of fabric.

** Disclaimer - I did not have my editor review any of the above
fabric/batting requirements like I usually do for my wholesale/retail patterns.  
I think they are all 100% correct but if you find any miscalculations 
please email me at gigisthimble@hotmail.com so I can make the corrections.

1. No border.


This will finish at approximately 74" x 74".
Backing: 4-2/3 yards (cut 2 pieces, 84" x WOF)
Binding: 2/3 yard (cut 8 strips, 2-1/2" x WOF)
Batting: 82" x 82"

2. Inner and Outer Border.


This will finish at approximately 89" x 89"
Inner Border: 2/3 yard (cut 8 strips, 2-1/2" x WOF) 
Outer Border: 1-7/8 yards (cut 9 strips, 6-1/2" x WOF)
Backing: 8-1/8 yards (cut 3 pieces, 97" x WOF)
Binding: 7/8 yard (cut 10 strips, 2-1/2" x WOF)
Batting: 97" x 97"

3. Inner and Large Outer Border for Applique.
This is for those of you that want to do something similar
to my original pink and green Pineapple quilt.
Note: if you decide to do this you will be on your own
for designing the applique pieces themselves.
Also, I did a 5 x 5 layout in mine.  The following info is for
a 6 x 6 layout so you can use all of the blocks made in the QAL.


This will finish at approximately 96" x 96"
Inner Border: 2/3 yard (cut 8 strips, 2-1/2" x WOF) 
Outer Border: 3 yards (cut 9 strips, 10-1/2" x WOF)
Backing: 8-2/3 yards (cut 3 pieces, 104" x WOF)
Binding: 7/8 yard (cut 10 strips, 2-1/2" x WOF)
Batting: 104" x 104"


QUILTING IDEAS
I will share 3 options...

1. Custom quilting.
This is the most expensive and time-consuming option.  
Prices range depending on the design, density, and whether it's done by 
computer or free hand.  Sometimes, the turn-around time can be long too!
So get a price quote and estimated turn-around 
date from your longarm quilter beforehand.  
Work with him or her to choose some custom quilting designs
that suit you and your quilt.  Or let them surprise you!  Here are some 
close-ups of my pink and green Pineapple quilt quilted by 
Melissa Kelley (@sewshabbyquilting on IG) in American Fork, UT.
It was all free-motion quilted (not computerized).  Her prices now start at
.06 cents per square inch and go up from there!  She's an incredible quilter!


You can check out the rest of the details for that quilt HERE.


2. Semi-Custom Quilting.
My friend Susie Smart made a pink and green
Pineapple quilt recently and she gave me permission to share these
pictures of the semi-custom quilting she had done on her quilt.
Semi-custom is when a longarm quilter quilts one specific
design in each block and then possibly does something different on the border 
and/or sashing.  It's not an edge-to-edge design but it's simpler than 
full-custom quilting.  These 2 designs were done by computer.


Susie's longarm quilter was Camille Mendel in Sandy, UT and 
she charges .04 per square inch for this type of project.


I think it turned out beautiful Susie and Camille!

If you're looking for more semi-custom quilting ideas,
I think this could be really cute as a block design on a Pineapple quilt:
Glam Block by Karlee Porter Link


3. Edge-to-Edge Quilting.
This is the least expensive option when it comes to hiring out your 
quilting and it's what I usually do on most of my quilts.  The standard
price for this in my area is .015 cents per square inch.
Check with your quilter for pantograph suggestions and prices.
Here are some ideas that I think would be lovely on a Pineapple quilt.

Most any kind of Orange Peel design would be really cute, 
especially on a small scale.  I like that it emphasizes the diagonals
of the pineapple block and that it's not directional.  
Here are a couple of Orange Peel ideas or google,
"Orange Peel Panto" for other variations.

Orange Leaf by Karlee Porter Link


Cross Hatch Quilting would be another swoon-worthy
idea for your Pineapple quilt!  It's simple yet so striking and classic!
Crosshatch Link

Or straight grid quilting would be just as good!
I love this quilt so much!  Photo used with permission
from @frannyharrington on Instagram.


This could be cute if you want something a little loopier:

Hoopla by Karlee Porter Link

Cat Eyes could be fun!


I've used this next one before on a quilt and loved it!
I would just discuss sizing with your longarm quilter and have him or her
make the space between the lines of the pantograph bigger 
or smaller than the "slices" on your blocks so they don't compete with each other.


This next one reminds me a little bit of the custom quilting
that was done on the blocks of my pink and green Pineapple quilt.
It's called Garland.
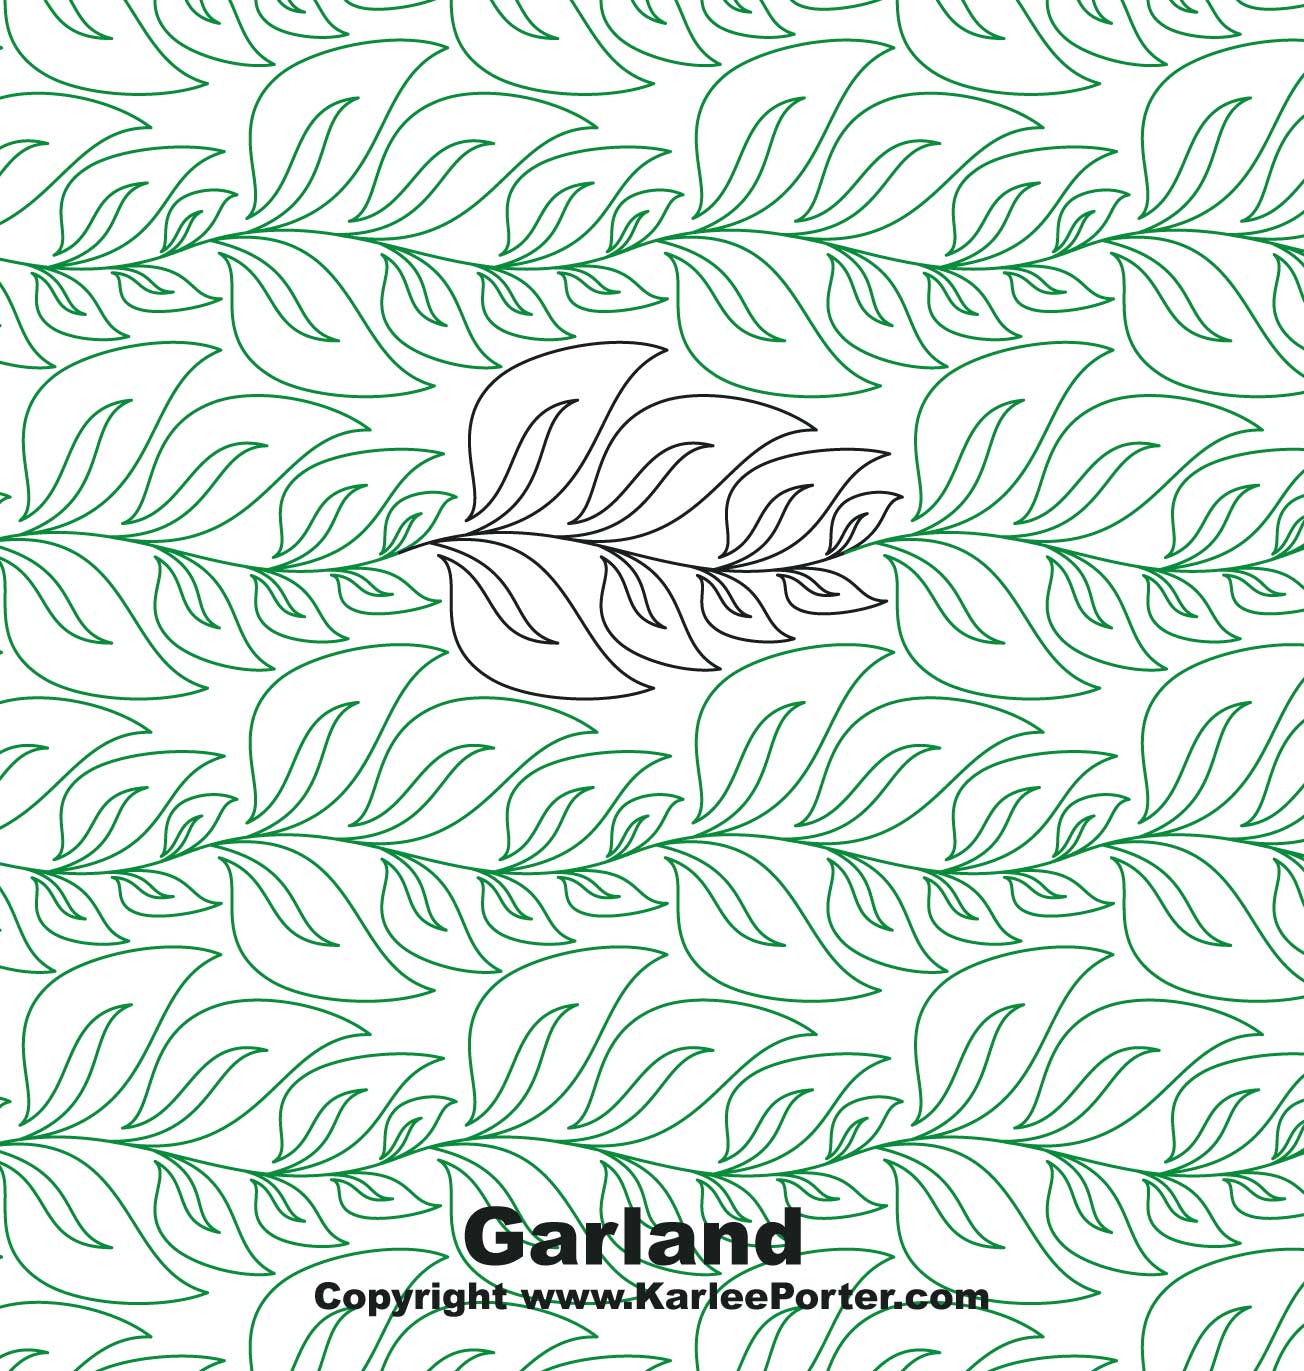
Garland by Karlee Porter Link

 Those are just a few ideas but I'm sure there are lots more out there!
If you click on the links you can sometimes see them quilted out.
Or just google those names to find similar-looking pantos.

Tell me, what are your plans for quilting your Pineapple quilt?

Well, friends, that was a lot of information!
I hope that answered all your questions on 
how to finish your Pineapple quilt.  Please let me know if you have
any other questions and good luck finishing yours!
I can't wait to see it.  If you post about it on Instagram, please tag me
@gigis_thimble and use the hashtag #perfectpineappleqal
or you're welcome to email me photos at gigisthimble@hotmail.com.

RELATED LINKS:


Happy quilting!

Gigi's Thimble Newsletter Signup

Friday, September 9, 2022

I believe there are 2 kinds of people in this world.
1. The kind of people that have 30 (or under) unread emails in their inbox.  
2. The kind of people that have 7,552 unread emails in their inbox. 
There is no in between...is there?

I personally get a little stressed out if I have more than about 30 unread emails.  
I feel my life spinning out of control after 50 (wink, wink).   
But honestly, it takes some major stick-to-itiveness to constantly 
"unsubscribe" and clean out my inbox!  So I am really careful 
about what emails I sign up for.

With that being said, I have had requests for a way for you guys to follow
along with my blog.  Unfortunately, Blogger got rid of their "follow by email" function a 
while back and I didn't know another way to do it.  Until now;
I've finally decided to jump on the newsletter bandwagon.
 I plan to send a newsletter out about once a month.
Only with pertinent information if I have some.  I won't send them out
just to "be on your radar".  I won't inundate your inbox weekly or even
every other week.  But if you want to be in the know
about blog posts, new patterns, shop sales, upcoming events, and maybe 
a few of my favorite quilty things at the moment then click HERE
I promise I'll be nice!

I'd love to hear if you like newsletters or not,
what kind of things you like to see in them, etc.
I'm new at this so any tips or suggestions would be greatly appreciated!
Or if you want to confess how many unread emails you have in YOUR
inbox - this is a judgement free zone.  Go ahead and share!  

(I currently have 15 unread emails in my inbox and I'm pretty sure that's 
because the rest of my life is crazy busy right now so that's the only
thing giving me a sense of control.)

Have a great day my friends!

Quilt the Rainbow Book Tour

Monday, August 22, 2022

The Quilt the Rainbow book tour just wrapped up
so today I want to share all of the finished quilts/quilt tops
here - in case you missed them on Instagram!
First up was Barbara's quilt
 (@sewstitchindarling on Instagram).  She chose to make
Tile Revival - the black and white quilt in the book.


If you know me you know I love red, white, and blue quilts so I absolutely fell
in love with this.  It was fun to see Tile Revival in a two-colorway.  The panto she used is
Mike's Swoosh and I think the whole thing turned out just beautiful!

Next up was Stacie's version of the Glimmer of Light quilt - the purple quilt.
Stacie is @wildflowerfrippery on Instagram and I love her pretty, sweet style.


I love the colors Stacie chose and you better believe
I immediately bought some of that bird background fabric by Sharon Holland
after seeing Stacie's quilt. So fun and whimsical.  Great fabric choices Stacie!

The third person to share a quilt on the tour was Jennifer 
(@crimsonconfection on Instagram).  She chose to make the 
Crowning Glory pattern - the yellow quilt.  Here's her version:


Again, I love the red, white, and blue.  This is so different than mine 
and I love the chambray background!  It's so fun to see how color
placement can completely change the look of a quilt.

Then it was Denise's turn!  Denise's Instagram 
handle is @happyvalleyquilting.  She made Star Studded -
the rainbow quilt on the cover of the book.


I love the ombre effect and I absolutely LOVE blue and white quilts.  
A classic that I think you can never have enough of!
Denise is a longarm quilter so she quilted this herself.  

After Denise, Jandi (@jandidean on Instagram) shared
her version of Patchwork Plaid - the blue quilt.


Her colorful rainbow version was such a fun, unexpected surprise!
So clever!  Just goes to show you can totally make the patterns
in Quilt the Rainbow your own!

Aniva, shared her blue and white version of
Sew Delightful - the red quilt.  Aniva is @aniva_rose on Instagram.


I love the simplicity of this.  With just 3 fabrics, Aniva's
quilt is so pretty and peaceful!  The colorful back adds a fun, unexpected pop!

Andy made Blossom's and Buds - the orange quilt.  Andy is
@abrightcorner on Instagram.  She even wrote a blog post about this
quilt and the book that you can check out HERE.


I love Andy's dark and moody version of this pattern.  The fabrics and
quilting are so pretty.  Go check out her blog post for all the details!

Next up, was Christopher (@the_tattooed_quilter on Instagram).
He made a small, Christmas version of Scrapology - the pink quilt.


It was nice to see a more colorful version of this pattern.  I love the
fabrics Christopher used.  They inspire me to make
another version of this quilt!  You can read about the details
of this project and his thoughts on the book HERE.

And finally, Jessica Dayon (@jessicadayon on Instagram)
made Seaside - the aqua quilt.


So scrappy.  I love how she reversed the dark and light fabrics.
This is complete perfection for my blue loving heart.
I'll be hosting a quilt-along for Seaside in September.
You can find all the details for that HERE.

Aren't these all so fun?!?
I would love to know which pattern you would
make if you could make one of them.


If you would like to purchase a copy of
Quilt the Rainbow you can find it HERE.
To see all of the original quilts from the book click HERE.

I want to give a huge thank you to my friends for participating in the
book tour!  I know each of you are very busy.  It means the
world that you would spend your time, talents and resources on my behalf!


P.S. Some of you may notice the only quilt not featured here
is the green quilt - Box Elder Trail.  Life gets busy and one of my friends
wasn't able to make it.  Luckily I actually made a second version of it
(it's probably the quickest pattern in the book to make!)  Here's a sneak peek
of my multi-colored version.  I just got it back from my quilter and 
still need to bind it.  I'll share photos of it soon; stay tuned!

UPDATE: Click HERE to check out the finished version of this quilt!

Thanks for stopping by today!

Seaside Quilt Along

Thursday, August 18, 2022

My next quilt-along will be the Seaside pattern from my new book, Quilt the Rainbow! 
It's a beginner-friendly pattern and a great way to whittle down
some of your fabric stash!


When: Starts September 19,  2022

It's a 6-week quilt-along.

The schedule is as follows:
Week of 9/19 - cutting
Week of 9/26 - make 9 blocks
Week of 10/3 - make 9 blocks
Week of 10/10 - make 9 blocks
Week of 10/17 - make 9 blocks
Week of 10/24 - assembly
10/31 - show finished quilt top

Where: Instagram, follow me @gigis_thimble
I'll be posting the weekly prompts every Tuesday.
Mark your calendars!

Pattern: Seaside from the book
Quilt the Rainbow


You can purchase autographed books from my Etsy shop HERE.
Or you can try Amazon, The Fat Quarter Shop, or your local quilt shop!

Quilt the Rainbow includes 10 quilt patterns to help you whittle down 
each color of your fabric stash.  I also share the meaning/symbolism of each
color, tips on cutting scrap quilts efficiently, scrap storage ideas, choosing fabrics
for scrap quilts, some of my favorite time-saving notions, and tips on making
scrappy bindings and scrappy backings.  I think you'll find this book both
useful and inspiring, plus, I think all of the patterns are timeless patterns
that will be cute in any colorway!

I can envision Seaside is so many different colorways.
Here are just a few ideas:


Classic solid black + white


Classic scrappy red + white


Low volumes with your favorite accent color


Low volumes with an assortment of accent colors!
Arranged in a rainbow configuration?


I'm planning on making something similar to this image (above).
I'll be using light, earthy prints for the background
and darker earthy prints for the accent colors.
Here are my fabrics all ready to go:


It will be very scrappy and I'm excited about the colors/fabrics!

Please note, there will be no sign-ups or weekly emails.
Just mark your calendar, grab your copy of Quilt the Rainbow and your fabric,
and look for the weekly Instagram prompts starting the week of September 19th.

Let's use the Instagram hashtags:
#gigisthimblepattern and #seasideqal
to post our progress and encourage each other!

I'll pick someone from the hashtag pool to send a
couple of Quilt the Rainbow quilt labels to the first 5 weeks!
Post your progress each week to be entered to win.
(I know this is a very tiny prize but they're useful and fun!
Maybe I'll throw in one of my quilt patterns too!)


Click HERE for a printable schedule, materials list and coloring sheet.

That is it!  Please let me know if you have any questions.
I'm excited to quilt along with you!

Glory Quilt

Thursday, August 11, 2022

 If you've been following along with me
on Instagram you may have seen a simple
star/flag quilt I made in July.  I finally got it bound and
photographed so I want to share the details
with you today.


In June of this year, I took a trip to McCall, ID, and happened 
upon a really incredible quilt shop called,
J. Beck Home.  I was inspired by the red, white, and blue
fabrics and vintage quilts there and ended up
buying most of the above fabrics.  I had something like this
design floating around in my head for what to do with them:


I used instructions from my recently published
Sawtooth Star Cutting Chart to make the stars.
It includes cutting instructions for block
sizes 3" - 20".  Click HERE to check it out.
I made 12" finished stars for this project.


I was a little nervous that this pattern was going to be too simple
but when it was all said and done, I loved it!


The background fabric I used is a light gray/puddy color
called Celestial by Art Gallery Fabrics.
The backing fabric I used is from the Watermark collection
by Tammy Green for Riley Blake Designs.
The binding fabric is Stripes C495 by
Riley Blake Designs.


I had my quilter, Jen Ostler in Highland, UT.
quilt it for me with a 3/4" grid.  I've had that size grid done before
and loved it.  I don't think it makes the quilt too stiff
and it's just so pretty!


She quilted her signature "hidden object" in one of the
squares -  the tiniest little star!  I just love it!


The labels are from Everemblem.
I get the 2" cotton, fold-over, sew-in labels.
If you go to their site, you'll have to pick a cotton label 
and customize it from there.  I've loved the ease of these labels.
Now I don't have an excuse to not label my quilts!


My quilt finished at 63" x 93"
(so about the size of an XL twin
commercial size comforter).


I turned it sideways on my king-size bed
and it makes for a really nice coverlet!


I wasn't planning on doing a pattern
or full tutorial for this quilt but I know 
some of you want to make something similar
so here are a few more details:

Make 12" finished stars using my Sawtooth Stars Cutting Chart.
(There's a tutorial on that blog post for how to make the stars.)
Sashing and borders - cut 3-1/2" wide strips.
Binding - cut (9) 2-1/2" wide strips.

FABRIC REQUIREMENTS
Red stars: (18) 1/4 yard prints
Blue Stars: (6) 1/4 yard prints
Background: 4-3/4 yards
Backing: 5-2/3 yards
Binding:  2/3 yards 
Batting: 71" x 101"


Apparently, there was a right and wrong side to the
Celestial solid fabric I used for the background.
I didn't notice until I took the above picture.


I hope you found inspiration here today!
Thank you to @imacoffeemom on 
Instagram for helping me name this quilt.
If you decide to make something similar to this
I'd love to see it on Instagram.
Tag me @gigis_thimble and use the hashtags
#gigisthimblepattern and #gloryquilt.