Scrap Jar Stars ~ Tutorial & Giveaway!

Monday, January 16, 2012

 I L♥VE scrappy quilts! 
I love the idea of making something beautiful and original out of seemingly nothing.  I love the idea of making something useful with little or no cost. 
I love that sense of nostalgia I get when I see an old, worn, hand-quilted quilt, that was pieced together with scraps saved over the course of many years.  Scrap quilts are charming to say the least!  That's why I had so much fun making these little cuties a few weeks ago.  I called them my Scrap Jar Stars.


Shortly after posting this photo, my friend Jodi {from Pleasant Home} emailed me and said those stars were just the thing she was looking for to round out her 2012 Sew Scraps Along!  She's a girl after my own ♥ and I love that she's dedicating the whole month to sewing with scraps, including lots of great tutorials and giveaways!  Head on over to Pleasant Home for all the fun details!


Jodi asked me if I'd post a tutorial of my Scrap Jar Stars and maybe give away a few scraps as part of the fun.  I was flattered as could be that she asked and happy to do a giveaway.  Hopefully, one gals scraps will be another quilters treasure!  Edit: I now have a full pattern in my Etsy shop that includes efficient cutting instructions for 4 different size quilts (not just one block) and modified block instructions so there are fewer seams!  It's available in paper and PDF.  You can check it out HERE.

So here we are.  A little tutorial just for you! 


As part of the Sew Scraps Along, I decided to make up another colorway of my Scrap Jar Stars.  I pulled out my reds, navys, blues and aquas from my scrap jars.  I'm loving these colors against the white.  A happy and fresh combo if you ask me.  Of course, there's a million different possibilities, so pull out some of your favorite scraps and let's get started!


Cutting
(per block)

(12) 2" bright squares
(12) 2" white squares
(4) 2" x 3-1/2" white rectangles
(4) 4-1/4" white squares*
(4) 4-1/4" bright squares*

* Note: Cut more than 4 for more variety!


I like to make one block first and then when I know what I'm doing I use an assembly line for the rest. So you might like to multiply the cutting requirements (above) by however many blocks you are making. It seems to go quicker that way.


Assembly

Make Star Points: 
You will need 8 Half-Square Triangle blocks for each star.  Each pair of bright/white 4-1/4" squares will make two HST blocks.  Make extra HST's for more variety in your star points :)

Step 1: On each of your bright colored 4-1/4" squares, draw a diagonal line from corner to corner.  Pair up each bright square with a white square with right sides together (RST).

Step 2: Use a 1/4" seam allowance to sew along both sides of the line.

Step 3: Cut on the line to form two HST's.

Step 4: Press the seams towards the dark side.


Step 5: Use a ruler to trim the HST blocks to 3-1/2" square.  By starting out a little big and trimming down to 3-1/2" square your star points will be more exact.  I like to use my small 6-1/2" square ruler to do this step.  Set the HST's aside. 

Make 16-Patch:
Lay out sixteen 2" squares next to your sewing machine (alternating 8 white with 8 bright).  Use a 1/4" seam allowance to sew the squares together in rows. 


Press seams towards the bright fabrics.  Then, sew the rows together (butting up alternating seams against each other and pinning in place).  Press row seams in one direction.  Set aside.


Assemble Star Blocks:
First, lay out 2 HST blocks on each side of the 16-patch block to make the 8 star points.


Sew each set of HST's together with RST.  Press the seams open.


Sew two of the sets of HST's to opposite sides of the 16-patch.  Press seams towards the 16-patch.


Before sewing the other sets of HST on, you will need to make the corner blocks.  I like to sew them together at this point (instead of earlier) so that I can make sure the bright corner fabric is not the same as the two star points on either side of it.  So lay out the desired 2" bright colored squares in what will be each of the outer corners of the star block.  Then lay out a 2" white square next to it (on the inside) and a 3-1/2" rectangle above or below them (depending on which side of the 16-patch unit you will be sewing it on to).

Make the corner blocks by first sewing a bright 2" square to a white 2" square with RST.  Press seam towards the bright square.  Then sew that unit to a 3-1/2" white rectangle and press seams towards the white rectangle.


Sew a corner block to each side of a set of HST's, making sure to keep the bright square in the outer corner (see photograph below). 


Sew two of these units to the sides of the 16-patch unit to complete the Scrap Jar Star.


This unit should measure 12-1/2" unfinished.

I made four blocks and sashed them with (4) 2" x 12-1/2" white strips and (1) 2" bright colored square in the middle.  I'm still deciding whether to make a table topper or a throw size quilt.  Any thoughts???


So there you go!  I hope you liked this tutorial
(and I hope it all made sense ~ my brain is fried right now :)
They're really fun to make and if you haven't been there already,
go to Pleasant Home to see Jodi's "camping" colorway! 

Speaking of Jodi, ever since she contacted me about her Sew Scraps Along, I have been looking forward to emptying out my scrap jars for a giveaway.  It's a new year and time for a fresh start!  If you'd like to enter to win some of mine, please leave a fun comment below.

* THIS GIVEAWAY IS NOW CLOSED *
Here are the details:

Giveaway will end on Saturday, January 21st at midnight.
Leave one comment below for one entry.
For a second entry, leave another comment telling me that you're a follower.
I will announce a winner on Monday.

If you'd like the full pattern which includes efficient cutting instructions for 4 different size quilts (not just one block) and modified block instructions so there are fewer seams visit my Etsy shop HERE!  It's available in paper and PDF.  Or shoot me an email (gigisthimble@hotmail.com) for wholesale prices.

Happy Sewing!
Amber

Hop For Your ♥

Friday, January 13, 2012


I was really excited when I got an email from Leah at Burgundy Buttons (the other day) asking if I would like to participate in the
Sew Red Blog Hop.  I jumped at the chance to help bring awareness to this important cause.


What is the hop about?

Well, it's about hopping!  And raising awareness about heart disease!

Each month, Sew Red for Women will feature an original quilt block designed especially for you by some of today's most inspiring designers and bloggers.  We will provide a special link to hop on over to the blogger and/or designer's site for details and instructions for completing the featured block. And you just might learn a thing or two about heart disease while you're there!

The hopping begins on February 3rd, which happens to be Wear Red Day!


Who's Participating? And when?

February 3 - Leah of Burgundy Buttons
March 3 - Fat Quarterly's Tacha of Hanies Quilts
April 3 - Katie of Swim, Bike, Quilt
May 3 - Melissa Corry of Happy Quilting
June 3 - Charlie of Qubee Quilts
July 3 - Jessica of Twin Fibers
August 3 - Melissa of The Polkadot Chair
September 3 - Amber of A Little Bit Biased
October 3 - Amy of Diary of a Quilter
November 3 - Amy of Amy's Creative Side
December 3 - Sherri of A Quilting Life
January 3 - Lynne of Lily's Quilts


What fabric are we using?
 While we do not yet have a final fabric supply list as the designer's are still creating their block, we will be using fabrics from Chemistry by Cosmo Cricket and coordinating Bella Solids.  Naturally you may use any fabric you like!

As the blocks are released, Burgundy Buttons will offer a block-specific fabric pack for purchase while supplies last.


Will there be a flickr group?

What fun is it if you can't show off?  Share pictures of your block and finished projects with the group at http://www.flickr.com/groups/sewredforwomen/

We are so excited to bring you this heart friendly hop and raise awareness about heart disease at the same time!  Please help us save lives by sharing information about this event on your blogsite, twitter and facebook!  Grab a button over from the right and add it to your side bar!

Together we can make a difference!

Ten Little Things

Thursday, January 12, 2012

 {I'm grateful for}
  1. A boy that wakes up every morning immediately talking in silly voices (at least he's happy, right?)
  2. A girl that calls down to me every night, asking me to come stay for her personal prayers.
  3. A politically informed guy that listens lovingly as I inarticulately try to describe Newt Gingrich's speech from the other night (which I liked).
  4. An unexpected offer from a mom & dad to offer to watch their grand-kids so their daughter and son-in-law can have a date night.
  5. Sparkly taupe nail polish that symbolizes sisterhood (and the memory of the fact that aqua nail polish makes my older sister "want to throw up").
  6. 5 lbs. lost
  7. Using Christmas money from in-laws to get a queen-sized quilt quilted (for .05 cents an inch!  Yay!!)
  8. The same politically informed guy calling me while I'm out shopping to tell me he is going to donate some cash to the "get new church clothes & shoes fund" when I didn't want to ask for anything more since he spoiled me for Christmas.
  9. A little girl that prays to make {more} girl friends, {better} girlfriends.
  10. 5 hours to myself to hit some local quilt shops/market patterns, look into "going back to school" and do some shoe shopping and if there's time, hopefully get some sewing in :)

If you want to share the little moments that inspire, beckon, excite or move you, you can link up to Cassie's "Little Things Series" HERE.

Tuesday Tips {Between The Lines}

Tuesday, January 10, 2012

Hello!  Hello!  Welcome to another installment of
Tuesday Tips
{for your creative space!}

I'm excited today because I have my dear sister {Cassie} here to share some organizational tips from her creative space!  She is a writer, a crafter, the most beautiful bookmark you've ever seen maker, an amazing mommy, a fabulous wife, a vintage finds huntress, a baker, a photographer and an all around amazing little sister.  She shares these talents (and others) on her blog,
A Serenade for Solitude.


Cassie also owns one crafty Etsy shop called, Between the Lines
where she sells all things that have to do with books and their lovers (bookmarks and home decor and such). 
Check out what makes this creative girl tick...

♥ ♥ ♥ 

It is so fun to be part of this series and share with you my creative space tips! 
What came to mind when Amber asked me to do a post for her series of Tuesday's Tips, and what I feel is key in one's creative space is:
There are a whole ton of things that inspire me--pictures, words, color and a sprinkling of rustic and vintage are a handful of things that make my heart happy, so I've done my best to incorporate aspects of these things into my studio space.

Inspirational words keep my purpose in mind.
I also have one of my favorite books by Sabrina Ward Harrison on display, that to me is the epitome of creativity in both writing and art.
I find it especially fun to decorate with items from my shop!
Pennant banners, chalkboards and chalk board erasers are
here on this armoire.


I also have an inspiration board to gather bits of inspiration for future projects
or to display pretty pictures.  You can see it below.  It still needs lots of love.


My husband helped me make this stand for my most recent craft show.
The antlers and whitewashed wood is just my style, and it is so fun
having pretty creations on display.  I'm a firm believer in enjoying what you create!  Do you display what you love in your space?

Organization:
I think it should be functional and display pretty, too.
I love to thrift. 
Using old trunks and vintage tool and tackle boxes is one of my favorite ways to store and display items craft items.

This rustic and industrial drawer system is one of my favorite thrift finds!
It has since been turned into my sewing caddy.


This rusty old toolbox is where I keep some of my order supplies.
One of my greatest investments as someone who works with beads and charms was this:

A sectioned tray to store my charms, pendants and beads.  Again, having it stored pretty makes such a difference when I'm trying to get inspired. 
However, once I get going, my table goes from tidy to this:

Thankfully, the mess is still beautiful. These vintage trays help me keep organized and focused on projects as well:


Since one of the main mediums I use in my work is ribbon, I have a slight obsession with ribbon shopping, and have come to love growing my collection.


Lastly, I definitely have a notepad nearby, always.
You never know when inspiration is going to meet you.


What inspires you and have you incorporated it into your space?

♥ ♥ ♥
You can visit Cassie
on her blog HERE
or check out her shop
HERE 
I hope you enjoyed Cassie's rendition of Tuesday Tips! 
Can't you relate (as quilters) to so much of what she said? 
Feel free to leave a comment below. 
We'd love to hear about what inspires you!

Orange and Turquoise

Saturday, January 7, 2012

I've been working on a little of this and a little of that.
Not much to show quite yet, but I thought I'd give you a little sneak peak of my next pattern...


A simple charm pack friendly pattern.  I'm just finishing up the binding and have to write the instructions still but I'll show pictures soon.

I don't use orange very often but I was really happy when I got my allpeoplequilt.com weekly e-newsletter at the end of December and it said that the PANTONE color of 2012 is Tangerine Tango!  They even suggested pairing it with Turquoise!  Wow.  I'm not really a "trendy" person per say (I try to think outside of the box) but I have been loving this color combination for a while now.  Here are some of my favorite pics from Pinterest that I've been collecting in that color scheme:


click HERE for sources.

Fun right?

I actually got started making this quilt because of a challenge that my quilt group was doing.  Each person picked a brown paper bag that had two crayons inside.  We were challenged to make a project using those two colors.  We could use any shade of the two colors and we could also add one other color (white and black counted) if we wanted.  In my bag were orange and turquoise so I chose to make a quilt using lots of shades of both with white as my third color.


More pictures coming soon.

Hope you're all having a great weekend!
~Amber

Tuesday Tips {Thimbleanna}

Monday, January 2, 2012

Welcome to Tuesday Tips! 
 Today we have a special post from a special friend of mine ~
Anna, from the blog, Thimbleanna.  I've been following Anna's blog for a long time now and I am so happy she agreed to share a little bit of her creative space with us.  She's got some great organizational tips and I know many of you will be able to relate to Anna's room ~ so check it out!

♥ ♥ ♥ 
 
Hi Everyone!

Original Masthead

I'm Anna from the blog, Thimbleanna and I'm very excited to be posting here on Amber's blog for Tuesday's Tips.  I had the honor of meeting Amber at quilt market in Salt Lake City last spring -- and she's just as sweet and talented as you'd imagine from her blog (which I stalk, btw!).  I really had to laugh though, when Amber asked me to post for Tuesday's Tips. My sewing room is anything but glamorous, but then I thought that my ugly might be beneficial?!?

Tip #1: Work With What You Have!
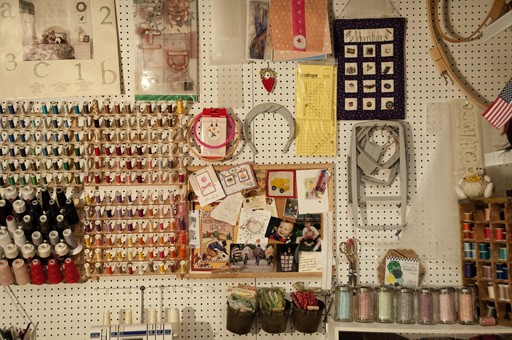
There are so many beautiful, inspirational sewing rooms on the internet and it's easy to become discouraged if your room isn't drool-worthy. I love seeing those gorgeous rooms and I often get some great ideas from them, but that's not my reality. My sewing room is in the basement of our home and my sewing companions are the furnace and water heater. I've often debated about turning one of my now-grown-boys' rooms into my sewing room -- it would be much prettier and I could have a window, but I wouldn't have enough room to store all of my supplies. So, I'm working with what I have and staying in the basement. I lovingly refer to it as the dungeon and I try to put a positive spin on it. My fabrics and threads won't be damaged by sunlight, right? The reality is, I don't need a beautiful room to create pretty things. I just need some supplies, my sewing machine, a few notions, and a little organization to be able to find things. When we moved into our home, the mechanicals were all on one side of an unfinished storage room, so I blocked them off with a few old hutches so that I can't see the ugly stuff. That left me with three walls -- two walls were unfinished but lined with shelving (perfect!) and a third wall was unfinished studs. The first thing we did was put pegboard up on the stud wall. I love this wall for holding notions. Someday, when I have time to frou-frou-up my sewing room, I'll put some cute stuff on this wall.

Sewing Room

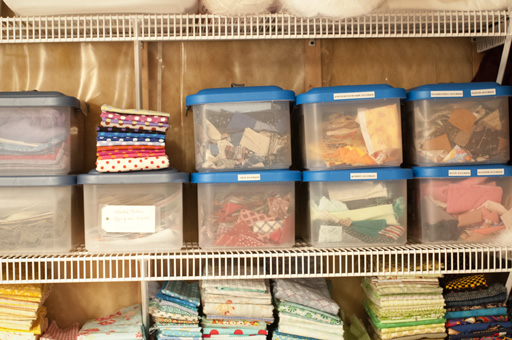
The two walls with shelving hold all of my supplies. Over the years I've picked up plastic storage bins on sale (this is the perfect time of year to buy them!). This group of bins hold my fabric scraps. (See those unfinished walls back there -- I hardly even notice them anymore.)

Sewing Room

Below the bins are some of my fabrics.
Tip #2: Fold Your Fabrics Nice and Tidy!
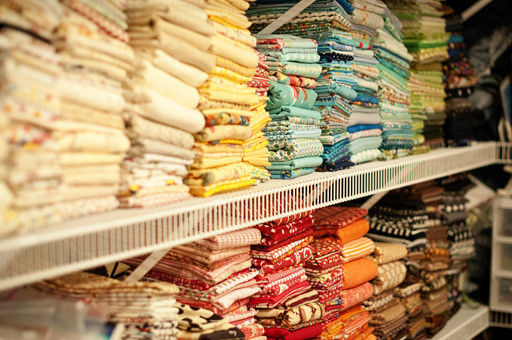
When I first started blogging I stumbled upon Monica's fabric folding technique. It took me 3 days to fold all of my fabrics, but it changed my life!;-) Since my shelves are all open it's really nice to have neat fabric stacks instead of the unsightly mess that I used to have.

Sewing Room

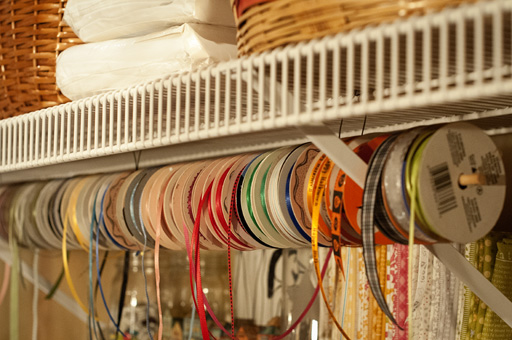
I'd love to have some of those really cool ribbon shelves but I don't have anywhere to hang or set them. So, I improvised. I took a dowel rod and suspended it from one of my shelves with some wires. It works great to hold a lot of my ribbon spools.

Sewing Room

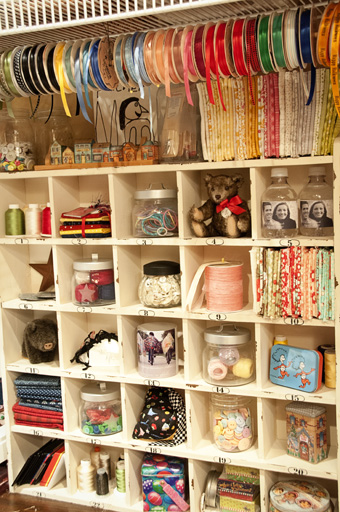
I do have one really cool Pottery Barn organizer that my sister gave me a few years ago for Christmas. I helps cover up some of the unfinished walls -- you can see how the ribbon looks hanging above it.

Sewing Room

Now, one last tip -- my favorite.
Tip #3: Add a Little Whimsy to Your Sewing Room!
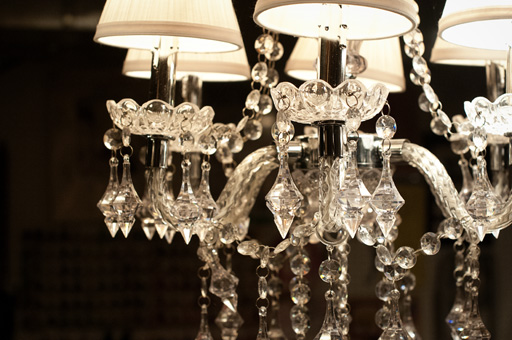
It will make you happy. Here's my favorite embellishment to my unfinished room -- Shandi the Chandelier.

Sewing Room

A few weeks ago I had a few of my work friends over and they begged to see my sewing room. I was very hesitant to let them see it -- I know all of you crafty types would understand, but none of them are obsessed like we are and I worried that they might think I need psychological help when they saw all of my fabric and doodads. I finally gave in -- I'm not sure what they were thinking, but I do know that when they saw Shandi hanging from the floor-joist-ceiling, they all laughed and ooohed and aaahed. It was a fun moment for Shandi and me!

So, that's it! Thank You So Much Amber for letting me share a little of your space here today! XOXO, Anna

♥ ♥ ♥

Some great ideas Anna!  I definitely want to check out that link to Monica's fabric folding technique and I love how you've displayed all the loveliness that allows you to create the beautiful things that you do.

Please leave Anna some comment love below.  She's so sweet to have shared her creative space and some great tips with us today.