Hi friends! Today I have a really special (long) post for you!
Today I want to share a quilt that took me two years
and about 85 hours to complete - my Postage Stamp quilt!
I got so many questions on Instagram every time I posted pictures of this project
so I will try to cover all the FAQ's here. First, let me start at the beginning...
THE INSPIRATION
My grandmother passed away in October 2019.
She was the one who taught me how to quilt and who my pattern company is named after.
After she passed, my mom and aunt asked if I would finish a couple of the quilts she
had been working on so we could give them to family members.

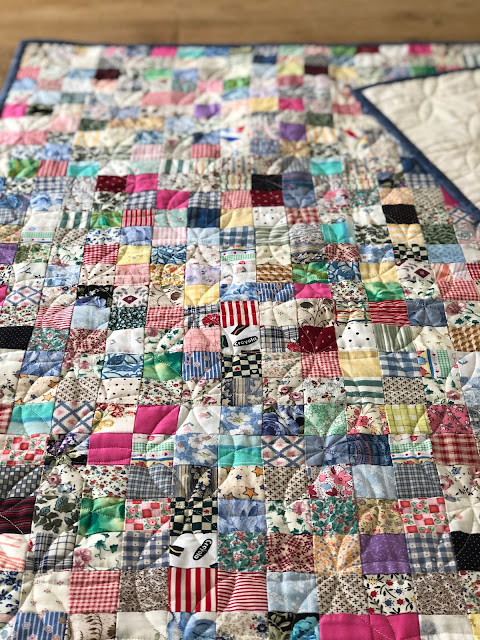
This red, yellow, and green 9-Patch quilt one was one of them.
I don't know the name of the pattern but I know it came from a magazine. I remember her
working on this quilt over the years and I know each individual square finished at
3/4". Can you believe that!?! The quilt top was finished many years ago so I just got it longarm quilted (with a Baptist Fan pattern) and then I bound it by hand.

The back was white with colorful buttons and the binding is black with red and yellow
flowers on it, as you can see here. The backing fabric was hanging with the quilt top
in her closet and I believe I picked out the binding fabric from her stash.
This quilt went to my aunt Janet and her husband Dave.

The other quilt I finished at that time (I have 2 more I still need to finish!)
was this little baby quilt. I think the squares finished at 1-1/4". My aunt and I chose
the back and binding fabrics from my grandmother's fabric stash and then I had it
longarm quilted with the Interlocking Orange Peel panto by Karlee Porter.

This quilt went to one of my cousins.
So after finishing both of those quilts made by my grandmother,
I was inspired. I never thought I would make a Postage Stamp quilt;
too intense for me! But I got the itch around that time to make something
with tiny squares and a little while later I made my first blocks.

CUTTING
I cut 1-1/2" squares that would finish at 1" each.

I did not do all my cutting at once.
I found that I liked to cut batches of squares, both bright and white, whenever
I was running low or got tired of the ones I had in my pile. It was a nice
way to break up all of the sewing.

Postage Stamp quilt I would keep piles of squares by my machine so I could
easily grab and sew. I didn't put too much thought into what fabric went where.
I just tried to space out colors to create balance. When I needed a break from
that project I simply put the squares in a ziplock bag. They didn't get wrinkly
so it was easy to pick up where I left off the next time I was ready to work on my quilt.
FABRIC
I used lots of different whites, creams and low volumes for my
"whites". If you look closely at some of the following pictures you'll be able to tell.
From far away, everything reads as white but the quilt still has a really scrappy
feel to it. Plus it was a great way to use up scraps!
As far as the brights go, I used alll the colors. My only requirement was
there had to be enough contrast between the brights and whites. There are several fabrics
of my grandmother's in this quilt. Including a few squares that have remnants of
her embroidery! Those are my favorite!

ASSEMBLY

There are several ways to assemble a Postage Stamp quilt.
You can strip-piece units together. But since I used scraps for all of my pieces
I cut squares and sewed them together one-by-one. I didn't mind; in fact
I preferred to do it that way so it would be extra scrappy! But of course, you
could strip piece if you wanted.

For the most part, I chain-pieced rows together to make regular, small 9-Patches (above).
I made some that had brights in the corners and some that had whites in the corners.
This was such mindless sewing and I quite enjoyed it! Immediate satisfaction!
Then I sewed nine of those 9-Patches together to make big 9-Patches that had
81 squares in each block. I figured out it took me about 45 minutes to make a block
(maybe about an hour with cutting).


Towards the end of this project, I switched from making small 9-Patches to just
chain piecing squares together to make a row for the big 9-Patches. I started by sewing tons
of pairs of bright and white squares together. When I got bored I separated the pairs
and then sewed them together to make units of 4 squares each.
Once I had all those sewn together I sewed 2 of those units together plus one extra
square to make a row of 9 squares.

PRESSING
After I made each block row, I pressed the seam allowances toward the dark/bright fabrics.
After I sewed the rows together, I pressed the seams open.
I pressed everything as I went. It may seem daunting but I honestly
got faster the more I did it. It really wasn't too bad. I definitely
recommend pressing as you go and pressing the seams open will help your
quilt lay nice and flat.
Quick side note here:
I never pin when I piece. If you're really accurate in your cutting
and piecing all of your seam allowances should be able to nest together nicely.
I'm sure that saved me a lot of time while making this quilt. I have some tips saved
in my Instagram highlight bubbles on precision piecing and cutting.
Check it out @gigis_thimble.

making two blocks and kept trying to double the number of
blocks I had until I finished. One month I challenged myself to
make 100 little 9-Patches and towards the end of this project, I challenged myself to make 1
big 9-Patch a day until I was done making all of my blocks. I always tell myself,
"A little progress every day adds up to big results!" and that is definitely the case
with a Postage Stamp quilt!

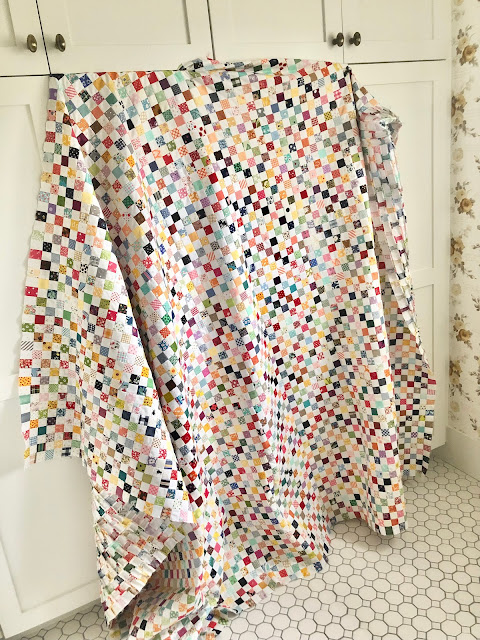
Because there are a gazillion seams in this quilt, it is heavier than normal.
The seams can start to stretch apart because of the weight and become
harder to match up. So I would recommend that you make two halves of your quilt;
press the row seams and then sew the 2 halves together to complete your quilt.
Here I am at the halfway point:

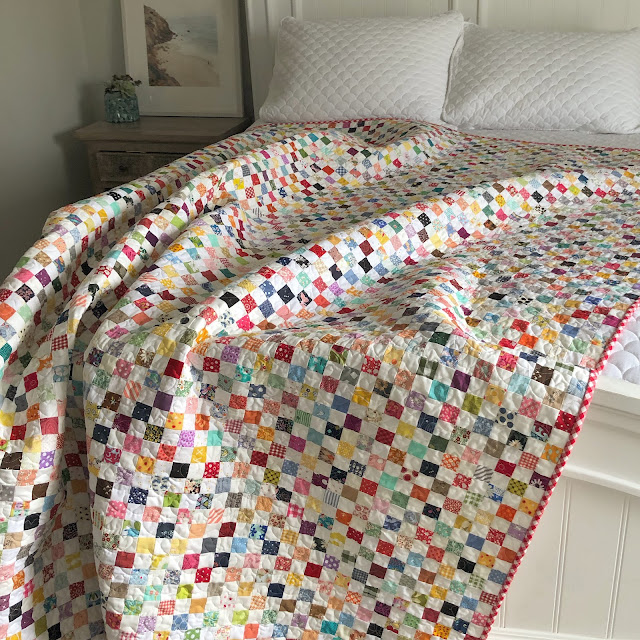
And here is the finished quilt top. An exciting moment!

FINISHING
I bound the quilt in this red and white gingham fabric that I had in my stash.


I also had this rainbow fabric in my stash that I had bought recently for another project (that didn't turn out how I wanted so I gave it away). The fabric is 55218-20 from the fabric line Shine On by Bonnie and Camille for Moda. I used it for the back of my quilt and I love it.

My friend Jen Ostler quilted it with the Scribble Hearts panto.
She always hides an object in her quilting for her clients to find so this time
she did a rainbow. It took me forever to find but I think it's darling.
It's much easier to find from the backside of the quilt than the front!

quilted with the Scribble Hearts panto and I thought it was sweet and fun so I decided
to do the same on mine. I love the quilting community where we can all
inspire and learn from each other!

I've been buying custom quilt labels from Ever Emblem for the last couple of years.
I get the 2" cotton fold-over, sew-in labels and I've been really happy with them.
They're really inexpensive and a quick way to label your quilt.

Well that's it! I think I addressed all of the FAQ's! Please let me know if I missed anything.
Just to recap here is a quick breakdown of all of the details...
DETAILS
Finished size of individual squares: 1".
Finished quilt size: 72" x 90"
Total number of big 9-Patch blocks: 80
Layout: 8 x 10 blocks
Total number of 1" squares: 6,480
Start date: December 27, 2019
Finish date: November 3, 2021
Longarm quilter: Jen Ostler in Highland, UT (@drycreekquilter on Intstagram)
Quilt panto: Scribble Hearts
Hidden object in the quilting: rainbow
Backing: Rainbow 55218-20 by Bonnie + Camille for Moda
Approximate time to make this quilt: 85 hours
Batting: 100% cotton
Machine pieced
Hand-bound
1/4" seams


I hope you enjoyed this post!
Like I said, please let me know if you have any questions.
I'd love to know what you think about this project
and whether or not YOU might make a Postage Stamp quilt someday!
Happy quilting!

Thank you for sharing your journey with this beauty!!!
ReplyDeleteYour postage stamp quilt is so lovely and a true labor of love! Thanks for sharing!
ReplyDeleteWOW, BEAUTIFUL! There is no way I'd ever do a postage stamp quilt as my piecing isn't accurate enough to get it done right. I'm jealous of you guys that can accomplish that kind of perfection. I'll just enjoy vicariously through you. Merry Christmas!
ReplyDeleteI agree with that.
DeleteI'm doing one using the 10 sisters grid fabric. That is literally only the way my lines would match up. I cut one square of every piece of material that I have and get. My sister-in-law did one and only had one fabric where there were two squares of the same. Most people could not find them, but her identical twin autistic sons, pointed it out right away.
DeleteThat's so interesting they both found them so quickly! Best of luck with yours!
DeleteAmber
This turned out to be so gorgeous! It does take a lot of time, especially when you are making it with squares instead of strip piecing, but as you say, a little bit at a time and persevering makes it worth while. I am making a similar quilt, using a different constant instead of the low volume for each block. My blocks are the same size as yours, and I make them using the second method you mentioned, a row at a time. I am really enjoying it. I hope mine turns out to be as pretty as yours.
ReplyDeleteI almost never read a blog...just enjoy the pics. But I read this entire blog and fully enjoyed it. Thank you for sharing your inspiration for this wonderful heirloom!!!
ReplyDeleteSame!!
DeleteThe quilt is beautiful! Thank you for explaining your process. I have a lot of patience, but I think you have more! :o)
ReplyDeleteKathleen - kakingsbury at verizon dot net
Gorgeous! Might have to make one as my leader and ended in 2022 😁🥰
ReplyDeleteI love it!
ReplyDeleteI have always wanted to make one of these quilts. How kind of you to share your detailed method with us. I've written it all down and can't wait to work on it between projects in the new year. Thank you.
ReplyDeleteI am just finshing the hand quilting on one I started this year, only 50 x 60. I want to do a lighter brighter one now, after seeing yours. Love yours!
ReplyDeleteThis is so inspiring. I’m heading to my sewing room to sort through my scraps😊. Turning bits of fabric into something beautiful and useful makes me happy. This is also a great New Year project. Thank you.
ReplyDeleteI lived following your progress on IG. Thank you for putting it all together in this blig post. You made a beautiful quilt and have memories to treasure.
ReplyDeleteThis quilt is so wonderful! It's a very charming project: you must fall in love with it and stick to it in time. I have kilos of scraps and this is definitely a beautiful way to use them. And the look of your quilt really makes me jump on board. Thank you for all details in the blog, and for sharing your adventure.
ReplyDeleteHow beautiful!! Love how memories of your grandmother is part of your creating. Before reading your post I would never have considered a postage stamp quilt - but your tips and slow-and-steady-wins inspiration puts it back in the 'consider' category. Thank you for sharing!!
ReplyDeleteThank you so much for sharing your process and your quilt. It is amazing!
ReplyDeleteWow! Congratulations! It’s a beauty
ReplyDeleteIt is beautifull
ReplyDeleteAbsolutely stunning!! And I've started collecting squares in the same colours as you. When I finish up a quilt that uses brights, I cut the leftovers into 1.5 inch squares and in 20 years, I'll have enough for a quilt!! Thanks for sharing and Happy New Year!
ReplyDeleteWonderful quilt, and thanks for all the explanations!!! Love it!!
ReplyDeleteSo lovely, I am inspired!
ReplyDeleteI love it. I want to make one now with all my stash scraps!
ReplyDeleteAn impressive amount of work that paid off. A nice story about picking up where Grandma left off.
ReplyDeleteThank you for sharing this colorful adventure. Your gran must be looking on proudly!!
ReplyDeleteAll of your quilts are so nice. I like they way you do so many at a time. I especially enjoy the Postage Stamp quilt. I seen one many years ago. I’ve always wanted to make one. Considering of starting one one block a day. Because I have other projects I started. I really do need to attempt to finish them.
ReplyDeleteThank you! Best of luck finishing your projects!
DeleteYour quilt is beautiful love your colors from La.
DeleteBeautiful! This is what I'm going to do with my scraps! I plan to do cutting and piecing as time and scraps allow.
ReplyDeleteThat's the way I like to do it to help break up the monotony. Have fun!
DeleteAmber
Beautiful! I did a similar thing with the pineapple block, 99!pineapples for a king sized quilt. I don’t know how to add a photo.
ReplyDeleteWhoa! That sounds intense! Good for you!
DeleteAmber
Love this quilt. I am making one right now. From all the scraps I had from making my grandchildren's quilts. Funny, the backing fabric you used is one of the fabrics in my quilt! :) LOVE!!!
ReplyDeleteI love it! I have never seen a postage stamp quit before. You have inspired me to make one. Thank you for sharing. Your Quit is beautiful.
ReplyDeleteThank you!!
DeleteLove your project. Truly ageless.
DeleteHi I enjoyed your blog you make the process of making this quilt easy, I look forward to try and do it too. Your quilt is beautiful!
ReplyDeleteThank you! I hope you enjoy making one as much as I did! The good thing is you can make it as small or as big as you'd like!
DeleteAmber
I love this!!! I’ve always wanted to do a postage stamp quilt, especially since my husband and I are both (now retired) letter carriers. Your tutorial is inspiring and has given me the courage to start cutting and sewing little squares together!! I really like your varied “whites” and I believe that detail will make this project even more fun for me. I appreciate your details of breaking the process down I to different smaller manageable sections. I’m starting tomorrow!!
ReplyDeleteYay! Best of luck to you and happy quilting!
DeleteAmber
Wow! I stumbled across this post and it couldn’t of come at a better time. A friend and I are both going to do a penny quilt starting this July at a retreat we are going to in Lancaster, PA. You have given all the instruction and tips we need!! Thank you :)
ReplyDeleteGlad I could help! Have fun at your retreat!
DeleteAmber
I Love this quilt!! I have always been drawn to postage stamp quilts but I thought it was definitely to long of a project for me. Your wonderful pictures and instructions have inspired me and a postage stamp quilt is on my bucket list now. Thank you for taking the time to provide instructions and pictures
ReplyDeleteThank you for sharing your beautiful quilt pattern. After seeing your lovely quilt and reading your journal I too am inspired by yours and your grandmother’s work. Although I am just beginning to learn how to quilt at 72, I am looking forward to taking on this task. Thank you!
ReplyDeleteThis is a quicker way to do a postage stamp quilt, rather than cutting so many individual squares: https://www.redpepperquilts.com/2012/04/postage-stamp-quilt-tutorial.html
ReplyDeleteThanks for sharing Rita's tutorial! That's a great way to do it! I was just working with scraps mostly so that's why squares worked for me! Lots of ways to do a Postage Stamp quilt!
DeleteWOW That is just beautiful! I admire your skill and patience. I would love to make a postage stamp quilt but I know I'd never have the patience to work with such small pieces. thank you for sharing the process with us.
ReplyDeleteYour quilt is beautiful. I have 2 1/2 “ squares in my sewing bag in the caravan and when hubby goes to play lawn bowls I sew up the squares into strips and press when I get home then will join on next trip. This is my holiday quilt so going to take a long time. I hope it turns out as nice as yours
ReplyDeleteI heard that for a true postage stamp quilt, each fabric is used only once. Thoughts?
ReplyDeleteHi there. I'm not sure if that's a hard and fast rule. I think that would be hard to keep track of personally and I was happy to use up scraps so I don't mind that certain fabrics repeat. It's a personal choice I think. :)
DeleteThank you for giving a play by play of your postage stamp quilt. It is wonderful and you should be so proud of yourself. Now I've got to go get started on one!
ReplyDeleteThank you! Hope all those details help. Happy quilting!
DeleteAbsolutely love quilts like that. I made one with 4” squares then put half inch sashing in between each one. I keep any piece of fabric I can cut an 1.5” square out of. Can’t wait to start one like yours
ReplyDeleteThat sounds cute!!!
DeleteLove this!!
ReplyDeleteI just might start one too!
Thank you so much!!
What an inspiration, it's a great scrap stash buster and a lovely project to start and stop. It's also a great memory quilt to sit and browse over. It's a dull rainy day here in the UK so I'll grab my scaps and a rotary cutter and get started. Thanks again for your inspiring post
ReplyDeleteSounds like a perfect day to spend a rainy day. Thanks for stopping by...
DeleteI love your Postage Stamp Quilt! I have been working on one for my daughter & her husband for YEARS! Problem is keep having granddarlings. 😀 And THEY need a quilt themselves. 😀
ReplyDeleteI began it as a mindless quilt when she was a young teenager, she loved it and claimed it as her “ someday wedding quilt”.
I used all fabrics leftovers of garments I have made for her in her life, plus once she was engaged,she added some of her to be groom boxers.😉. THEN, I have added HER children’s baby quilts fabric to it.
Finally, IF I can keep my beloved well long enough, I can finish the last few rows, assemble it, bind it & quilt it, whew!
She believes it will become a family “I spy” quilt, with all the fabrics of everyone’s quilts included.
Sounds absolutely amazing!!!
DeleteBeautiful job. I must have read one of the instructions incorrectly as how do you iron with seams open when you sewed with seams nested. Thanks for your helpful instructions.
ReplyDeleteThank you! When I sew the individual squares together I press towards the dark color and then when I sew the rows together I press them open.
DeleteI absolutely love this quilt. I read the whole blog and enjoyed your tips all along the way. As a novice quilter the information is invaluable but I can’t see me attempting a project like this. Thank you. Co Durham England
ReplyDeleteI love, love, love this quilt!!! My mother received a similar quilt when she married in the midwest in the late 1940s. Her mother in law's church friends worked together to make it. Instead of white, the color red was used. That quilt lasted a short time in quilt time as we kids spent a lot of hours looking for our favorite piece of fabric. What I would give to see it again. And thank you for the tips on how to move this project along. I'm on it.
ReplyDeleteThat is so cool. Such a sweet gift from the church friends and I love the red idea!
DeleteThe quilts are lovely and the postage stamp quilt is a beautiful tribute to Gigi. I’m sure she is very proud of all your hard work.
ReplyDeleteI Love a postage stamp quilt! I like the idea of using different creams and whites. What a wonderful story about you GrandMother!
ReplyDeleteI love your quilt. Your journey has inspired me to give it a try.
ReplyDeleteFrom 2019 to 2020 I was in Hawaii and pretty much trapped indoors due to COVID restrictions.
ReplyDeleteWe couldn’t even walk on the beaches for months. I only went to the grocery store in the early mornings, before 10 am. I mostly sat at my little sewing machine and listened to the radio. SO- one-by-one I pieced together my first postage stamp quilt top. I had been collecting 1&1/2” squares for years and years. My first quilt top which was too big and heavy for me to quilt was long armed by a friend. That quilt is named ‘10,001 Memories’. Can you guess how many one inch squares are in that quilt? The next two are twins, ‘House Arrest’ and ‘Isolation’. They each have 3,948 squares. I have completed a baby quilt with a flannel back that is named
‘1,008 Wishes for a Long and Happy Life’. Can you guess how many one inch squares are on it’s front. There is a quilt top ready to put with a batting and back that has over 5,000 squares AND I still have many pounds of squares to sew together. For about 20 years I have never thrown away a scrap of material from which I could get a 1&1/2” square !
Wow! That is amazing! I don't think I'll do another one. Didn't even think I would do the first one to be honest. I admire you though! They are so lovely when finished!
DeleteAn alternative to making an entire postage stamp quilt, is to use these small squares as centers for star blocks (Ohio, Sawtooth). I had some leftover peach and pink fabric that I paired with white to make multi-patch centers for Sawtooth stars. (Just match the patches needed to construct the center needed for the block you choose..
DeleteMy 12 year old son with my guidance is making what I called a 1inch quilt. I had no idea it was called a postage stamp quilt! He started in July and I have recently cut new squares for him. He wanted to know how tiny he could go as he love miniature things. He will be excited to know the proper name for his quilt!
ReplyDeleteThat is so cool that he is doing it and that you found a project to do together! Best of luck!
DeleteAmber
Love it.
ReplyDeleteI am contemplating starting a postage stamp quilt, just trying to decide if I want random colors or only brights.
Thanks for sharing.
Ohh touch decision but either one will be lovely!
DeleteHaving all of the steps along the way is really helpful, thank you so much for sharing them. I have never thought of doing a postage stamp quilt and now have something to save my tiny fabric scraps for.
ReplyDeleteYou're welcome and thanks for stopping by. Happy quilting!
DeleteAmber
First, thanks so much for sharing your quilts. Second, thank you so much for the Emblem Label Link. I ordered some labels. They have great prices and and selection of labels sure to please any.
ReplyDeleteYou're welcome! They're great labels. I'm glad you are enjoying them.
DeleteThis is just so beautiful. It was so fun sharing in your journey and feeling like we were along with you every step of the way. Thank you for sharing. Enjoy your exquisite quilt
ReplyDeleteThanks so much for cheering me on! I needed it sometimes!
DeleteThis is my dream quilt. I hope I live long enough to make one.
ReplyDeleteI never thought I would make one and then one day...I just started!
DeleteI am just starting postage stamp quilt, but I am doing EPP. 🤪. This quick is gorgeous!!!
DeleteWow! That is so cool! Enjoy the process!
DeleteTruly fabulous & a real labour of love!
ReplyDeleteThank you!
DeleteDo you wash the fabric before starting your quilt? Your postage stamp quilt is beautiful. Thank you for sharing your directions.
ReplyDeleteI didn't because I was just using scraps. I don't usually prewash much of my fabric. Once in a while I do if it's a really deep saturated color and it is going to be a high-contrast quilt. I use color catchers when I wash the quilt for the first time to help soak up any extra dye floating around and I always use high-quality fabric.
DeleteBecause of the COVID outbreak, I was mostly house bound from mid 2018 to fall 2019. I had been collecting 1&1/2” squares for over 20 years. It was the time to listen to music or the TV and piece together most of my collection. My first quilt, which I had machine quilted by a local professional long armed, is called ‘10,001 Memories’. Can you guess how many one inch squares are in it? The next two twin quilts are named ‘House Arrest’ and ‘Isolation’. They each have 3,948 one inch blocks. Next quilt I made ‘1,008 Wishes (for a long and happy life)’.
ReplyDeleteAwesome!
DeleteWhen piecing your version using rows, how do you handle/know which direction(s) to press the rows? Must have taken lots of patience when putting this quilt together! It’s now an incentive for me to learn a little patience!
ReplyDeleteI first pressed my seam allowances to the dark/bright squares and then I pressed my seam allowances open after sewing the rows together.
DeleteAmazing quilt, wonderful instructions and helpful tips for your beautiful handiwork! I am trying to use my scraps in a way that I don’t have to cut all kinds of sizes…lengths and shapes! This seems to be the answer! Thank you for inspiration to get me started… Sherry Melendy, Chester, Vermont.
ReplyDeleteThank you! Glad you found it helpful! Have fun!
DeleteBeautiful! You’ve inspired me to make my own!!
ReplyDeleteThanks! It was a fun project!
DeleteIt is a beautiful quilt. If you make it with 2” squares, do you still call it a stamp quilt?
ReplyDeleteThanks! I've seen people refer to postage stamp quilts with all different size squares but I also just saw something online that said postage stamp quilts are made with scraps the size of postage stamps. So I think it goes both ways but maybe (technically) they're made with 1" finished squares.
DeleteAgree--I think the limit is 1 inch; some people use 3/4 inch and even 1/2 inch--can't imagine that! I'm working on one myself, but stitching all the pieces by hand in 100-piece blocks (10 rows of 10). No white--no solids--nearly all 30s repro prints. I think I will do a huge center to fit a queen-sized bed, then a "border" of white, then a border of postage stamp, then another border of white. Have already worked on it a lot--started in November and am almost finished my 8th block (800 pieces sewn together). Aiming for 25 blocks for the center, I think.
DeleteWow, that sounds incredible! Have fun!
DeleteI am in awe of you, your patience and perseverance. The quilt is just beautiful. Thank you for the tutorial it has inspired me!
ReplyDeleteI never thought I would make one. Can't believe I actually did it! It wasn't too bad though! Some people just whip them out!
DeleteOh my goodness!! This is amazing! But worth the effort! I’ll have to put this on my some day list! I also like to keep the tiniest scraps so I do have lots of ingredients!! Keep up the wonderful ( work) fun and thanks for sharing!😊
ReplyDeleteThanks for your kind words! This is a great way to use up those tiny scraps!
DeleteThank you for rhe inspiration and helpful instructions! I just finished mine. We call it the eye spy quilt, my kids have so much fun finding the different fabrics. They even added their own shapes to find by embroidery. It's a family favorite that will hopefully last generations.
ReplyDeleteThat's so awesome! I'm sure it's incredible!!!
DeleteThanks so much for sharing this, especially all the details and photos! I've been wondering if I was crazy to be saving the 1-1/2" scraps and now I know what I will be doing with them!! Love everything about your quilt...colours, binding, panto, etc. Thanks again
ReplyDeleteThank you so much!!!
DeleteSorry - didn't mean to post as anonymous. Glad you shared all the info and off I go to get started.
ReplyDeleteI have started cutting up my scraps and I am hoping to make a postage stamp quilt with my 1 1/2” squares. Yours is beautiful!
ReplyDeleteAmazing work, how do you get perfect seams, I’m overwhelmed of your accuracy!! It must be your amazing skills, patience and your sewing machine. Please send my way. ❤️😍❤️
ReplyDeleteThank you! I think it all starts with cutting accurately. But yes, I've had lots of practice. Can't believe I've been quilting for over 20 years! It doesn't need to be perfect though so please don't be overwhelmed! Just dive in and do your best!
DeleteOh my gosh this is adorable! I remember many years ago seeing a postage stamp quilt in a quilting book in the 80's and loving the look. It has been many years since I made a quilt but have been feeling the itch to start again, this would be a perfect pattern to start. What a wonderful gift of sewing your grandma passed on to you. Blessings!
ReplyDeleteYes, an easy project for sure. Time consuming, but easy and mindless!
DeleteSo beautiful!
ReplyDeleteThank you so much for your informations! I have been planning to make a postage quilt and these informations will be quire helpful! Your quilt is beautiful!
ReplyDeleteThank you and best of luck on yours!
DeleteTotally impressive! What a wonderful quilt, and such a legacy!
ReplyDeleteWow! This beauty is breathtakingly gorgeous and inspirational! Good job! I only have a few 1 1/2 inch strips given to me from a friend. I guess I better get busy cutting more. Thank you for sharing!
ReplyDeleteThank you! You can cut 1-1/2" strips anytime you have a piece of fabric out for another project. It's nice to cut different size strips for different scrap projects while you have the fabric out! :)
DeleteI took the class one time and the teacher suggested that when we finish a project we have a couple played times between quilts and times when we just didn’t wanna seriously quilt and do what you did. She also suggested that you get a basket and as you make your blocks, you just throw your blocks in the basket. It may take a long time but eventually when you put all of those play blocks together, you will have a quilt.
ReplyDeleteLove those ideas!! Thanks for sharing!
DeleteI collected 1&1/2” squares for about 10 years. Finally when COVID hit and we were not allowed out very much in Hawaii( we couldn’t even walk the beaches!) I decided to start sewing my collection together. I name all my quilts. The first completed was named “10,000 and 1 Memories”. Can you guess how many 1 inch blocks were on that quilt? The next two were twin bed sized. One is named “House Arrest” and the second is “Isolation”. They both have 3,948 one inch blocks. These three quilts do have borders for added size. The next quilt was donated to the NICU unit at the hospital in Tacoma, Wa. It is called “1,008 Wishes for a Long and Happy Life” I still have a LOT of 1&1/2” blocks ! I collected a big suitcase full for a few more quilts for the infants getting out of the NICU unit. It should be a celebration, don’t you agree?
ReplyDeleteThank you for the pressing tips, hopefully my postage stamp will look as good as yours!
ReplyDeleteLoved your quilt and the process you used to complete this project. I have been fascinated with the postage stamp quilt and have been wanting to make one. My sister tells me I’m mathematically challenged, and I am. With a small cutting mat and a 2-1/2” square ruler, I have quiet a stash working towards my non postage stamp quilt. After cutting these squares, I place them in a narrow plastic drawer saver which keeps the squares in a neat stack, also easy to store. Very informative, useful information I plan to use in assembling my future quilt. Thank you!
ReplyDeleteI'm glad to hear that! Best of luck on your postage stamp endeavor! It's a time-consuming but beginner friendly project!
DeleteYou inspire me!! Thankyou. Your quilt is beautiful and I appreciate how you did it.
ReplyDeleteLove your beautiful quilt! I, too, collect & sew 1-1/2” squares. It’s addictive. Thank you for sharing not only the inspirational pictures, but also your process
ReplyDeleteYour grandmother's quilt is called Gone to Pieces from better homes & garden, Feb. 2008 issue. I made this quilt also & entered it in our county fair & got 1st place, judges choice. Love your quilts, a lot of time went into the postage stamp quilt
ReplyDeleteAhh that's so good to know. Thank you!!! And congrats to you on your county fair entry!
DeleteAbsolutely amazing! Congratulations! I love your colours!🥰🌺
DeleteI think your quilt is beautiful! I have a bunch of leftover 1 1/2” squares and was searching for a project to use them in and stumbled upon your article. I will definitely be making a postage stamp quilt. Thank you for sharing!!
ReplyDeleteThank you!
DeleteAll I eant yo say is "WOW". Your Grandmother would be so proud.🙏 A Beautiful Quilt. ❤️
ReplyDeleteWhy thank you! :)
DeleteI think you should publish the quilt’s weight in the statistics. I never considered that so many small squares could be so heavy. Very interesting post.
ReplyDeleteGood idea to publish the weight!
DeleteI am very impressed. Now I have to complete my started quilts so that I can begin another!
ReplyDeleteThank you!
DeleteQuite impressed. I think I'll do a few squares & see where this leads...
ReplyDeleteGood idea!
DeleteYour quilt is beautiful and your piecing is so perfect. I’m on my 3rd block, making them 12.5 X 12.5. I started piecing them y strips but stopped as I enjoy placing colors as I go along. Your sewing table looks just like mine!! I have many bags of scrap I’m trying to use up. Thanks for posting your postage stamp quilt. It’ll be for my sil when I finish..few years from now. 😘❤️
ReplyDeleteYou are very generous to give that away. She'll love it. Thank you!
DeleteThis is such a beautiful quilt! I am inspired to take my smaller scraps from another quilt project and put them to use- thank you for inspiring me!
ReplyDeleteGreat idea! Such a great scrap buster!
DeleteAmber
I love this quilt. I’m going to try to make a postage stamp quilt. I lost my 16 year old daughter almost 25 years ago. I have a few of her blouses saved. I’m going to incorporate them into the quilt. Thank you for the inspiration and wish me luck.
ReplyDeleteI'm so sorry for your loss. That will be amazing to incorporate some of her clothing into the quilt. You can wrap yourself up in the quilt and think of her. I love that.
DeleteMany thanks for sharing your stunning work of art! And the instructions too. They are really helpful. I’ve been collecting 1930’s fabric, which is not easy as I live in the U.K. but I’m getting there. So it will be a lovely bright and colourful quilt. I’m going to do a mix of individual piecing and short strips. Can’t wait to get sewing once I’ve cut the scrap fabric up that I’ve been lucky enough to get hold of!
ReplyDeleteOh best of luck! That's exciting you're going to start! Happy quilting!
DeleteAmber
I. Love making postage stamp quilts. I can’t waste scraps of precious fabrics. I make mine with 2.5 inch squares. It is ga good way to use up left over jelly roll strips. I use 40 squares to make the width of the quilt pressing the seams open and starched for perfect seams.
ReplyDeleteGreat idea to use leftover jelly roll strips! I should do that sometime!
DeleteBeautiful story and I love your quilts. My grandmother and mother were both fabulous seamstresses and loved to also quilt. I have many quilts that have been handed down. It gives me a warm smile to wrap myself up in their quilts and reflect of times I shared with them. Job well done! They are absolutely amazing!
ReplyDeleteThat's what quilting is all about! Thanks for the reminder!
DeleteI have made several of these in blue and white, and I always tie them together. The strip method works best for me, and the smallest size squares I've used were 2". I find them a fast and easy project.. Well done!!!
ReplyDeleteBlue and white - classic! I'm sure they're gorgeous. I love a blue and white quilt.
DeleteI’m making one using 2” squares. Mainly florals. I’m hand piecing into 8x8” grid
ReplyDeleteSounds lovely!
DeleteI love your quilts. I am working on one myself (1-1/2” squares). Thanks for your tips. I have a question: on your wall you have some wire hooks; where did you get your hangers and clips?
ReplyDeleteI wish I knew! They were a gift from my sister-in-law over a decade ago. I'm so sorry I don't have a source on that.
DeleteAmber
Wow! This is beautiful. I also am making a postage stamp quilt. It is indeed a GOZILLION little squares.
ReplyDeleteSimply beautiful! I am making the postage stamp quilt also & you do have to pace yourself. ♥️
ReplyDeleteThat is absolutely
ReplyDeletebeautiful!! You have inspired me!!
A Bucket list item for me I sewed my borders on yesterday.
ReplyDeleteCongrats! That's a huge accomplishment!
DeleteI’m in process of adding more rows to my postage stamp quilt but I’m getting waves on the edges. So, I guess I’ll add larger blocks instead of single rows. It is so hard to pull the two fabrics together while sewing and keeping everything even. I love it so much & has become addictive. It’s for my SIL who has inherited a rather large stamp collection from
ReplyDeleteHis father.
Yes, once the quilt top gets big, the weight can start to make things shift as you're sewing so I would definitely recommend sewing the whole thing together in sections. Adding large blocks on instead of rows should help. That's very generous of you to make your SIL a postage stamp quilt!
DeleteThis Amazing❤️
ReplyDeleteI have so many scraps and I would LOVE to make one of these! Especially since it's a project I can work on in small sections of time when I've got fifteen or twenty minutes here and there to pick it up! I haven't made many pieced quilts on my sewing machine (I've mostly done EPP), so I'm a little worried about lining everything up perfectly, but I'm excited to try anyway!
ReplyDeleteIt's the perfect project for working on a little here and a little there. Making it in sections will help with lining things up. It gets heavy and then it's hard to work with because it pulls down so definitely work in sections as you sew the blocks together.
DeleteThis quilt is amazing. God Bless You for your patience. Priceless!!!
ReplyDeleteHaha, thank you!
DeleteI inherited several quilt tops (,old) one of which is the postage stamp. The fabric it's very old,and hand stitched.It is very large and I have to go over every single block as it has pulled apart in places. I have cut some of it apart and will put in squares to try to finish it. Your quilt has given me inspiration to GET GOING. Thank you!
ReplyDeleteOh wow, I recently repaired an antique quilt top. It was just 3" squares throughout but it was a painstaking process to unpick damaged squares and insert new ones. After years of washes the fabric had cinched up around the stitches. It was very difficult to repair the whole thing and took many hours. Good on you for doing that!
DeleteNice quilt! I couldn’t find the rainbow. Can you tell us? You have inspired me to finish my first quilt from 1998/99. It’s a log cabin quilt and I have about 12 blocks done. I have finished 4 quilts since starting that one. 3 baby and one big throw for my husband. Same as you, machine pieced and hand bound. Gotta get back into quilting. Started doing other things too. Too many unfinished projects! Like a lot of us I am sure.
ReplyDeleteAll fun stuff though! I would love to see your Log Cabin quilt! I love them! So classic. Happy quilting! Amber
DeleteI happened to stumble upon your blog this evening and enjoyed reading about your postage stamp quilt. I am currently making a similar quilt with 2 inch finished squares. I cut 2.5 inch squares from a layer cake for the darks and a couple of charm packs for the light, as I wanted it very scrappy. It is set on point and looking beautiful. While I didn't use up random scraps, I did use up precuts in my stash that I fell in love with and were just waiting for the right project. I also have incorporated some special 2 inch blocks that have tiny embroidered designs and fussy cut images. No rush to finish this one, but it is the most enjoyable and relaxing quilt that I have made. No intricate points to match or borders to add.
ReplyDeleteIt sounds amazing!!
DeleteI have always wanted to make a postage stamp quilt. Yours is an inspiration. I liked a Comment that suggested doing the center in postage stamp and finishing with a different pattern around the outside.
ReplyDeleteThat would be so cute!!
DeleteLOVE, LOVE, LOVE IT!!! And the red gingham binding just makes it!
ReplyDeleteThank you! You can never go wrong with gingham!
DeleteI love this quilt. Thank you for sharing.
ReplyDeleteThank you!
DeleteI absolutely love your quilt! The Postage Stamp quilt is on my list of quilts to make and I have finally started one using scraps. I came across your wonderful blog when looking to see how others put it together. I really liked your process and plan to go about putting my one inch pieces together like you initially did. Thank you so much for sharing your process. Deborah
ReplyDeleteThank you! Glad this post cold help! Best of luck with your postage stamp quilt!
DeleteYour post so inspired me I began a postage stamp quilt. I made mine into 4 patches. So far I have 640 4-patches. As I started to put them together from my design wall, I realized the size really shrinks and I plan on adding to the rows. It has been addicting, but taking my time. Thanks for your help in getting me started.
ReplyDeleteOh I am so happy to hear that you found some inspiration here! Enjoy working on your postage stamp quilt!
DeleteI’m still very new . When you say hand bound you mean you did the binding seeing by hand correct? Also were you using 3/8 or 1/4 in seams?
ReplyDeleteHi! Yes, I machine stitch it to the front side of my quilt with a 1/4" seam allowance and then hand stitch it to the back side. That is considered hand-bound. But if you machine stitch it to both sides that is considered machine-bound.
DeleteWow! Absolutely beautiful!
ReplyDeleteThank you!
DeleteThis quilt started my quilting journey. Along the way I've taken classes & made several quilts that have all been gifted to others. Now I'm returning to this quilt as a gift to myself. The goal is to finish it by my 60th birthday in 10 months. When I told my sewing friends I was doing this, they generously offered me their scraps... and their prayers. Lol This quilt when completed will keep me warm with the love of friendship.🥰 I'll share pictures when mine is completed.
ReplyDeleteI would love to see yours when it's finished! Sounds like you have great friends! Best of luck with your postage stamp quilt!
DeleteYour quilt is stunning, so beautiful. I made about 10 total squares and realized how stiff it was. What am I doing wrong? Is there any way to fix it?
ReplyDeleteThank you for your inspiration.
Thank you! Are you using starch? Are you using stabelizer? Good quality quilting fabric? It shouldn't be any stiffer than normal blocks...maybe just a bit heavier because there are so many seams...but not stiffer. Hope that helps.
DeleteI have always wanted to do a postage stamp quilt. I read your post a couple of times. I wanted to do the same as you and do the individual scares vs strips. I have such a stash of vintage fabrics, I think this would be so much fun! One question to verify the process. As you sew one strip of blocks, you press the the seams in the direction of the dark. When you sew the rows together, you press them open. Is that correct?
ReplyDeleteHi there! Yes, on the blocks, I pressed the individual squares in each row - toward the dark/bright prints. Then I sewed all the rows together and pressed each row seam - open. Hope that makes sense! Thanks for stopping by!
DeleteAmber
My mother collected vintage fabrics for years and now I have all of it. I am now 72 and have always wanted to make a postage stamp quilt. I like the alternating cream squares, it makes the colored squares more distinctive. Question, would cutting the squares 2" make a significant difference in the overall look of the quilt? I want to make a king size quilt and thinking of the weight (in addition to the squares needed!)
ReplyDelete