Amazon Gift Card Giveaway + IronEZ Discount Code!

Friday, November 29, 2019

I hope you all had a wonderful Thanksgiving!

We hosted 15 family members at our house and everything went off without a hitch!  
We ate lots of good food of course and now I'm exhausted!  I plan to do lots of 
relaxing, eating leftovers (mostly pie) and a little online Black Friday shopping today!

[Wisconsin Cranberry Pie]

Speaking of Black Friday shopping, I have a fun giveaway and a discount code for you today!
You know I'm a fan of my IronEZ, right?
I've been a long-time user of the ironing board spray bottle holder.


Without fail, my spray bottle used to fall off my ironing board every time I ironed.
It's no longer a problem though with my IronEZ.  I love it!  It's my favorite spray bottle
and the holder rotates for easy ironing board storage!
Plus, I think it's a great gift for quilters and anyone who just likes to iron 
(sounds weird but trust me, they're out there.  My mom is one of them, ha!)


My friends at IronEZ wanted to giveaway a little something to my followers today
so they've offered to give TWO $25 Amazon gift cards!  
They've also given me a discount code to share with you 
for 15% off + free shipping (US only) on their site!
Click HERE to visit IronEZ and use the code "AJ15" at checkout.


I like food.  I also like to not think too hard so we're going to keep this giveaway really simple.
To enter to win one of the $25 Amazon gift cards
leave a comment below telling me what your favorite Thanksgiving dish is.
 I'm going to start.  My name is Amber and I like stuffing and dessert of all kinds.  Oh, and pretzel jello and homemade rolls.  Okay, I clearly couldn't pick just one dish.  But you get the idea.  This is a safe place; no judgement here..  Just tell me all the foods you love at Thanksgiving and I will be drooling by the end of this, I'm sure.  I'll announce the winners Wednesday, December 4th.  Ready, set, go!

Poppie Cotton Fabric Giveaway!

Wednesday, November 20, 2019

Good morning!
First, I just want to thank everyone for the love on my
Gingham Farmhouse projects!  I truly love working with Poppie Cotton fabrics!  
They are so pretty and sweet and I think each line keeps getting better and better if that's even possible!  I can't wait to see what they come up with next!


Now, without further ado, the winners of the Gingham Farmhouse 
monogram panels & coordinating fat quarters are... 


#1 Little Quiltsong who said, "Such a beautiful quilt, Amber - love how it showcases the many pretty prints in the fabric line - and the pretty pillow - so cute! I love our big windows in our home that face to the back and the lovely landscaping from our surrounding neighbors, including ours :)!"

#2 Barbara Woods who said, "right this minute that it's warm! been cold in the South for a few days."

...when asked what they love about their homes.

Little Quiltsong and Barbara, please email me your name and shipping address and I will get your prize shipped right off to you!  My email is gigisthimble@hotmail.com.

I loved reading all of your answers to that question!  Thank you for playing along.
I hope you'll go out and get yourself some Poppie Cotton.  Maybe the Gingham Farmhouse monogramed panel so you can make the HOME pillow using the tutorial I posted HERE.  
It would be a really sweet homemade gift for a friend or family member for the holidays!


You can also find a list of a few shops that carry 
the monogram panel from Gingham Farmhouse in the tutorial.  

Well that's it for today friends!
Come back next week because I actually have another 
Black Friday giveaway for you!  It's gonna be good!
See you then!

Gingham Farmhouse Fabric Tour + Tutorial and Giveaway!

Thursday, November 14, 2019

I've been waiting for this day for weeks now!
It's my stop on the Gingham Farmhouse Fabric Tour and guys, I absolutely LOVE 
this fabric line by Poppie Cotton!


It's full of florals, orange peels, houses (not shown here), gingham and gingham BUNNIES!!!  I mean, can you even!?!  All things I love in soft, beautiful colors!  But I especially love the navy!  


Gingham Farmhouse also includes the sweetest alphabet panel that you ever did see.  
It's available in 3 different colorways!


I couldn't resist making a little something from the panel and a "HOME" pillow seemed to be the perfect thing.  Click HERE for the tutorial! 


I also made a quilt!


The pattern is called Sugar from my book, Vintage Vibe.
(Click HERE to get an autographed copy.  
It's on sale right now for $14.99 for 14 project patterns!)


Sugar calls for 8 fat quarters for the blocks but I used 18 and made it really scrappy!


It finishes at 64" x 80".


I had my quilter, Cathy Barney in Alpine, Utah do an orange peel edge-to-edge design on it.
It's one I hadn't used before and I love the way it turned out!


Look at that texture!


I finished this quilt off with a scrappy binding.  
I think it adds a fun touch and is a great way to use up fabric from the line.  
Do you ever do scrappy bindings?  They're my fave!


I want to share the love of Poppie Cotton with you
so today I am giving away 2 darling Gingham Farmhouse 
panels with coordinating house print fat quarters! 
You can make a pillow (like mine!) using THIS tutorial 
or you can incorporate these letters and numbers into a quilt.  
There are so many possibilities!

Two lucky winners will be chosen.
Just leave a comment below telling me what you love about your home.
I will announce the winners next Wednesday, November 20th here on the blog.


Thank you for stopping by today!
Be sure to visit the other blogs for more Gingham Farmhouse inspiration!


Gingham Farmhouse HOME Pillow Tutorial

As part of the Gingham Farmhouse Fabric Tour, 


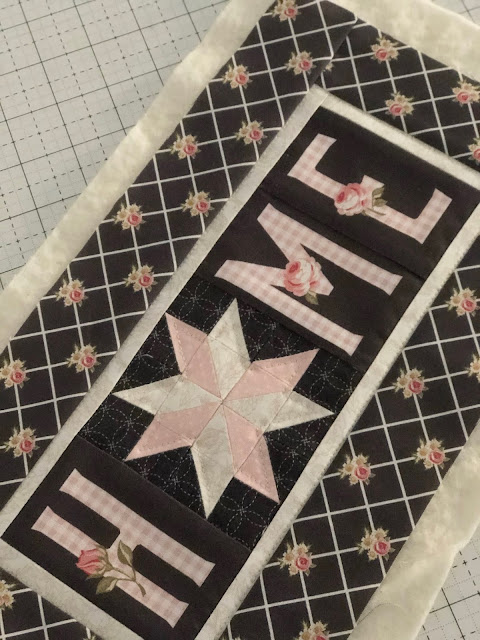
and a sweet little pillow using the Rosy Monogram in Navy from Gingham Farmhouse by Poppie Cotton.  Today I would like to share a tutorial for the pillow!  It's a fun project you could easily get done in a day!


Materials you will need:
1 Rosy Monogram panel in Navy from Gingham Farmhouse by Poppie Cotton
2.5" x 10" strip of pink dot fabric (I used a scrap from my stash) - star
2.5" x 10" strip of white fabric (Peony Roses Basic from Gingham Farmhouse by P.C.) - star
2.5" x 18" strip of navy fabric (Wedding Ring Navy from Gingham Farmhouse by P.C.) - star block
1.5" x 40" strip of white fabric (Peony Roses Basic from Gingham Farmhouse by P.C.) - inner border
2.5" x 40" strip of navy fabric (Lattice Navy from Gingham Farmhouse by P.C.) - outer border
9" x 15" piece of navy fabric (Vintage Roses Navy from Gingham Farmhouse by P.C.) - back 
9" x 15" piece of batting
pillow stuffing

To make the star, cut:
4 navy squares, 2"
4 navy squares, 1 3/8"
4 pink dot squares, 2"
4 white squares, 2"


1. Draw a diagonal line from corner to corner on the wrong side of the 
4 navy 2" squares and 2 of the white 2" squares
2. Pair up a navy 2" square with a pink dot 2" square, right sides together.
3. Sew on both sides of the drawn line using a 1/4" seam allowance.
4. Cut on the drawn line to make 2 half-square triangles. 
5. Press the seam allowances open. 
6. Square up both half-square triangles to 1 3/8" x 1 3/8". 
7. Repeat steps 2 - 6 to make 2 more navy/pink half-square triangles.
8. Repeat steps 2-6 to make 4 navy/white half-square triangles.
9. Repeat steps 2-6 to make 4 pink/white half-square triangles.
10. Sew the half-square triangles and 4 navy 1 3/8" squares together into rows according to the photo above.  
Press the seam allowances open.
11. Sew the rows together and press the seam allowances open.  
The star block should measure 4" x 4".

(Sorry not a lot of pictures through that process! 
See my "How to Square Up Half -Square Triangles Tutorial"
for more tips and photos, if needed.)


To make the "HOME" block:

1. Carefully cut the "H", "M" and "E" letters from the panel.  Use the width of each letter - to the dashed cutting line.  Cut the height of each letter to 4" (which is slightly smaller than the given allowance).

2. Sew the 3 letters and the star block together.  Press the seam allowances away from the star block. 


Add the borders:

1. For the inner border, cut 2 white strips, 7/8" x 4".  Sew the strips to the sides of the "HOME" block.  Press the seam allowances toward the border.  Cut 2 white strips, 7/8" x 10 3/4".  Sew the strips to the top and bottom of the "HOME" block.  Press the seam allowances toward the border.

2. For the outer border, cut 2 navy strips, 2" x 4 5/8".  Sew the strips to the sides of the "HOME" block.  Press the seam allowances toward the border.  Cut 2 navy strips, 2" x 13 3/4".  Sew the strips to the top and bottom of the "HOME" block.  Press the seam allowances toward the outer border.   

3. Square up.  I trimmed my outer border to 1 5/8" wide all the way around.


Quilt as desired:

1. Layer the pillow top with batting (pillow top facing up).  Pin in place several times to secure.

2. Quilt as desired.  I just went around the inside of the star with a 1/8" seam allowance, as well as, in the ditch of the seam between the inner border and outer border.  Very simple but I think it was enough.

3. Trim excess batting.


Assemble the Pillow:

1. Cut the navy fabric for the back the same size as the quilted pillow top.  

2. Layer the quilted pillow top and back piece, right sides together.

3. Pin the layers together around the perimeter. 


4. Sew around the perimeter using a 1/4" seam allowance.  Leave a 2" opening at the bottom.


5. Clip the corners off to eliminate bulk.  Be careful not to clip the stitches.


6. Turn the pillow right side out.  Poke the corners out with a blunt object. 


7. Press the opening to ensure the 1/4" seam allowance.


8. Stuff the pillow to your desired liking


9. Hand sew the opening closed with a whip stitch and coordinating navy thread.


I hope you enjoyed this tutorial! 
Let me know if you decide to make the pillow.  
Gingham Farmhouse is in stores now so hurry and get yourself 
a fat quarter of the panel so you too, can make this sweet little pillow. 

Here are a few places I found that carry this panel...


To see my coordinating quilt using Gingham Farmhouse by Poppie Cotton click HERE.

Thanks for stopping by today!

Scrappy 9-Patch and Snowball Quilt

Thursday, November 7, 2019

I promised I would show you what I made with the leftovers from my Bow Tie Quilt...


Well, I actually made TWO quilts.  But today I am sharing just one of them (don't worry I'll share the second one soon).  The first quilt from the leftovers was a scrappy 9-Patch and Snowball quilt!  Two blocks, in my opinion, where you never can go wrong!


In fact, this combination of blocks creates a classic pattern you've probably seen before.


They make a fun secondary pattern together, too!  


This is a great pattern to help you use up scraps!


I used 4" (cut) squares for the 9-Patch squares and the bright Snowball corners.
The large, white Snowball squares were cut at 11". 


But really, with some simple math, you could adjust this pattern to work with any size squares!
I just so happened to have 4" squares left over from my Bow Tie quilt.


I mocked up this version in EQ7 to show you the entire layout.
I did a 5 x 7 block layout to keep the symmetry, but with that came a slightly long, skinny quilt.
Mine finished at 52" x 73".  Normally I think a good proportion is about a 12" - 15" difference.


If you aren't a fan of the long, skinny look, another option would be to make it square.  I personally am perfectly fine with square quilts, but I know some people aren't.  And since I was making this just for fun (and was planning on selling it), I decided to keep it rectangular.


I found a pink Riley Blake floral for the back and a turquoise gingham for the binding. 


I didn't show many pictures of this quilt on Instagram because unfortunately there was an issue with the long-arm quilting.  You probably can't tell from these photos since I tried to hide the parts that were really bad, although now I'm wishing I would've taken some pictures of those parts to show you!  But basically, I used a new-to-me long-arm quilting company and I think this was the first time they used this orange peel design and they had a hard time lining up the design.  There was a lot of overlapping and such.  I felt bad (and I know they felt really bad) but these things happen sometimes.  Fortunately, they made it right in the end, which I appreciated.  I ended up selling the quilt (with a huge discount) to a photographer wanting to use it as a photo prop.  And obviously, I told her ahead of time what the situation was.


Overall, I still think this quilt turned out cute.  After washing and drying it, the owner may not notice all the imperfections in the quilting.  I love the fabrics and the design, and orange peel quilting is always a favorite of mine!  Maybe I'll make another one someday.  I definitely have lots of squares that need to be put to good use. 

Have you ever had a long-arm quilting "mishap"?
I am thinking about putting together a blog post with some advice to long-arm quilters from their customers.  Over the 20 years that I've been quilting, I've had hundreds of quilts long-arm quilted and I've learned a lot.  I've dealt with a few mishaps along the way and have definitely seen a difference in how different long-armers handle them.  Some of them handle it wonderfully and some of them don't.  I wish they all had a policy in place for how they will handle mistakes, because they are bound to happen once in a while.  Please share your "mishap" stories or the advice you wish you could give your long-arm quilter below.

Thanks for stopping by!

Bow Tie Quilt

Sunday, November 3, 2019

 Hi friends!  It feels like it's been forever since I popped on the blog!  My last post was 10 weeks ago!  I've missed capturing my quilt journey and connecting with all of you here.

I wanted to share a quilt that I finished back in April but haven't shared here.  It's one of my favorite quilts I own right now and I plan to hold on to it for a long time.  It includes all of my favorite elements of a quilt - scrappy, happy colors, and a classic pattern.  It definitely has a vintage vibe too!


I actually received a majority of the blocks from a block swap I participated in with my local quilt group.  We used my friend, Andy Knowlton's free tutorial called Ties to Liberty Quilt on her blog, A Bright Corner.  We were to swap blocks in batches of 40.  I swapped 2 batches and then made another 40 blocks to keep (for a total of 120 blocks).


The blocks finish at 7" x 7".  I used a 10 x 12 layout so my quilt finished at 70" x 84" - a great bed size quilt!


Because this is a classic quilt pattern, I decided to stick with an equally classic edge-to-edge quilting design.  Baptist Fans!  I love them and can't get enough of them!  I've used them several times.  Denae Hansen of Plain Jane Quilting in American Fork, Utah quilted this for me and obviously, I'm obsessed.


Look at that texture!  What do you think?  Are you a fan of Baptist Fans?


For the backing, I used the Bright Side print in color Sunshine from Lella Boutique's beautiful line called Garden Variety.  I fell in love with that yellow print the moment I saw it.  It added enough color (and a whole lot of happiness!) yet didn't compete with the blocks. The binding fabric was just an aqua stripe I had in my stash (sorry I don't know the designer details on that!)


A Bow Tie quilt had been on my bucket list for a long time and I was so excited when my quilt guild decided to swap Bow Tie blocks.  Have you ever made a Bow Tie quilt?  Is there another pattern you've always wanted to make but haven't yet?  Do tell below!  

P.S. Someday I hope to make a Josephs Coat Quilt.  Eeek!  I'm very intimidated by that one!

Thanks for stopping by!  Come back soon to see what I made with my scraps from this quilt!